In this series of design pattern, we will inspect the Builder Design Pattern.We will continue our learning of design patterns and cover the Builder Pattern.
Builder Design Pattern
The Builder design pattern is part of the creational design patterns family and helps us build complex Java object in an easy and readable manner. We can define it as a pattern that separates the construction of an object from its representation. The implementation is relatively simple for this pattern.This pattern is quite similar to Factory/Abstract Factory patterns; however, the difference is that the Builder pattern provides more control over how we create the complex objects.
We can see it in working in real-life as well. Take an example of a computer, a car, or even a burger. We build them all using the Builder pattern; We start with the required properties (properties, which are a must for all cars, say wheel, brake, headlight), and add optional properties as per the customer needs (properties like a sunroof, leather covers, etc.).
Why do we require the builder design pattern?
The Builder design pattern allows us to create immutable objects with a large set of state attributes. Let’s go over some more reasons on why do we require this pattern:
1. We don’t want to create a chain of contractors.
2. We don’t want to create the constructor with too many parameters as it will be difficult to manage from client code and it creates confusion like ordering of arguments.
3. We don’t want to pass with optional arguments to constructors as NULL.
We don’t want to build such a complex object using a factory pattern.
1. How Builder Pattern Work?
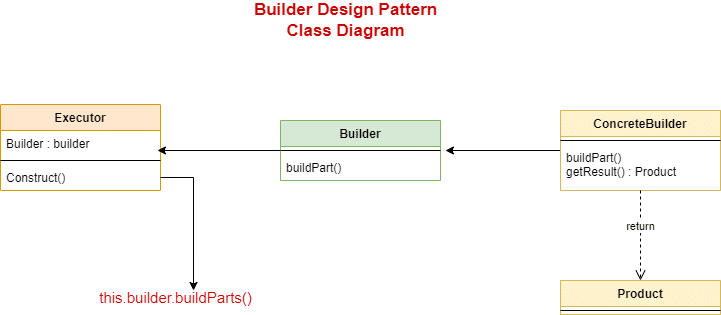
There are 3 major parts to the Builder design pattern implementation.
- Product: This is the actual object that we are trying to construct, e.g., a car, a computer, etc.
- Builder: This is the primary engine that builds complex objects.
- Executor: This is the client code that calls on the builder to build the complex objects as per client needs.
2. Builder Design Pattern In Java
Let us understand the builder design pattern using an example in Java. We will use our personal computer as a product and building it using mandatory properties like:
- HDD
- RAM
- Screen Size
And with some optional properties like
- Graphics Card Enabled (boolean).
- Bluetooth Enabled (boolean)
- Touch Screen Enabled (boolean)
- WebCam Enabled (boolean)
The builder class will be a static nested class inside the computer class. However, for simplicity, I am keeping it outside so that you can understand it better.
2.1. Product
This is the actual product we want to build. As mentioned above, we will have mandatory properties that will always be there, and optional properties that may or may not be part of all computers.
package main.com.kunwar.designpatterns.creational.builder;

/**
 * @author Kunwar
 * Product Class
 * Builder Pattern Class
 */
public class Computer {
    //required parameters
    private String HDD;
    private String RAM;
    private String screenSize;

    //optional parameters
    private boolean isGraphicsCardEnabled;
    private boolean isBluetoothEnabled;
    private boolean isWebCamEnabled;
    private boolean isTouchScreenEnabled;

    public String getHDD() {
        return HDD;
    }

    public String getRAM() {
        return RAM;
    }

    public String getScreenSize() {
        return screenSize;
    }

    public boolean isGraphicsCardEnabled() {
        return isGraphicsCardEnabled;
    }

    public boolean isBluetoothEnabled() {
        return isBluetoothEnabled;
    }

    public boolean isWebCamEnabled() {
        return isWebCamEnabled;
    }

    public boolean isTouchScreenEnabled() {
        return isTouchScreenEnabled;
    }

    private Computer(ComputerBuilder builder) {
        this.HDD = builder.HDD;
        this.RAM = builder.RAM;
        this.screenSize = builder.screenSize;
        this.isGraphicsCardEnabled = builder.isGraphicsCardEnabled;
        this.isBluetoothEnabled = builder.isBluetoothEnabled;
        this.isTouchScreenEnabled = builder.isTouchScreenEnabled;
        this.isWebCamEnabled = builder.isWebCamEnabled;
        this.isWebCamEnabled = builder.isWebCamEnabled;
    }

    @Override
    public String toString() {
        return "Computer{" +
            "HDD='" + HDD + '\'' +
            ", RAM='" + RAM + '\'' +
            ", screenSize='" + screenSize + '\'' +
            ", isGraphicsCardEnabled=" + isGraphicsCardEnabled +
            ", isBluetoothEnabled=" + isBluetoothEnabled +
            ", isWebCamEnabled=" + isWebCamEnabled +
            ", isTouchScreenEnabled=" + isTouchScreenEnabled +
            '}';
    }
}
2.2. Builder
Lombok provides few annotations to implement the builder pattern without writing this boilerplate code.
This is the static nested class; it will create the computer objects as per the client’s requirement. As you can see below, it will have a constructor taking only required parameters and using other setters’ methods for adding any optional parameters. With this, creating any complex is super-easy and clean.
//Builder Class
public static class ComputerBuilder {

    // required parameters
    private String HDD;
    private String RAM;
    private String screenSize;

    // optional parameters
    private boolean isGraphicsCardEnabled;
    private boolean isBluetoothEnabled;
    private boolean isWebCamEnabled;
    private boolean isTouchScreenEnabled;

    public ComputerBuilder(String hdd, String ram, String screenSize) {
        this.HDD = hdd;
        this.RAM = ram;
        this.screenSize = screenSize;
    }

    public ComputerBuilder setGraphicsCardEnabled(boolean isGraphicsCardEnabled) {
        this.isGraphicsCardEnabled = isGraphicsCardEnabled;
        return this;
    }

    public ComputerBuilder setBluetoothEnabled(boolean isBluetoothEnabled) {
        this.isBluetoothEnabled = isBluetoothEnabled;
        return this;
    }

    public ComputerBuilder setWebCamEnabled(boolean webCamEnabled) {
        isWebCamEnabled = webCamEnabled;
        return this;
    }

    public ComputerBuilder setTouchScreenEnabled(boolean touchScreenEnabled) {
        isTouchScreenEnabled = touchScreenEnabled;
        return this;
    }

    public Computer build() {
        return new Computer(this);
    }
}
2.3. Client Class
Finally, in the demo class, where we will create three different computer models using the builder pattern.
package main.com.kunwar.designpatterns.creational.builder;

/**
 * @author Kunwar
 * Builder Pattern Client Class
 * Create Computer object with mandatory and optional properties
 */
public class BuilderPatternDemo {
    public static void main(String[] args) {

        Computer model1 = new Computer.ComputerBuilder(
                "1 TB", "16 GB", "15.6").setBluetoothEnabled(true)
            .setGraphicsCardEnabled(true).setTouchScreenEnabled(true).setWebCamEnabled(true).build();
        System.out.println("model1: " + model1.toString());

        Computer model2 = new Computer.ComputerBuilder(
                "256 GB", "8 GB", "14.6").setBluetoothEnabled(true)
            .setGraphicsCardEnabled(true).build();
        System.out.println("model2: " + model2.toString());


        Computer model3 = new Computer.ComputerBuilder(
            "128 GB", "4 GB", "13.6").build();
        System.out.println("model3: " + model3.toString());
    }
}
2.4. Output
model1: Computer {
    HDD = '1 TB', RAM = '16 GB', screenSize = '15.6', isGraphicsCardEnabled = true, isBluetoothEnabled = true, isWebCamEnabled = true, isTouchScreenEnabled = true
}

model2: Computer {
    HDD = '256 GB', RAM = '8 GB', screenSize = '14.6', isGraphicsCardEnabled = true, isBluetoothEnabled = true, isWebCamEnabled = false, isTouchScreenEnabled = false
}

model3: Computer {
    HDD = '128 GB', RAM = '4 GB', screenSize = '13.6', isGraphicsCardEnabled = false, isBluetoothEnabled = false, isWebCamEnabled = false, isTouchScreenEnabled = false
}
Most of the IDE (e.g. IntelliJ IDEA, Eclipse etc.) provide plugin to generate builder class for your application. You can always use those, provided we clearly understand the builder design pattern.
Here is the class diagram to provide you a better understanding of the builder pattern.
3. Pros and Cons
Let’s talk about some of the major advantages and disadvantages of using the builder design pattern.
3.1. Advantages
- This pattern encapsulates the code for object construction from the client.
- This pattern provides great control over the construction process of the object.
- This pattern allows for creating complex objects in an easy and neat way.
- This pattern gets rid of a chain of constructors to build complex objects. Also, we need a constructor only for mandatory arguments making it less complex.
- This pattern provides great flexibility and readability, though it increases the number of lines (fortunately that also can be reduced using the Lombok library).
- This pattern allows us to build immutable objects with little complex logic.
3.2. Disadvantages
- Increased number of lines.
- Not all the data members are guaranteed to be initialized.
- Challenging to support dependency injection.
in summary, abstract factory pattern is the answer to
"WHAT"and the builder pattern to"HOW".
4. When to use Builder Pattern
There are many use cases where using the builder design pattern will give you benefits.
- We should use this pattern when we need to build a complex object having some required and some optional properties.
- We should use this pattern when the construction of objects depends on run-time values.
- We should use this pattern when the client isn’t concerned about the actual implementation of the object.
Summary
In this article, we talked about the builder design pattern. We covered its key features along with details about when to use this pattern in your application. As always, the source code for our articles is available on our GitHub repository.
Here are some of the existing example from JDK using this pattern:
- java.lang.Appendable
- java.lang.StringBuilder#append() [Unsynchronized class]
- java.lang.StringBuffer#append() [Synchronized class]