In this Spring Boot article, we will look at how to configure multiple cache managers in Spring Boot application.
Multiple Cache Managers in Spring Boot
In standard Spring Boot application, we may need only one caching provider, however there are many use cases where you want to configure multiple cache providers and like to use those based on your requirements. This article, we will look at Spring Boot caching API and ability to configure multiple cache managers in Spring Boot. There are several ways to do this and the right approach dependents on how you are planning to use cache. This article works as a guide and choose the approach best suitable for your requirement. In this article, we will use the following 2 cache API for the configuration.
This article assumes that you have working knowledge of Spring Boot and Spring caching API.
1. Application Setup
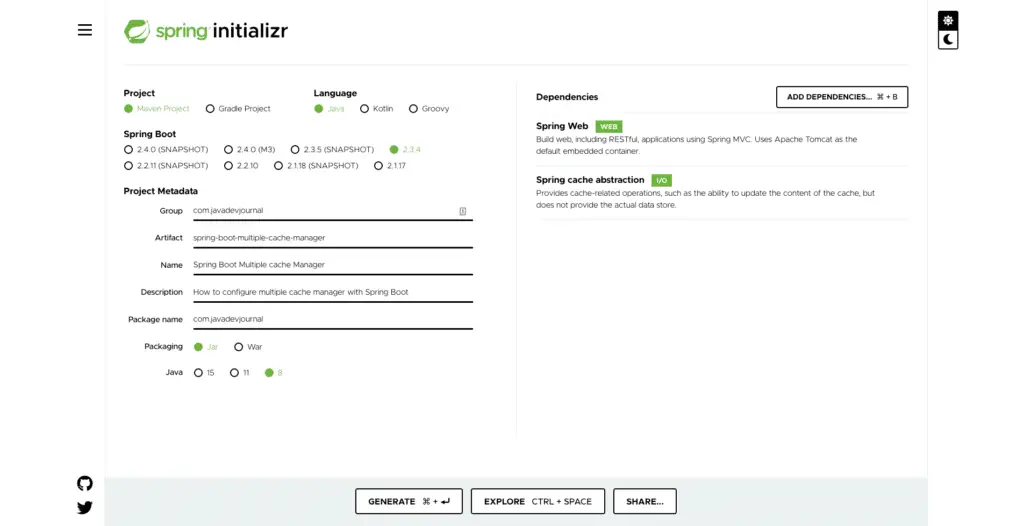
Let’s start by setting up the application. We are going to use Spring auto configuration to perform heavy lifting for us. You can generate the application structure by using Spring Initializr or can use IDE to generate the application structure.
Here is how our pom.xml looks like
<?xml version="1.0" encoding="UTF-8"?>
<project xmlns="http://maven.apache.org/POM/4.0.0" xmlns:xsi="http://www.w3.org/2001/XMLSchema-instance" xsi:schemaLocation="http://maven.apache.org/POM/4.0.0 https://maven.apache.org/xsd/maven-4.0.0.xsd">
   <modelVersion>4.0.0</modelVersion>
   <parent>
      <groupId>org.springframework.boot</groupId>
      <artifactId>spring-boot-starter-parent</artifactId>
      <version>2.3.4.RELEASE</version>
      <relativePath />
      <!-- lookup parent from repository -->
   </parent>
   <groupId>com.javadevjournal</groupId>
   <artifactId>multiple-cache-manager</artifactId>
   <version>0.0.1-SNAPSHOT</version>
   <name>multiple-cache-manager</name>
   <description>Multiple Cache manager with spring boot</description>
   <properties>
      <java.version>11</java.version>
      <ehcache-version>3.9.0</ehcache-version>
      <caffeine-version>2.8.6</caffeine-version>
   </properties>
   <dependencies>
      <dependency>
         <groupId>org.springframework.boot</groupId>
         <artifactId>spring-boot-starter-cache</artifactId>
      </dependency>
      <dependency>
         <groupId>org.springframework.boot</groupId>
         <artifactId>spring-boot-starter-web</artifactId>
      </dependency>
      <dependency>
         <groupId>com.github.ben-manes.caffeine</groupId>
         <artifactId>caffeine</artifactId>
         <version>${caffeine-version}</version>
      </dependency>
      <dependency>
         <groupId>org.ehcache</groupId>
         <artifactId>ehcache</artifactId>
         <version>${ehcache-version}</version>
      </dependency>
      <dependency>
         <groupId>org.springframework.boot</groupId>
         <artifactId>spring-boot-starter-test</artifactId>
         <scope>test</scope>
         <exclusions>
            <exclusion>
               <groupId>org.junit.vintage</groupId>
               <artifactId>junit-vintage-engine</artifactId>
            </exclusion>
         </exclusions>
      </dependency>
   </dependencies>
   <build>
      <plugins>
         <plugin>
            <groupId>org.springframework.boot</groupId>
            <artifactId>spring-boot-maven-plugin</artifactId>
         </plugin>
      </plugins>
   </build>
</project>
We are using the Caffeine cache and default ConcurrentHashMap caching for this example.
2. Spring Caching
Spring provides a powerful and flexible caching abstraction. The caching abstraction makes it easy to implement caching in Spring application. We can enable the caching API using @EnableCachingAnnotation. Spring will fall back to the ConcurrentHashMap as the underlying cache if we’ve not specified any other explicitly.
@Configuration
@EnableCaching
public class MultiCacheManagerConfig{
    //to enable caching for our application
}
As said earlier, there are many ways to enable and configure multiple cache managers in Spring Boot. Let’s see these options.
3. Multiple Cache Managers via CacheConfigurerSupport
In case you application use one cache provider for most of the use cases and only want to use the other caching manager for specific use, configuring multiple cache managers using CacheConfigurerSupport will provide your more flexibility.
- We can define a default cache manager using this approach.
- You can continue using the caching annotation with no change.
- For specific use case, we can pass the
cacheManagerwith@CacheConfigor@Cacheableannotations.
Let’s see how to configure it.
package com.javadevjournal.config;

import com.github.benmanes.caffeine.cache.Caffeine;
import org.springframework.cache.CacheManager;
import org.springframework.cache.annotation.CachingConfigurerSupport;
import org.springframework.cache.annotation.EnableCaching;
import org.springframework.cache.caffeine.CaffeineCacheManager;
import org.springframework.cache.concurrent.ConcurrentMapCacheManager;
import org.springframework.context.annotation.Bean;
import org.springframework.context.annotation.Configuration;
import java.util.Arrays;
import java.util.concurrent.TimeUnit;

@Configuration
@EnableCaching
public class MultiCacheManagerConfig extends CachingConfigurerSupport {

    public String[] cacheNames = {
        "products"
    };

    /**
     * We are using CachingConfigurerSupport to define out main caching
     * provider. In our case it's Caffeine cache. This will be the default cache provider
     * for our application. If we don't provide explicit cache manager, Spring Boot
     * will pick this as default cache provider.
     * @return
     */
    @Override
    @Bean // good to have but not strictly necessary
    public CacheManager cacheManager() {
        CaffeineCacheManager cacheManager = new CaffeineCacheManager();
        cacheManager.setCacheNames(Arrays.asList(
            "customers",
            "products"
        ));
        cacheManager.setCaffeine(caffeineCacheBuilder());
        return cacheManager;
    }

    Caffeine < Object, Object > caffeineCacheBuilder() {
        return Caffeine.newBuilder()
            .initialCapacity(100)
            .maximumSize(500)
            .expireAfterAccess(10, TimeUnit.MINUTES)
            .weakKeys()
            .recordStats();
    }

    /**
     * Second cache provider which can work as fallback or will be used when invoked explicitly in the
     * code base.
     */
    @Bean
    CacheManager alternateCacheManager() {
        return new ConcurrentMapCacheManager(cacheNames);
    }
}
With Caffeine cache, we are configuring 2 caches (customers and products) while with default cache; we are setting up our product cache.Here is how you can use these cache managers in your application
//Class levels
@CacheConfig(cacheManager = "alternateCacheManager")
public class DefaultProductService {

}

//method levels
@Cacheable(cacheNames = "products", cacheManager = "alternateCacheManager")
@Override
public Product getProductByCode(String code) {

}

@Cacheable(cacheNames = "products")
@Override
public Product getProductByBrand(String brand) {

}
4. Multiple Cache Managers Using @Primary
If we don’t want to use CacheConfigurerSupport, we can use the @Primary annotation mark one bean as primary. Spring will pick the primary bean automatically if we don’t specify the cacheManager with @CacheConfig or @Cacheable annotations.
@Configuration
@EnableCaching
public class MultiCacheManagerConfig {

    public String[] cacheNames = {
        "products"
    };


    @Bean
    @Primary
    public CacheManager cacheManager() {
        CaffeineCacheManager cacheManager = new CaffeineCacheManager();
        cacheManager.setCacheNames(Arrays.asList(
            "customers",
            "products"
        ));
        cacheManager.setCaffeine(caffeineCacheBuilder());
        return cacheManager;
    }

    Caffeine < Object, Object > caffeineCacheBuilder() {
        return Caffeine.newBuilder()
            .initialCapacity(100)
            .maximumSize(500)
            .expireAfterAccess(10, TimeUnit.MINUTES)
            .weakKeys()
            .recordStats();
    }

    @Bean
    CacheManager alternateCacheManager() {
        return new ConcurrentMapCacheManager(cacheNames);
    }
}
5. Using CacheResolver
The CacheResolver provides more fine grained control. You should thin of using the CacheResolver:
- If you need to pick the cache manager on case by case.
- You need to pick the cache manager at runtime based on type of request.
The CacheResolver is more aligned with JSR-107. As a first step, we need to create our custom CacheResolver by extending the CacheResolver.
package com.javadevjournal.caching;

import com.javadevjournal.service.impl.DefaultCustomerService;
import com.javadevjournal.service.impl.DefaultProductService;
import org.springframework.cache.Cache;
import org.springframework.cache.CacheManager;
import org.springframework.cache.interceptor.CacheOperationInvocationContext;
import org.springframework.cache.interceptor.CacheResolver;
import java.util.ArrayList;
import java.util.Collection;
import java.util.Collections;

public class CustomCacheResolver implements CacheResolver {

    private final CacheManager cacheManager;
    private final CacheManager alternateCacheManager;

    public CustomCacheResolver(final CacheManager cacheManager, CacheManager alternateCacheManager) {
        this.cacheManager = cacheManager;
        this.alternateCacheManager = cacheManager;
    }

    @Override
    public Collection << ? extends Cache > resolveCaches(CacheOperationInvocationContext << ? > context) {
        Collection < String > cacheNames = getCacheNames(context);
        if (cacheNames == null) {
            return Collections.emptyList();
        }
        Collection < Cache > result = new ArrayList < > (cacheNames.size());
        if (context.getTarget() instanceof DefaultProductService) {
            for (String cacheName: cacheNames) {
                Cache cache = cacheManager.getCache(cacheName);
                if (cache == null) {
                    throw new IllegalArgumentException("Cannot find cache named '" +
                        cacheName + "' for " + context.getOperation());
                }
                result.add(cache);
            }
        }
        if (context.getTarget() instanceof DefaultCustomerService) {
            for (String cacheName: cacheNames) {
                Cache cache = alternateCacheManager.getCache(cacheName);
                if (cache == null) {
                    throw new IllegalArgumentException("Cannot find cache named '" +
                        cacheName + "' for " + context.getOperation());
                }
                result.add(cache);
            }
        }
        return result;
    }

    protected Collection < String > getCacheNames(CacheOperationInvocationContext << ? > context) {
        return context.getOperation().getCacheNames();
    }
}
The next step is to define our custom CacheResolver as a bean. We are using our Config class extending the CachingConfigurerSupport.
@Configuration
@EnableCaching
public class MultiCacheManagerConfig extends CachingConfigurerSupport {
    ....

    @Bean
    @Override
    public CacheResolver cacheResolver() {
        return new CustomCacheResolver(cacheManager(), alternateCacheManager());
    }
}
To use the custom CacheResolver, we can pass it with @Cacheable or other caching annotations.
@Cacheable(cacheNames = "products", cacheResolver = "cacheResolver")
@Override
public Product getProductByBrand(String brand) {

}
6. Testing Application
To check if the multiple cache managers are working as expected and returning the cache instance, let’s create a simple controller and service class to see the workflow in action.
6.1. Product Controller
Our product controller will have 1 method and it will use DefaultProductService to get the product data. The DefaultProductService service will use the alternate cache manager to handle the caching.
@RestController
@RequestMapping("/products")
public class ProductController {

    @Autowired
    ProductService productService;

    @Autowired
    CacheManager alternateCacheManager;

    @GetMapping("/product/{code}")
    public Product getProductByCode(@PathVariable(value = "code") String code) {
        Product product = productService.getProductByCode(code);
        alternateCacheManager.getCacheNames(); // this is only for demo purpose, don't use this in real life application
        return product;
    }
}
6.2. DefaultProductService
@Service("productService")
public class DefaultProductService implements ProductService {

    private static final Logger LOG = LoggerFactory.getLogger(DefaultProductService.class);

    @Cacheable(cacheNames = "products", cacheManager = "alternateCacheManager")
    @Override
    public Product getProductByCode(String code) {
        LOG.info("Get product by code {} ", code);
        Product product = new Product();
        product.setCode(code);
        product.setBrand("Sony");
        product.setDescription("Sony new camera");
        product.setName("Sony Alpha A7S");
        return product;
    }
}
6.3. Customer Controller
The Customer controller will call the DefaultCustomerService which will reply on the defaulr CacheManager for handling the caching.
@RestController
@RequestMapping("/customers")
public class CustomerController {

    @Autowired
    CustomerService customerService;

    @Autowired
    CacheManager cacheManager;

    @GetMapping("/customer/{id}")
    public Customer getCustomerByID(@PathVariable(value = "id") Long id) {
        Customer customer = customerService.getCustomer(id);
        cacheManager.getCacheNames();
        return customer;
    }
}
6.4. DefaultProductService
@Service
public class DefaultCustomerService implements CustomerService {

    private static final Logger LOG = LoggerFactory.getLogger(DefaultCustomerService.class);

    @Cacheable(cacheNames = "customers")
    @Override
    public Customer getCustomer(Long id) {
        LOG.info("Fetching customer information for Id {} ", id);
        Customer customer = new Customer();
        customer.setEmail("[email protected]");
        customer.setFirstName("Javadev");
        customer.setLastName("Journal");
        customer.setId(id);
        return customer;
    }
}
6.5. Running and Checking the Cache
Run the application and hit the following URL’s:
http://localhost:8080/products/product/1http://localhost:8080/products/product/2http://localhost:8080/products/product/1http://localhost:8080/customers/customer/1http://localhost:8080/customers/customer/2http://localhost:8080/customers/customer/1
For the #1,#2,#4 and $5, you will see the log statement, while for the others, there will be no log statements as the data will be served from the cache. This his how your log may look like:
2020-10-21 16:57:48.611  INFO 99215 --- [nio-8080-exec-1] c.j.service.impl.DefaultProductService   : Get product by code 1
2020-10-21 16:57:53.314  INFO 99215 --- [nio-8080-exec-2] c.j.service.impl.DefaultProductService   : Get product by code 2
2020-10-21 16:58:46.810  INFO 99215 --- [nio-8080-exec-6] c.j.service.impl.DefaultCustomerService  : Fetching customer information for Id 1
2020-10-21 16:58:56.264  INFO 99215 --- [nio-8080-exec-7] c.j.service.impl.DefaultCustomerService  : Fetching customer information for Id 2
Here are some screen shot for better understanding
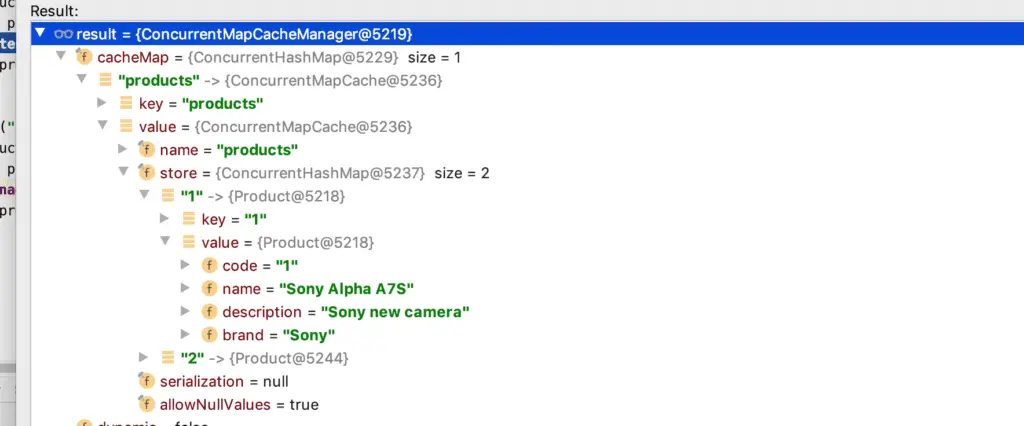
We configure our Caffeine cache to handle both products and customers cache, but we only used the customers cache in this example.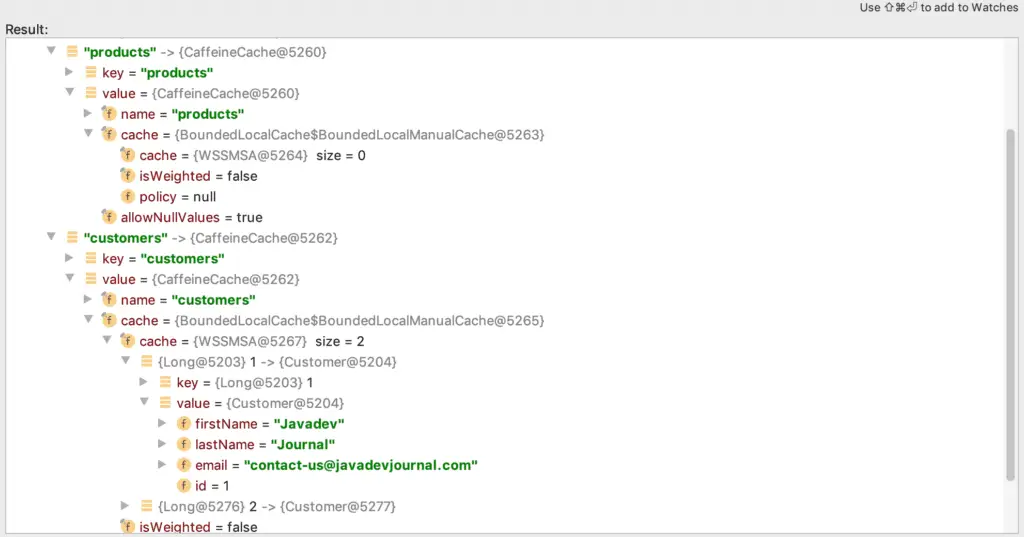
Summary
In this article, we saw how to configure multiple cache managers in Spring Boot using Spring caching. We saw the following options to handle multiple cache managers in Spring.
- Configuration via
CacheConfigurerSupport. - Using
@Primaryannotation. - Create custom
CacheResolver.
As always, the source code for this article is available on GitHub.