In this article, we will look at the Spring Boot JPA. We will see how to use Spring Boot to configure and setup support for JPA using Spring Data JPA.
Spring Boot JPA
Spring Boot auto-configuration provides a lot of flexibility and configuration, which makes it easy-to-use Spring Boot JPA out of the box. Before the Spring Boot, if you need to enable the JPA support for your application, you have to do at-least perform the following steps.
- Add dependencies for the JPA.
- Configure database.
- Setup the data-source.
- Handle transaction managements and many more.
In this article, we will see how to set up Spring with JPA using Hibernate as underlying persistence provider and MySQL as database. Spring Boot makes it easy to configure it using the starters and auto-configuration.
1. Spring JPA Dependencies
The first step is to add the Spring Data JPA dependency in our application. With Spring Boot, we need to add the spring-boot-starter-data-jpa starter in pom.xml. This is how our pom.xml will look like.
<?xml version="1.0" encoding="UTF-8"?>
<project xmlns="http://maven.apache.org/POM/4.0.0" xmlns:xsi="http://www.w3.org/2001/XMLSchema-instance"
	xsi:schemaLocation="http://maven.apache.org/POM/4.0.0 https://maven.apache.org/xsd/maven-4.0.0.xsd">
	<modelVersion>4.0.0</modelVersion>
	<parent>
		<groupId>org.springframework.boot</groupId>
		<artifactId>spring-boot-starter-parent</artifactId>
		<version>2.5.1</version>
		<relativePath/> <!-- lookup parent from repository -->
	</parent>
	....
	<properties>
		<java.version>11</java.version>
	</properties>
	<dependencies>
		<dependency>
			<groupId>org.springframework.boot</groupId>
			<artifactId>spring-boot-starter-data-jpa</artifactId>
		</dependency>
    </dependencies>
</project>
Read Spring Boot Starter Parent to understand how Spring Boot manage all the dependencies. Also note, we have defined no version for the Spring JPA starter.
1.1. Database Dependency
For our Spring Boot JPA to work with database correctly, we need to add dependency to a database specific JDBC driver. We are using MySQL for this post. This is how the DB drover dependency will look like.
<dependency>
	<groupId>mysql</groupId>
	<artifactId>mysql-connector-java</artifactId>
	<scope>runtime</scope>
</dependency>
2. Configuration
With the above configuration, Spring Boot will configure Hibernate as the default JPA provider. We don’t have to create/ define an entityManagerFactory, it will create and configure this automatically for us. Let’s look at some of the feature of Spring Boot JPA.
- The
dataSourcebean will be configured automatically for us based on the properties defined in the application.properties (we will discuss it in next section). - A dependency on the
HikariCPconnection pool will be added automatically with a default configuration. We can customize these configurations based on our need. - If no database driver is defined, an in-memory database will be created automatically for us.
- Transaction management configurations for us.
- Configuration to use Spring Data JPA’s repositories.
If you want to use a different database (e.g. PostgreSQL), all you need is to replace the MySQL driver configuration with PostgreSQL driver configuration. You don’t have to change any other configurations. They will be taken care automatically by Spring JPA.
2.1. Data Source Configuration
The easiest and flexible way to configure data source for our Spring Boot JPA application is through the application.properties file. Set the data source configuration with spring.datasource prefix
spring.datasource.url=jdbc:mysql://localhost:3306/testDB?useJDBCCompliantTimezoneShift=true&useLegacyDatetimeCode=false&serverTimezone=UTC&createDatabaseIfNotExist=true
spring.datasource.username=username
spring.datasource.password=12345678
#only for the local/ dev server to show the SQL queries on console.
spring.jpa.show-sql=true
2.2. Customize Default Configuration
Though Spring Boot provides a lot of configurations and setup with minimal code, it does not force us to use it. Spring Boot with JPA provides us the flexibility to customize and override these configurations. We can easily customize the default behavior or add custom configuration if required. Let’s take a simple use cases where we don’t want to use HikariCP as the default connection pool but like to use a different connection pool. To use a different pool, we will exclude the HikariCP from Maven and add the preferred connection pool as required dependency.
<dependencies>
   <dependency>
      <groupId>org.springframework.boot</groupId>
      <artifactId>spring-boot-starter-data-jpa</artifactId>
      <exclusions>
         <exclusion>
            <groupId>com.zaxxer</groupId>
            <artifactId>HikariCP</artifactId>
         </exclusion>
      </exclusions>
   </dependency>
   <dependency>
      <groupId>org.apache.commons</groupId>
      <artifactId>commons-dbcp2</artifactId>
      <version>${commons-dbcp2-version}</version>
   </dependency>
</dependencies>
Spring Boot will scan the class-path to configure the data source for us. We can also use the spring.datasource.type=org.apache.tomcat.jdbc.pool.DataSource to pass the data-source information explicitly to Spring Boot. Make sure you set the correct data source properties by using the prefix as spring.datasource.dbcp2 or spring.datasource.tomcat etc.
2.3. Customizing the Data Source
If you like more programmatic approach to configure your data source, you can configure the data source like:
@Configuration
public class CustomDataSourceConfig {

    @Bean
    public DataSource getDataSource() {
        DataSourceBuilder dataSourceBuilder = DataSourceBuilder.create();
        dataSourceBuilder.driverClassName("org.h2.Driver");
        dataSourceBuilder.url("jdbc:h2:mem:test");
        dataSourceBuilder.username("test");
        dataSourceBuilder.password("test");
        return dataSourceBuilder.build();
    }
}
3. Spring Data JPA Repositories
One of the major benefits of Spring Data JPA is its ability to configure repositories for our application. It makes really easy to work with the persistent layer and the Spring JPA repository will provide a set of standard methods to persist, read and delete entities. In case you don’t need this feature, you can use the Spring Boot application.properties file to disable it.
spring.data.jpa.repositories.enabled=falseFor more details on properties, please refer to the official documentation
3.1. Application Logging
During the development, it’s really important to get as much as information we need. We can configure the hibernate logging level as Info. Here are some recommendation for the same.
logging.level.org.hibernate=INFO
logging.level.org.hibernate.SQL=DEBUG
Make sure we set the log level to ERROR on production.
4. JPA Architecture
While working on the Spring JPA, it’s very important that we understand the JPA architecture as well as some of its important components. Here is a high level view of the Java Persistence API Architecture.
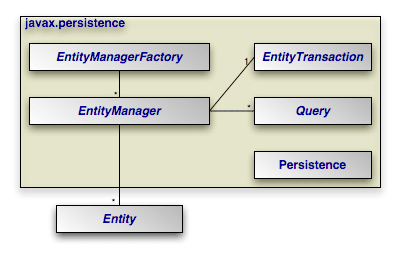
Let’s understand some of the important items of the JPA architecture.
Persistence: Persistence class contains static helper methods to getEntityManagerFactoryinstances in a vendor-neutral fashionEntityManagerFactory: To create anEntityManagerfor database interactions.EntityManager: The primary JPA interface used by applications. EachEntityManagermanages a set of persistent objects and has APIs to insert new objects and delete existing ones.Entity: A simple Java class that represents a row in a database table in its simplest form.Query: Interface implemented by each JPA vendor to find persistent objects that meet certain criteria.
Summary
In this article, we talked about the Spring Data JPA and its support with Spring Boot. We also saw how the Spring Boot auto-configuration makes it easy to work with JPA and other related technologies. In the last part of this article, we talked about how to customized / override the default configuration available through Spring Boot JPA. We briefly talked about the JPA architecture at the end of this article.