In this article of Rest of Spring Boot, we will configure and enable Oauth2 with Spring Boot. We will secure our REST API with Oauth2 by building an authorization server to authenticate our client and provide an access_token for future communication.
1. Introduction
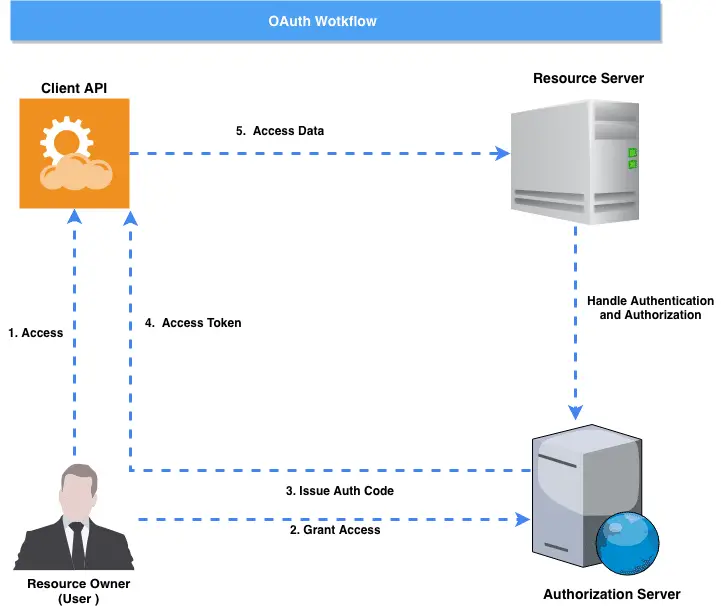
Before we dive in the details, let’s take a quick refresher to the Oauth2. Oauth2 is an authorization framework that enables applications to get limited access to user accounts on an HTTP service. It works by delegating user authentication to the service that hosts the user account and authorizing third-party applications to access the user account. Oauth2 provides authorization flows for web and desktop applications, and mobile devices.
Oauth defines the four main roles:
- Resource Owner
- Client
- Resource Server
- Authorization Server
Resource Owner: User – The resource owner is the user who authorizes an application to access their account
Resource / Authorization Server – The resource server hosts the protected user accounts, and the authorization server verifies the identity of the user then issues access tokens to the application.
Client: Application – The client is the application that wants to access the user’s account. Before it may do so, the user must allow it, and the API must validate the authorization.
Let’s see how this Oauth2 workflow looks like:
[pullquote align=”normal”]When working on the OAuth 2, please make sure you have a clarity between Access Token vs Refresh Token [/pullquote]
2. Oauth2 Authorization Server With Spring Boot
Let’s setup an authorization server to enable Oauth2 with Spring Boot. We have the option to create the application using IDE (like IntelliJ IDEA) or we can create an application using Spring Boot CLI.
$ spring init --dependencies=web,actuator my-projectIf you prefer a more visual interface to generate an initial structure, we can use the Spring Initializer:
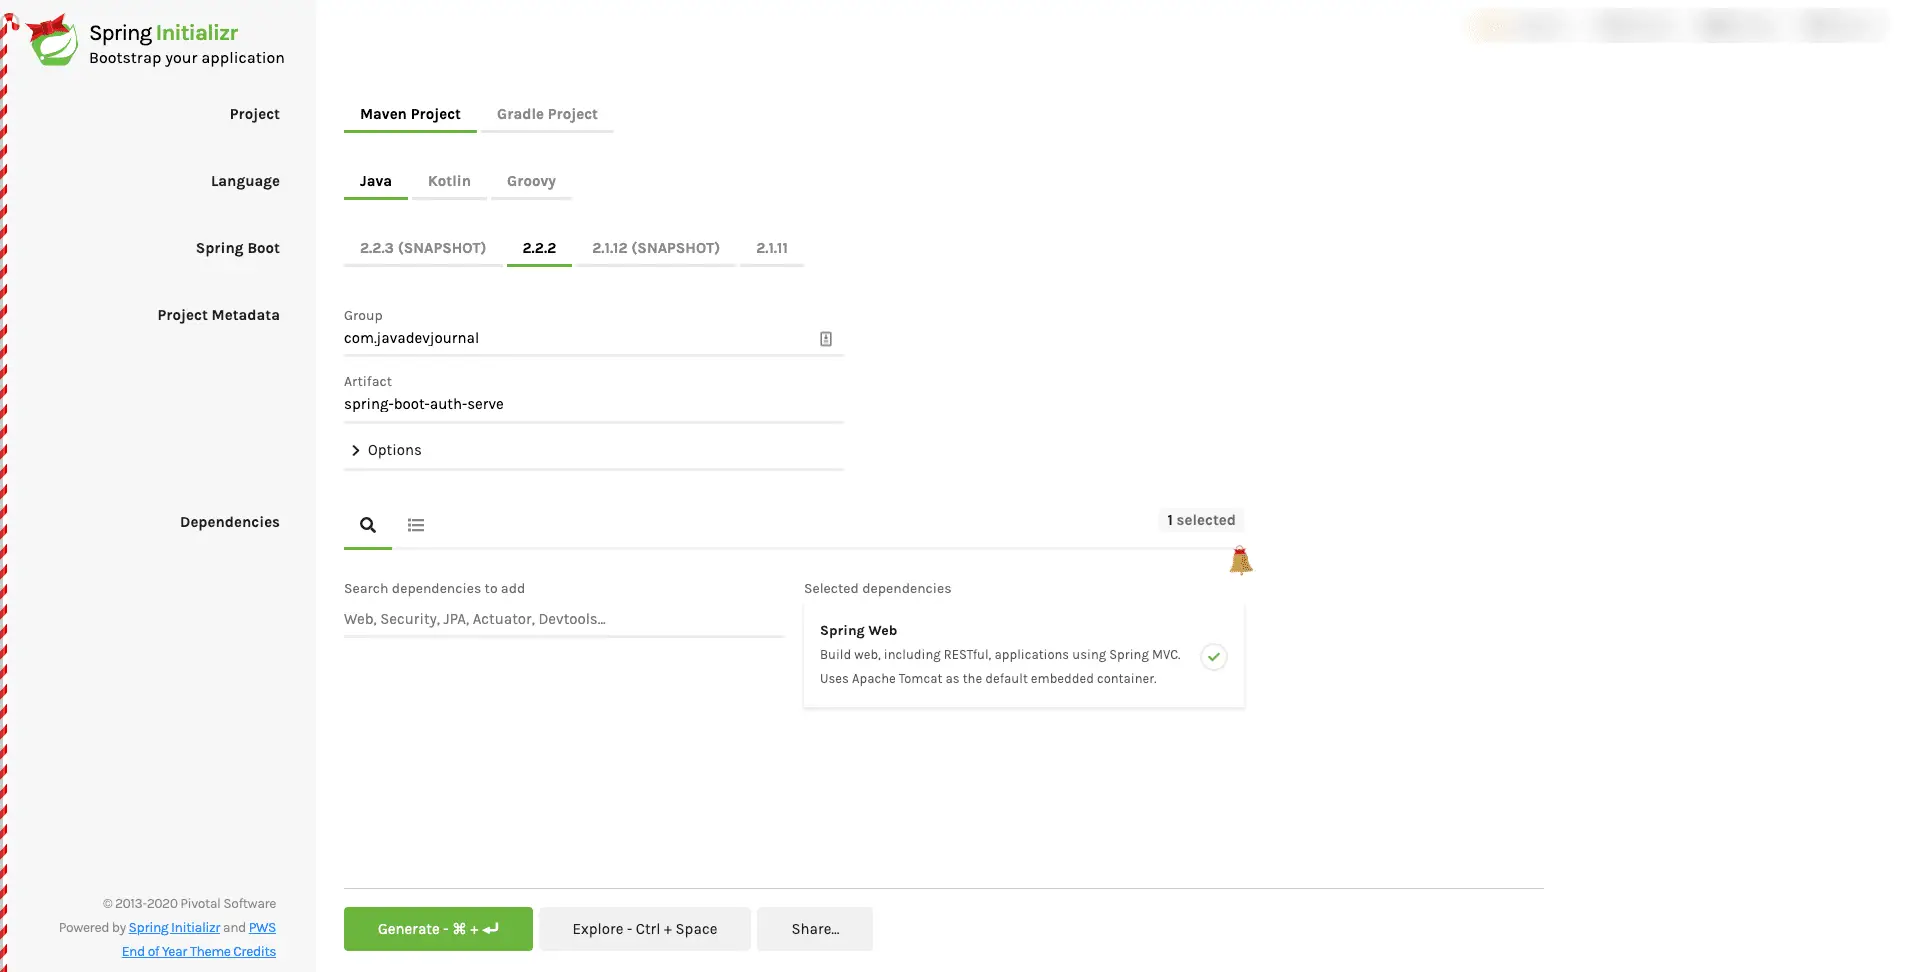
Click on the “Generate” button to download the project on your local machine.We selected the following dependencies for our application:
- Web starter
To enable the Oauth support, add the following dependency in the pom.xml file:
<dependency>
	<groupId>org.springframework.security.oauth</groupId>
	<artifactId>spring-security-oauth2</artifactId>
	<version>2.4.0.RELEASE</version>
</dependency>
This dependency will add all the prerequisite to use Oauth2 features for our application. The next step is to add some configurations for our application. Add the following entry to the src/main/resources/application.properties file:
user.oauth.clientId=javadevjournal
user.oauth.clientSecret=1234$#@!
user.oauth.redirectUris=http://localhost:8081/login
user.oauth.user.username=javadevjournal
user.oauth.user.password=javadevjournal
user.oauth.accessTokenValidity=300
user.oauth.refreshTokenValidity=240000
[pullquote align=”normal”]Change these values as per your requirement. [/pullquote]
Above configurations set the values that authorization server will use during the setup (You can always use the DB to store these values.). To activate the authorization server, add the add @EnableResourceServer annotation.
@SpringBootApplication
@EnableResourceServer
public class SpringBootAuthServerApplication {

    public static void main(String[] args) {
        SpringApplication.run(SpringBootAuthServerApplication.class, args);
    }
}
2.1 Security Configuration
Our next step configure our resource server. Let’s create OAuth2AuthServerConfiguration and extends AuthorizationServerConfigurerAdapter.This Spring configuration class enables and configures an OAuth authorization server.
package com.javadevjournal.oauth2;

import org.springframework.beans.factory.annotation.Autowired;
import org.springframework.beans.factory.annotation.Value;
import org.springframework.context.annotation.Configuration;
import org.springframework.security.crypto.bcrypt.BCryptPasswordEncoder;
import org.springframework.security.oauth2.config.annotation.configurers.ClientDetailsServiceConfigurer;
import org.springframework.security.oauth2.config.annotation.web.configuration.AuthorizationServerConfigurerAdapter;
import org.springframework.security.oauth2.config.annotation.web.configuration.EnableAuthorizationServer;
import org.springframework.security.oauth2.config.annotation.web.configurers.AuthorizationServerSecurityConfigurer;

@Configuration
@EnableAuthorizationServer
public class OAuth2AuthServerConfiguration extends AuthorizationServerConfigurerAdapter {

    @Value("${user.oauth.clientId}")
    private String clientID;

    @Value("${user.oauth.clientSecret}")
    private String clientSecret;

    @Value("${user.oauth.redirectUris}")
    private String redirectURLs;

    @Value("${user.oauth.accessTokenValidity}")
    private int accessTokenValidity;

    @Value("${user.oauth.refreshTokenValidity}")
    private int refreshTokenValidity;

    @Autowired
    private BCryptPasswordEncoder passwordEncoder;

    @Override
    public void configure(AuthorizationServerSecurityConfigurer oauthServer) throws Exception {
        oauthServer.tokenKeyAccess("permitAll()")
            .checkTokenAccess("isAuthenticated()");
    }

    public void configure(ClientDetailsServiceConfigurer clients) throws Exception {
        clients
            .inMemory()
            .withClient(clientID)
            .secret(passwordEncoder.encode(clientSecret))
            .authorizedGrantTypes("password", "authorization_code", "refresh_token")
            .scopes("user_info")
            .authorities("READ_ONLY_CLIENT")
            .redirectUris(redirectURLs)
            .accessTokenValiditySeconds(accessTokenValidity)
            .refreshTokenValiditySeconds(refreshTokenValidity);
    }
}
This class will return the token when a client application got authenticated. Let’s inspect some important points:
- Spring security Oauth expose 2 endpoints. It protects these endpoints behind the
denyAll()method. ThetokenKeyAccessandtokenKeyAccessenable these endpoints. - The
ClientDetailsServiceConfigureris used to define an in-memory or JDBC implementation of the client details service. We are using the in-memory approach for this post but I recommend using JDBC backed an approach for your production environment. The configuration is using the following attributes:
Client – The client Id registered with the auth server. We are defining it using the application.properties file.
Secret – Client secret (check application.properties file)
Scope – Scope of the client application. This shows what access we give for the client application. If scope is undefined or empty (the default) the client is not limited by scope.
authorizedGrantTypes – Grant types for the client to use. Default value is empty.
authorities – Authorities granted to the client (regular Spring Security authorities).
redirectUris – redirects the user-agent to the client’s redirection endpoint. It must be an absolute URL.
Token Validity – Last 2 configuration set the access and refresh token validity.
Let’s add some additional configurations for our resource server. Create a class OAuth2ResourceServerConfig and extend the ResourceServerConfigurerAdapter class.
@Configuration
public class OAuth2ResourceServerConfig extends ResourceServerConfigurerAdapter {

    @Override
    public void configure(HttpSecurity http) throws Exception {
        http
            .authorizeRequests()
            .antMatchers("/api/**").authenticated()
            .antMatchers("/").permitAll();
    }
}
Above config enable protection on all endpoints starting /api. All other endpoints are not secure and accessible without OAuth security.
2.2. User Authenication.
Spring security Oauth2 also provide a mechanism to authenticate users themselves. It’s a form based security feature. Create a SecurityConfiguration class which extends SecurityConfiguration class:
package com.javadevjournal.oauth2;

import org.springframework.beans.factory.annotation.Value;
import org.springframework.context.annotation.Bean;
import org.springframework.context.annotation.Configuration;
import org.springframework.core.annotation.Order;
import org.springframework.security.config.annotation.authentication.builders.AuthenticationManagerBuilder;
import org.springframework.security.config.annotation.web.builders.HttpSecurity;
import org.springframework.security.config.annotation.web.configuration.WebSecurityConfigurerAdapter;
import org.springframework.security.crypto.bcrypt.BCryptPasswordEncoder;

@Configuration
@Order(1)
public class OauthSecurityConfiguration extends WebSecurityConfigurerAdapter {

    @Value("${user.oauth.user.username}")
    private String username;

    @Value("${user.oauth.user.password}")
    private String password;

    @Override
    protected void configure(HttpSecurity http) throws Exception {
        http
            .antMatcher("/**")
            .authorizeRequests()
            .antMatchers("/oauth/authorize**", "/login**", "/error**")
            .permitAll()
            .and()
            .authorizeRequests()
            .anyRequest().authenticated()
            .and()
            .formLogin().permitAll();
    }

    @Override
    protected void configure(AuthenticationManagerBuilder auth) throws Exception {
        auth
            .inMemoryAuthentication()
            .withUser(username).password(passwordEncoder().encode(password)).roles("USER");
    }

    @Bean
    public BCryptPasswordEncoder passwordEncoder() {
        return new BCryptPasswordEncoder();
    }
}
Above class authenticate request to our authorization server. This completes the core setup for our authorization server. Let’s create a protected resource to test the complete workflow.
3. Oauth2 protected REST resources
To test our application, let’s create a REST controller. Our controller will return the user details based on the userID. This resource is secure and will not be accessible with a valid Oauth token. If we do not pass valid token in the request, system will not allow access and throws unauthorized exception back to the client.
package com.javadevjournal.controller;

import com.javadevjournal.data.CustomerData;
import org.springframework.web.bind.annotation.*;

@RestController
@RequestMapping("/api/customers")
public class CustomerController {

 @GetMapping("/customer/{userId}")
 public CustomerData getCustomerProfile(@PathVariable("userId") String userId) {
  return getCustomer(userId);
 }

 private CustomerData getCustomer(final String userId) {
  CustomerData customer = new CustomerData();
  customer.setEmail("[email protected]");
  customer.setFirstName("Demo");
  customer.setLastName("User");
  customer.setAge(21);
  customer.setId(userId);
  return customer;
 }
}
Customer data
package com.javadevjournal.data;

public class CustomerData {

 private String firstName;
 private String lastName;
 private int age;
 private String email;
 private String id;

 public CustomerData() {}

 public CustomerData(String firstName, String lastName, int age, String email, String id) {
  this.firstName = firstName;
  this.lastName = lastName;
  this.age = age;
  this.email = email;
  this.id = id;
 }

 public String getFirstName() {
  return firstName;
 }

 public void setFirstName(String firstName) {
  this.firstName = firstName;
 }

 public String getLastName() {
  return lastName;
 }

 public void setLastName(String lastName) {
  this.lastName = lastName;
 }

 public int getAge() {
  return age;
 }

 public void setAge(int age) {
  this.age = age;
 }

 public String getEmail() {
  return email;
 }

 public void setEmail(String email) {
  this.email = email;
 }

 public String getId() {
  return id;
 }

 public void setId(String id) {
  this.id = id;
 }
}
4. Testing Application
In the first part of the testing, I will use Postman. When any third party try to access the customer profile data, that service need oauth2 token.
4.1 Get authorization grant code
The first step in the process is to obtain the authorization grant from the resource owner. To get the authorization grant, use the following URL (In the real world application, the customer will be redirected to this site and will be prompted to give permission to the API to access a certain resource).
http://localhost:8080/oauth/authorize?client_id=javadevjournal&response_type=code&scope=user_info<code>This URL brings a login page. Once customer provides the login information, system redirects to the grant access page. The page gives an option to the customer to approve / reject the request or to provide certain access to the third-party applications. (do you remember when you added any app to your Facebook and it redirect you to a page to provide your permissions)
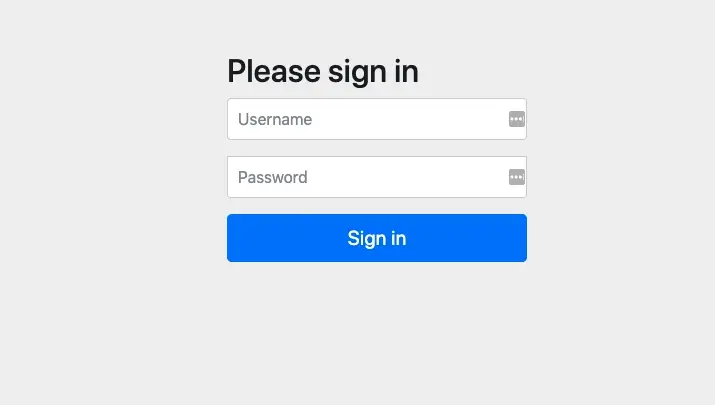
Provide the username and password (refer to the section 2 for these configurations)
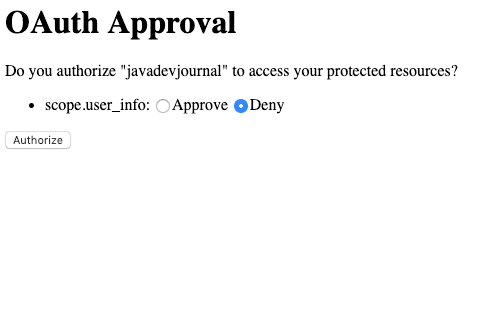
Once we approve the request, it will redirect to an URL (check the user.oauth.redirectUris property). This redirect URL will also contains a code as part of the query string (http://localhost:8081/login?code=13428u). This code is the authorization code for the third party application.
4.2 Get Access Token
Once we have the authorization grant, the next step is to get the access token. To get the access token, we need to pass the code received in the previous step. For this demo, send a simple cURL request.
curl -X POST \
  http://localhost:8080/oauth/token \
  -H 'authorization: Basic amF2YWRldmpvdXJuYWw6MTIzNCQjQCE=' \
  -H 'cache-control: no-cache' \
  -H 'content-type: application/x-www-form-urlencoded' \
  -H 'postman-token: f24e14c3-a90a-4866-59ae-3691dfb3ea0a' \
  -d 'code=ntCgjD&grant_type=authorization_code&redirect_uri=http%3A%2F%2Flocalhost%3A8081%2Flogin&scope=user_info'
On a successful request, the auth server will return the access token back in the response
{
    "access_token": "791dccdf-c41f-42c1-9b88-93853ed5c87b",
    "token_type": "bearer",
    "refresh_token": "ec2ef96e-1792-4188-b397-87b1a2afdeb4",
    "expires_in": 122,
    "scope": "user_info"
}
Once we have the access token, let’s get the user information by passing the access token in the request:
Here is the cURL request
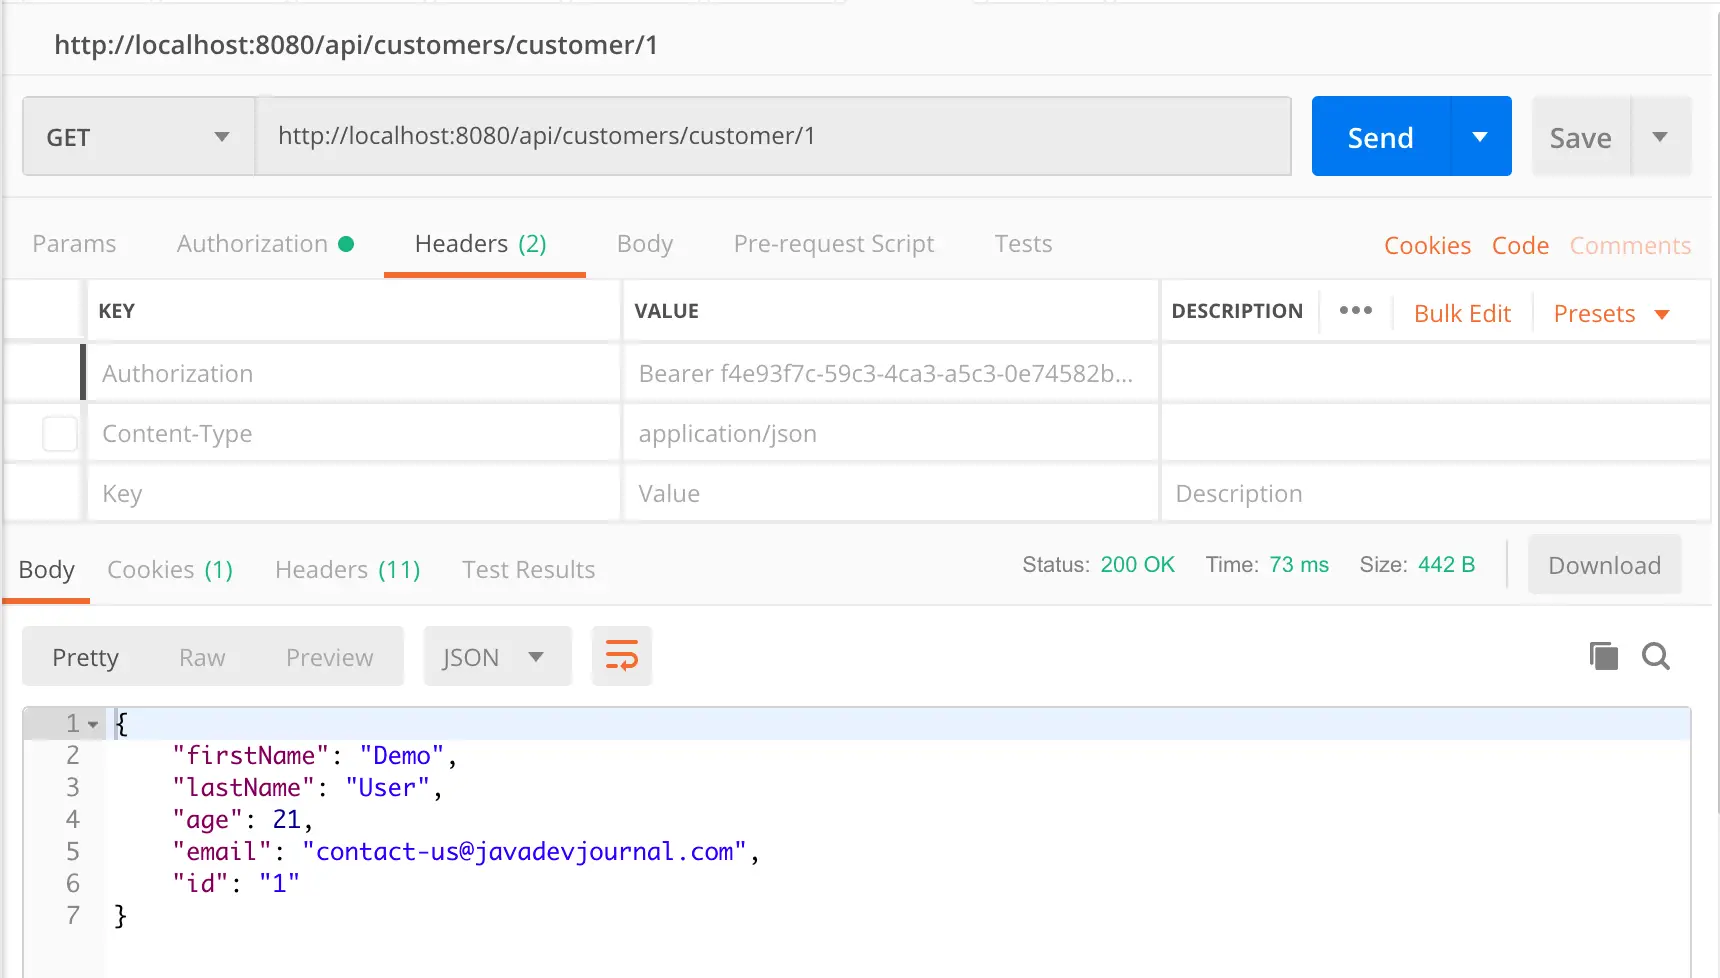
curl -X GET \
  http://localhost:8080/api/customers/customer/1 \
  -H 'Authorization: Bearer f4e93f7c-59c3-4ca3-a5c3-0e74582b1b18' \
  -H 'cache-control: no-cache'
[pullquote align=”normal”] To keep things simple in this post, I have omitted some information from this article like, storing the token in the database or injecting a user service and not using in memory user. These can be easily configured using Spring security [/pullquote]
5. Maven dependencies
Here is the complete pom.xml file for your reference:
<?xml version="1.0" encoding="UTF-8"?>
<project xmlns="http://maven.apache.org/POM/4.0.0"
    xmlns:xsi="http://www.w3.org/2001/XMLSchema-instance" xsi:schemaLocation="http://maven.apache.org/POM/4.0.0 https://maven.apache.org/xsd/maven-4.0.0.xsd">
    <modelVersion>4.0.0</modelVersion>
    <parent>
        <groupId>org.springframework.boot</groupId>
        <artifactId>spring-boot-starter-parent</artifactId>
        <version>2.2.2.RELEASE</version>
        <relativePath/>
        <!-- lookup parent from repository -->
    </parent>
    <groupId>com.javadevjournal</groupId>
    <artifactId>spring-boot-auth-server</artifactId>
    <version>0.0.1-SNAPSHOT</version>
    <name>spring-boot-auth-server</name>
    <description>Spring Boot Authorization Server</description>

    <properties>
        <java.version>1.8</java.version>
    </properties>

    <dependencies>
        <dependency>
            <groupId>org.springframework.boot</groupId>
            <artifactId>spring-boot-starter-web</artifactId>
        </dependency>
        <dependency>
            <groupId>org.springframework.security.oauth</groupId>
            <artifactId>spring-security-oauth2</artifactId>
            <version>2.4.0.RELEASE</version>
        </dependency>
        <dependency>
            <groupId>org.springframework.boot</groupId>
            <artifactId>spring-boot-starter-test</artifactId>
            <scope>test</scope>
            <exclusions>
                <exclusion>
                    <groupId>org.junit.vintage</groupId>
                    <artifactId>junit-vintage-engine</artifactId>
                </exclusion>
            </exclusions>
        </dependency>
    </dependencies>

    <build>
        <plugins>
            <plugin>
                <groupId>org.springframework.boot</groupId>
                <artifactId>spring-boot-maven-plugin</artifactId>
            </plugin>
        </plugins>
    </build>
</project>
Let’s take a quick look at some important definitions:
[sc_fs_multi_faq headline-0=”h2″ question-0=”What is Oauth2 in Spring Boot” answer-0=”Oauth2 is an authorization framework that enables applications to get limited access to user accounts on an HTTP service. It works by delegating user authentication to the service that hosts the user account and allowing third-party applications to access the user account. Oauth2 provides authorization flows for web and desktop applications, and mobile devices. Spring Boot provides some build in support for Oauth2.” image-0=”” headline-1=”h2″ question-1=”What is Spring Security Oauth2?” answer-1=”Spring security provides support for the Oauth2 in Spring framework. The @EnableResourceServer annotation in spring security enable a filter which looks for an Oauth2 token in the incoming request if it protects the requested resource using security configurations.” image-1=”” count=”2″ html=”true” css_class=””]
Summary
In this article, we discussed how to configure and enable Oauth2 with Spring Boot. We looked at the steps to use Spring Boot with Spring Security to enable Oauth2 support for our REST based application. The source code for this article is available on the GitHub.
Hi,
I am getting below error when I hit the API from postman,
{
“error”: “unauthorized”,
“error_description”: “Full authentication is required to access this resource”
}
Can you guide me for this.
are you using the same example or it’s different one? If it’s different one I need to see the code.This is common issue in case the token is missing or you are trying to access the resource without sufficient privileges.
SB 2.x uses Spring Security 5, while the spring-security-oauth2 apparently uses Spring 4.x under the hood (https://mvnrepository.com/artifact/org.springframework.security.oauth/spring-security-oauth2/2.5.0.RELEASE). Will spring-security-oauth2 still work running on Spring 5.x? I guess it must…
If you are planning to start with, I will highly recommend to take a look at https://spring.io/blog/2020/04/15/announcing-the-spring-authorization-server
How to get acces token?
I have explained it in section 4.2 as how you can get the token. Are you facing any specific issue while trying this?
I am below error when trying the first url-
<oauth>
<error_description>Full authentication is required to access this resource</error_description>
<error>unauthorized</error>
</oauth>
How are you sending out the request? It seems that the request structure is not correct and you are not getting the token.Make sure you are passing the secret and id as the header (default) and not as form-urlencoded. If you want to pass it as form data, you need to config it.
I can only suggest based on how you are trying this out.
Reading this article, I have the impression that an extra authentication / authorization server as CAS or Okta is not needed, it seems Spring Security Oauth2 alone is enough without any additional component to secure my applications for most of business cases. Am I right???
Agree, you can use the Spring Security build in Oauth2 feature.We need CAS or Okta if you have a complex requirements or want to use enterprise level identity management as these platform provides lot more feature than a simple security.
AuthorizationServerConfigurerAdapter and more are deprecated
Thanks Bart for the suggestion, will review and the code and updated if needed
Hey Bart, Can you please suggest an alternative to this?
@Chandrika: You can take a look at the new project from Spring security – https://github.com/spring-projects-experimental/spring-authorization-server