In this article of Spring Boot tutorial. we will have a detail look at the Spring Boot REST example. Spring Boot complements Spring REST support by providing default dependencies/converters out of the box. Writing RESTful services in Spring Boot is easy with support from Spring Boot auto configuration feature.
Introduction
In this post, we will create a Spring Boot rest example. This will be a step-by-step exercise to build a RESTful web service using Spring Boot. We will develop a web-service using the following main features.
- Create a customer.
- Get Customer/ Customers.
- Delete a Customer.
1. Creating Spring Boot Project
To start with our Spring Boot REST example, let’s create a Spring Boot web application. We can either use Spring Initializr or use IDE or we can create an application using Spring Boot CLI to create Spring Boot application.
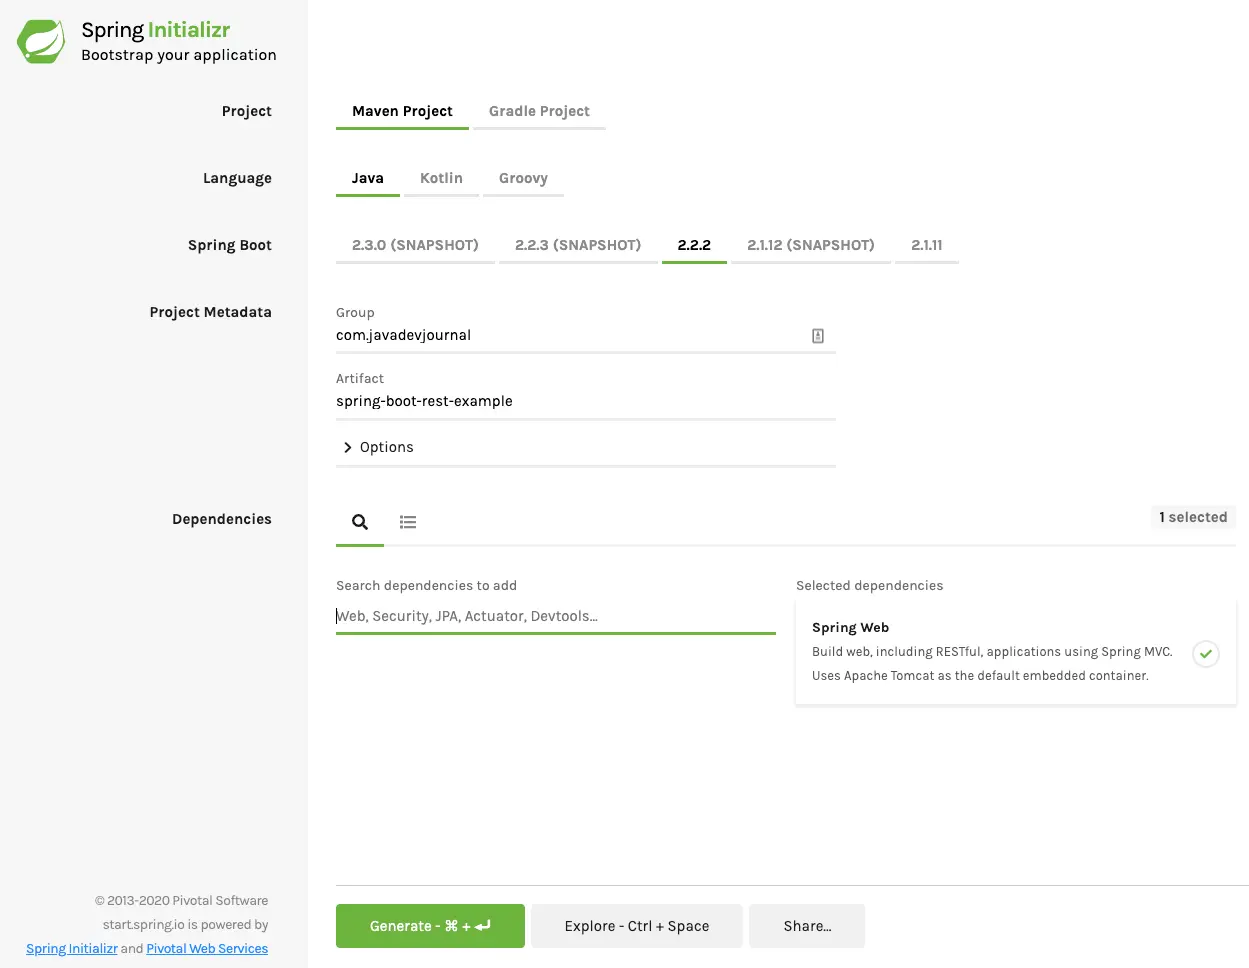
$ spring init --dependencies=web my-projectIf you prefer a more visual interface to generate an initial structure:
For an existing Spring Boot project, update the pom.xml file.This is how our pom.xml look like:
<?xml version="1.0" encoding="UTF-8"?>
<project xmlns="http://maven.apache.org/POM/4.0.0" xmlns:xsi="http://www.w3.org/2001/XMLSchema-instance" xsi:schemaLocation="http://maven.apache.org/POM/4.0.0 http://maven.apache.org/xsd/maven-4.0.0.xsd">
    <modelVersion>4.0.0</modelVersion>
    <parent>
        <groupId>org.springframework.boot</groupId>
        <artifactId>spring-boot-starter-parent</artifactId>
        <version>2.1.2.RELEASE</version>
        <relativePath /> <!-- lookup parent from repository -->
    </parent>
    <groupId>com.javadevjournal</groupId>
    <artifactId>spring-boot-rest-example</artifactId>
    <version>0.0.1-SNAPSHOT</version>
    <name>Spring Boot Rest Example</name>
    <description>Spring Boot Rest Example</description>
    <properties>
        <java.version>1.8</java.version>
    </properties>
    <dependencies>
        <dependency>
            <groupId>org.springframework.boot</groupId>
            <artifactId>spring-boot-starter-web</artifactId>
        </dependency>
        <dependency>
            <groupId>org.springframework.boot</groupId>
            <artifactId>spring-boot-devtools</artifactId>
            <scope>runtime</scope>
        </dependency>
        <dependency>
            <groupId>org.springframework.boot</groupId>
            <artifactId>spring-boot-starter-test</artifactId>
            <scope>test</scope>
        </dependency>
    </dependencies>
    <build>
        <plugins>
            <plugin>
                <groupId>org.springframework.boot</groupId>
                <artifactId>spring-boot-maven-plugin</artifactId>
            </plugin>
        </plugins>
    </build>
</project>
There are 2 important depedencies in the above file.Let’s take a closer look before moving to the next section.
spring-boot-starter-parent– This is an auto depedency management from Spring Boot.It adds lots of transtitive depedencies which are needed to run your application with minium code. For more detail, please read Spring Boot Starter Parent.spring-boot-starter-web– This adds required depedencies for our web application including Spring-MVC, jackson etc. For more detail, please read Spring Boot Starter Parent.
We will add JPA capabilities later in the articles. We will use JPA for storing and fetching customer information.
2. Quick Introduction to REST
REST is a short form of REpresentational State Transfer. Introduced by Roy Fielding, REST is an architecture style for distributed hypermedia systems. REST is not a standard but think of it as a set of constraints or principles it must satisfy if we want to refer to an interface as RESTful. While working on the REST API, we should keep in mind the following HTTP methods:
- GET – To fetch resources
- POST – To create resources
- PUT – Update resources
- DELETE – Delete resources
- PATCH – Partial update to a resource
[thrive_text_block color=”blue”] Read HTTP Methods in RESTful Web Services to get a basic understanding of the HTTP methods for your REST API.[/thrive_text_block]
3. Spring Boot REST Controller
Let’s create our REST controller for this exercise. Before we start, let’s keep following point in mind:
- We will use
@ResstControllerannotation for our controller. - The
@ResstControlleris a convenience annotation that is itself annotated with @Controller and@ResponseBody. - HTTP GET will return customer or customers list.
- HTTP POST will create a customer.
- DELETE method will remove a customer from the system
package com.javadevjournal.controller;

import com.javadevjournal.data.Customer;
import com.javadevjournal.service.CustomerService;
import org.springframework.beans.factory.annotation.Autowired;
import org.springframework.http.HttpStatus;
import org.springframework.http.ResponseEntity;
import org.springframework.web.bind.annotation. * ;

import java.util.ArrayList;
import java.util.List;

@RestController
@RequestMapping(value = "/customers")
public class CustomerController {

	@Autowired CustomerService customerService;

     /**
     * Get all the customer available in the underlying system
     * @return list of customers
     */
	@GetMapping
	public ResponseEntity < List < Customer >> getCustomers() {
		List < Customer > customers = customerService.getCustomers();
		return new ResponseEntity < >(customers, HttpStatus.OK);
	}

     /**
     * Create a customer with the system.This end point accepts customer information in
     * the json format.It will create and send back the data to the REST customer.
     * @param customer
     * @return newely created customer
     */
	@PostMapping(value = "/customer")
	public ResponseEntity < Customer > createCustomer(@RequestBody Customer customer) {
		final Customer customerData = customerService.createCustomer(customer);
		return new ResponseEntity < >(customerData, HttpStatus.CREATED);
	}

     /**
     * Deleted the customer from the system.client will pass the ID for the customer and this
     * end point will remove customer from the system if found.
     * @param id
     * @return
     */
	@DeleteMapping(value = "/customer/{id}")
	public ResponseEntity < String > deleteCustomer(@PathVariable Long id) {
		customerService.deleteCustomer(id);
		return new ResponseEntity < >(HttpStatus.OK);
	}

     /**
     * Get the customer detail based on the id passed by the client API.
     * @param id
     * @return customer detail
     */
	@GetMapping(value = "/customer/{id}")
	public ResponseEntity < Customer > getCustomer(@PathVariable Long id) {
		Customer customer = customerService.getCustomer(id);
		return new ResponseEntity < >(customer, HttpStatus.OK);
	}
}
There are multiple things happening in out sample REST controller.Let’s take a close look at these important points:
- The
@GetMappingannotation without any mapping (first mapping in our example) map the HTTP GET to the/customersmapping (look at the class level ). @PostMappingannotation map the HTTP POST to the/customersmapping which pass the execution to thecreteCustomer()method.- The
@PathVariablemaps the{id}to the id method parameter.
One of the main difference between a web application and REST API is the response body.REST web service do not use the tempelate engine to render/ generate the HTML for the view, it directly write the returned object to the HTTP response and Spring HTTP message convertor translate it to JSON object.The @RestController annotation is a combination of @Controller and @ResponseBody.
This is our Customer data class:
public class Customer {

	private String name;
	private int age;
	private String email;
	private Long id;

	//getter and setter
}
[thrive_text_block color=”blue”]There are few important points while working on the REST API like REST API Discoverability and naming conventions, etc. But to keep this article simple, I am leaving it blank. Please refer to the Build REST API with Spring for detail.[/thrive_text_block]
4. Spring Boot Main Class
Here is our Spring Boot main class:
@SpringBootApplication
public class SpringBootRestExampleApplication {

    public static void main(String[] args) {
        SpringApplication.run(SpringBootRestExampleApplication.class, args);
    }
}
This is the core component of our Spring Boot REST example.We need a way to let Spring know about REST controller and other configuration.Spring Boot auto configuration provide an intelligent mechanism to scan our application and provide a setup to run application with minimal code.In our case, auto-configuration detects the spring-boot-starter-web in our class path and will configure the embedded tomcat and other configuration automatically for us.
The @SpringBootApplication annotation performs the following 3 operation for us:
@Configure@EnableAutoConfiguration@ComponentScan
For our case, the @SpringBootApplication annotation performing following tasks for us
- It automatically detects out the type of our application (MVC in our case) and will configure and setup default configuration for us e.g setting up dispatche servlet, scan the component with the
@RestControllerand similar annotations. - configure embedded tomcat for us.
- Enable spring mvc default setup.
- Configure and setup the Jackson for JSON.
5. Accessing Data with JPA
For the completeness of this article, we will use Spring Boot JPA capabilities to store and retrieve customer section. I will not explain this as this need separate post. We do not relate this section to REST but probably part of your application layout (when working on real REST services).
import javax.persistence.Entity;
import javax.persistence.GeneratedValue;
import javax.persistence.GenerationType;
import javax.persistence.Id;

@Entity
public class CustomerModel {

	@Id@GeneratedValue(strategy = GenerationType.AUTO)
	private Long id;
	private String name;
	private int age;
	private String email;

	//getters and setters
	public Long getId() {
		return id;
	}
}
Our repository interface that works with Customer entities:
package com.javadevjournal.dao.entity;

import org.springframework.data.repository.CrudRepository;

public interface CustomerRepository extends CrudRepository<CustomerModel,Long> {
}
Service class which works between REST controller and Data layer:
package com.javadevjournal.service;

import com.javadevjournal.dao.entity.CustomerModel;
import com.javadevjournal.dao.entity.CustomerRepository;
import com.javadevjournal.data.Customer;
import org.springframework.beans.BeanUtils;
import org.springframework.beans.BeanWrapper;
import org.springframework.beans.BeanWrapperImpl;
import org.springframework.beans.factory.annotation.Autowired;
import org.springframework.stereotype.Service;

import java.util.ArrayList;
import java.util.List;
import java.util.Optional;

@Service
public class CustomerService {

    @Autowired CustomerRepository customerRepository;

    public Customer createCustomer(final Customer customer) {

        CustomerModel customerModel = new CustomerModel();
        BeanUtils.copyProperties(customer, customerModel);
        customerModel = customerRepository.save(customerModel);
        Customer customerData = new Customer();
        BeanUtils.copyProperties(customerModel, customerData);

        return customerData;
    }

    public List getCustomers() {
        List customers = new ArrayList<>();
        customerRepository.findAll().forEach(customers::add);

        List customerList = new ArrayList<>();
        for (CustomerModel customerModel : customers) {
            Customer customer = new Customer();
            BeanUtils.copyProperties(customerModel, customer);
            customerList.add(customer);
        }

        return customerList;
    }

    public Customer getCustomer(Long id) {

        Optional customer = customerRepository.findById(id);
        Customer customerData = new Customer();
        BeanUtils.copyProperties(customer.get(), customerData);
        return customerData;
    }

    public void deleteCustomer(Long id) {
        customerRepository.deleteById(id);
    }
}
6. Testing REST API
It’s time to see our Spring Boot REST example in action. Build and deploy your application. The easiest way is to run the main() method in SpringBootRestExampleApplication class. This will start the embedded tomcat. Once the application start, we will use REST client to test our application.
6.1 Create Customer
Let’s create customers. Open the REST client and use the http://{host}:{post}/customers/customer with POST
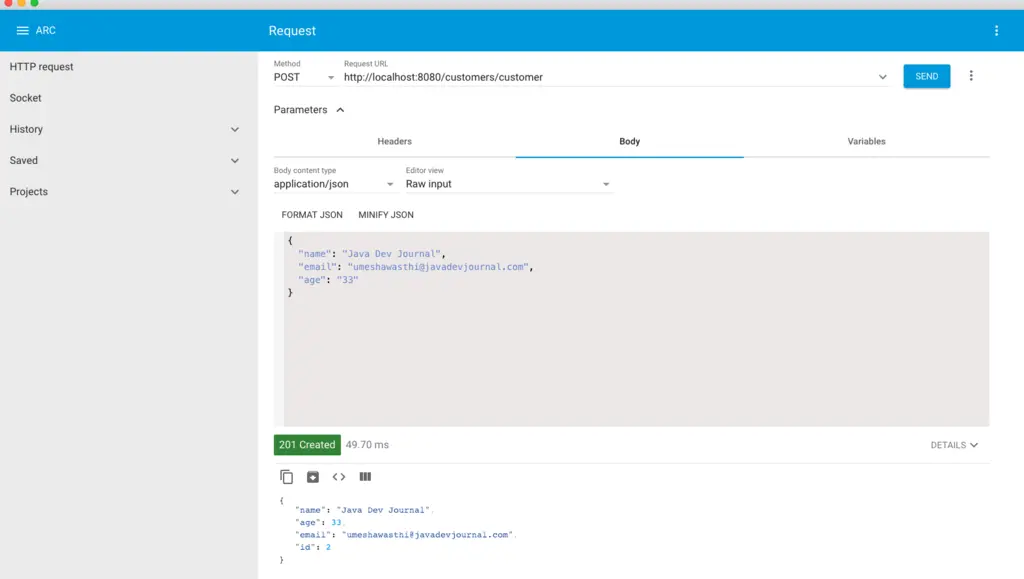
Response
{
"name": "Java Dev Journal",
"age": 34,
"email": "[email protected]",
"id": 3
}
6.2 Get Customers
Now we have created few customer, let’s get this list from the REST API:
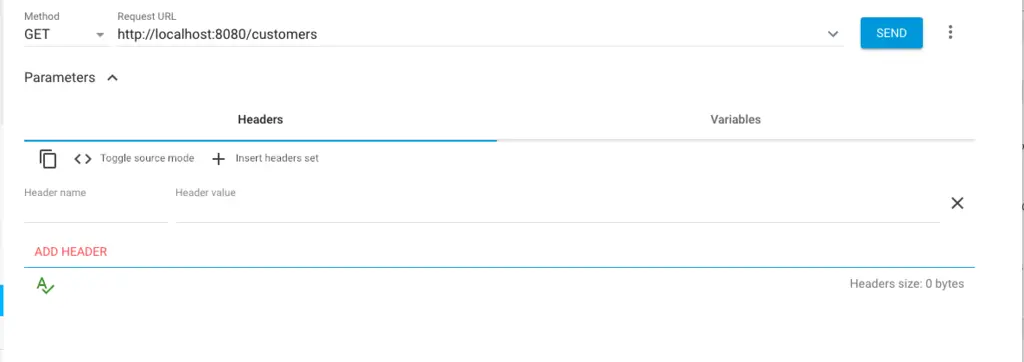
REST API Response:
[
    {
        "name": "Java Dev Journal",
        "age": 30,
        "email": "[email protected]",
        "id": 1
    },
    {
        "name": "Java Dev Journal",
        "age": 33,
        "email": "[email protected]",
        "id": 2
    },
    {
        "name": "User 1",
        "age": 34,
        "email": "[email protected]",
        "id": 3
    }
]
6.3 Get Customer By ID
our REST API example also has an endpoint to give customer information based on the ID:
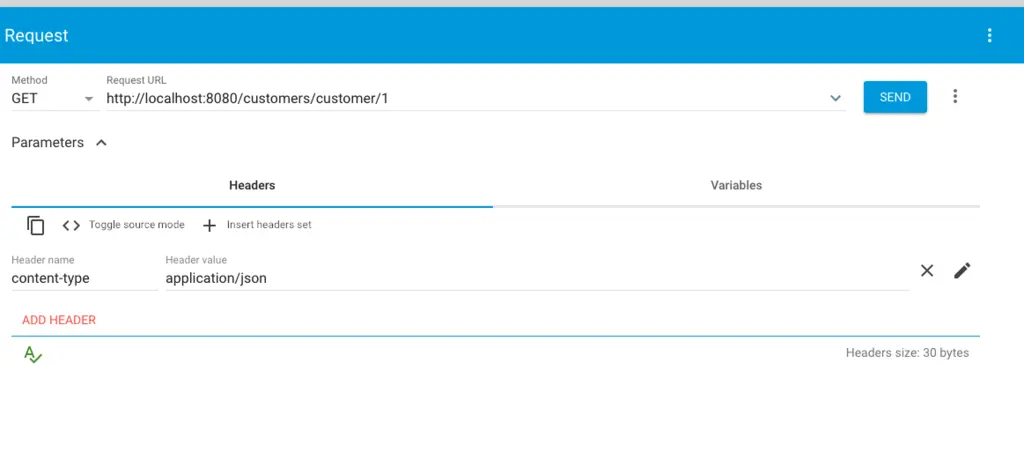
REST API Response:
{
    "name": "Java Dev Journal",
    "age": 30,
    "email": "[email protected]",
    "id": 1
}
7. FAQ Rest API
Before we conclude our artcile, let’s revise some core concepts of the Spring Boot REST API.
[sc_fs_multi_faq headline-0=”h2″ question-0=”What is REST API in Spring Boot?” answer-0=”A contoller class with ablity to server REST API request is known as rest controller.Spring provides a @RestController annotation which annotated a spring controler as REST controller. ” image-0=”” headline-1=”h2″ question-1=”How to create REST API in Spring Boot?” answer-1=”Creating a REST API in Spring Boot is as simple as creating a web project.Spring Boot provides a convient @RestController annotation to mark controller as REST controller.To create a REST API, follow these steps: 1. Create a Spring Boot web project. 2. Annotate the controller with @RestController annotation.” image-1=”” count=”2″ html=”true” css_class=””]
Summary
In this article, we have a detail look at the Spring Boot REST example. We covered the steps to create a REST API using Spring Boot. The source code for this article is available on our GitHub repository
If you have a gitHub account, I want to see your code overview
Here is the link for the source code on Github.
https://github.com/umeshawasthi/javadevjournal/tree/master/Spring-Boot/spring-boot-rest-example