In this article of Spring Boot, we will inspect the Spring Boot RestTemplate or Spring RestTemplate. It makes us easy to consume and creating a Spring Boot RESTful web service.
Spring Boot RestTemplate
Consuming and creating a Spring Boot RESTful web service requires a lot of boiler-plate code. The Spring Boot RestTemplate makes it easy to create and consume RESTful web service. RestTemplate is a Spring REST client which we can use to consume different REST APIs.
As of Spring Framework 5, alongside the
WebFluxstack, Spring introduced a new HTTP client called WebClient.
WebClientis a modern, alternative HTTP client to RestTemplate. Not only does it provide a traditional synchronous API, but it also supports an efficient non-blocking and asynchronous approach.our recommendation is to use the newWebClient. They will deprecate RestTemplate in future versions.
1. Introduction
The RESTful web services mainly stand for Representational State Transfer. It is basically an architectural style that is used to specify the constraints. These constraints include a uniform interface that leads a web service to induce desirable properties like performance and scalability. In short, RESTful web services help in making an application more reachable to the user.
The REST architectural style considers data and functionality as resources and these are accessed by using the Uniform Resource Identifiers, also known as URIs. These are mainly the connection that links it to the web. It also comprises an architecture that has a client/server connection and is mainly designed for providing a stateless communication protocol. We basically perform the client and server exchange representation of resources by using this standardized interface and protocols. Some of the major protocols that are used for the exchange/transfer of data are GET, POST, PUT, DELETE, and more.
1.1. Principles of RESTful application
There are some principles of RESTful applications that make the application simple, lightweight, and fast. These principles are:
- Identification of Resources through URI: We can expose resources by using a RESTful Web Service. These help in interacting the targets with the clients. Resources are identified by URIs that provide a global addressing space for service discovery. Some annotations for exposing resources are
@Path, @RequestMapping. - Uniform Interface: The resources can be manipulated by using the CRUD operation. These CRUD operations stand for Create, Read, Update and Delete i.e. POST is used for adding a new resource, we use GET for reading the already available resources, we can update a resource using PUT, and DELETE can be used for deleting the resources. All these are HTTP methods and use specific requests for performing actions.
- Description Messages: The resources or content can be accessed in a variety of ways, such as HTML, XML, plain text, PDF, JPEG, JSON, and others. We can also use the metadata in these RESTful web services for providing control caching, transmission errors, authentication, authorization controls, and more.
- Providing Stateful Interactions with the help of Hyperlinks: The interactions provided by these resources are stateless, i.e. the request messages and body are self-contained. They are based on the concept of explicit state transfer. We can also embed these states in the response messages to point to the valid future states of the interaction.
With the help of Spring Boot RestTemplate, we can create applications by using the above RESTful Web Services functions. We can use the exchange() method that can consume these web services for all the HTTP methods.
2. Maven Dependencies
Before moving on with the project, we would require the following pre-requisites to be downloaded and installed in the system:
- JDK should be installed on your computer.
- Use any IDE for development, such as IntelliJ, Eclipse, NetBeans.
- Postman should be installed for testing the API calls.
You will not need any special dependencies for creating the REST template. This will require the same dependencies as required to create any RESTful Web Services. Below are the dependencies required for creating the web services.
<dependencies>
   <dependency>
      <groupId>org.springframework.boot</groupId>
      <artifactId>spring-boot-starter-data-jpa</artifactId>
   </dependency>
   <dependency>
      <groupId>org.springframework.boot</groupId>
      <artifactId>spring-boot-starter-web</artifactId>
   </dependency>
</dependencies>
3. Project Setup
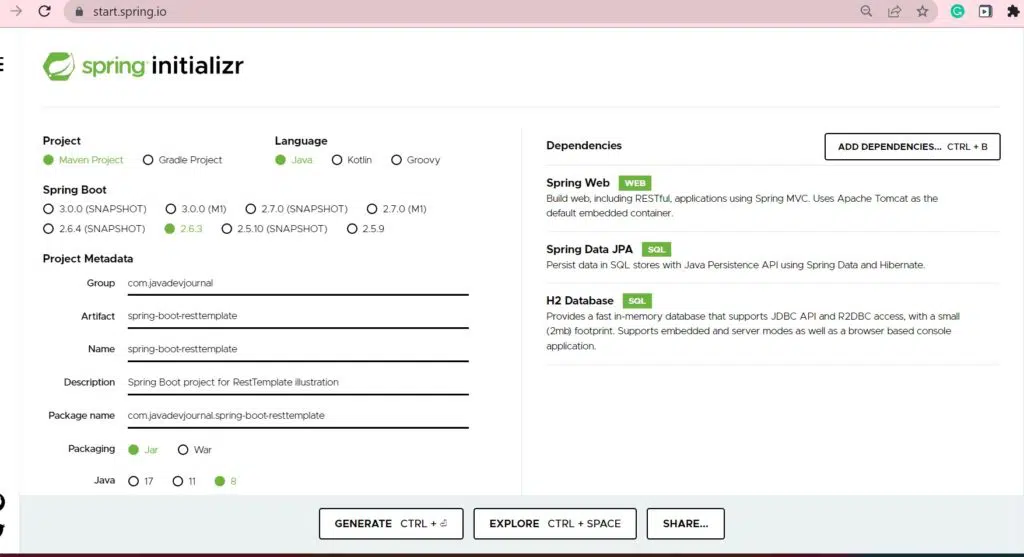
We will create a spring multi-module project to showcase how two micro-services interact, and how we can call a rest endpoint of one service from another service using RestTemplate. To bootstrap our project, we can use Spring initializr. We will create a parent module, which will contain dependencies common to both the modules, like Lombok, spring-boot-starter-test, etc. pom.xml is provided below for reference.
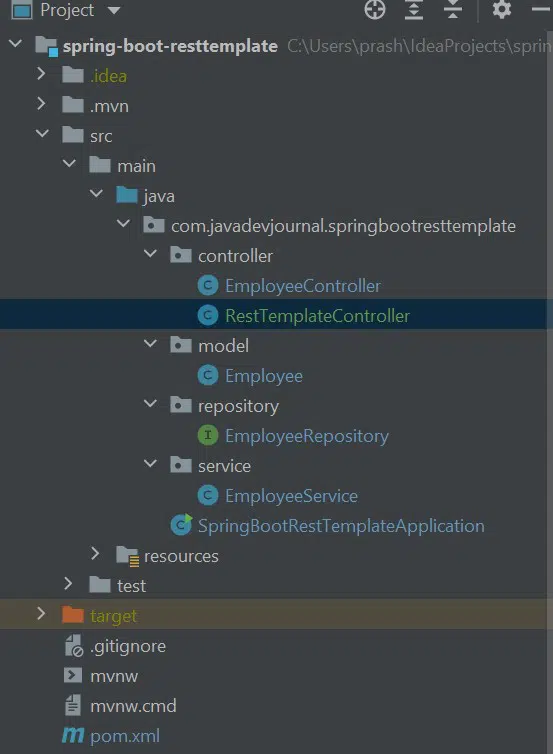
This is how the project structure will look like after we import it in the IDE.
Here is the complete pom.xml for our Spring Boot RestTemplate example.
<?xml version="1.0" encoding="UTF-8"?>
<project xmlns="http://maven.apache.org/POM/4.0.0" xmlns:xsi="http://www.w3.org/2001/XMLSchema-instance" xsi:schemaLocation="http://maven.apache.org/POM/4.0.0 https://maven.apache.org/xsd/maven-4.0.0.xsd">
   <modelVersion>4.0.0</modelVersion>
   <parent>
      <groupId>org.springframework.boot</groupId>
      <artifactId>spring-boot-starter-parent</artifactId>
      <version>2.6.3</version>
      <relativePath />
      <!-- lookup parent from repository -->
   </parent>
   <groupId>com.javadevjournal</groupId>
   <artifactId>spring-boot-resttemplate</artifactId>
   <version>0.0.1-SNAPSHOT</version>
   <name>spring-boot-resttemplate</name>
   <description>Spring Boot project for RestTemplate illustration</description>
   <properties>
      <java.version>1.8</java.version>
   </properties>
   <dependencies>
      <dependency>
         <groupId>org.springframework.boot</groupId>
         <artifactId>spring-boot-starter-data-jpa</artifactId>
      </dependency>
      <dependency>
         <groupId>org.springframework.boot</groupId>
         <artifactId>spring-boot-starter-web</artifactId>
      </dependency>
      <dependency>
         <groupId>com.h2database</groupId>
         <artifactId>h2</artifactId>
         <scope>runtime</scope>
      </dependency>
      <dependency>
         <groupId>org.springframework.boot</groupId>
         <artifactId>spring-boot-starter-test</artifactId>
         <scope>test</scope>
      </dependency>
      <dependency>
         <groupId>org.apache.httpcomponents</groupId>
         <artifactId>httpclient</artifactId>
      </dependency>
   </dependencies>
   <build>
      <plugins>
         <plugin>
            <groupId>org.springframework.boot</groupId>
            <artifactId>spring-boot-maven-plugin</artifactId>
            <configuration>
               <excludes>
                  <exclude>
                     <groupId>org.projectlombok</groupId>
                     <artifactId>lombok</artifactId>
                  </exclude>
               </excludes>
            </configuration>
         </plugin>
      </plugins>
   </build>
</project>
To understand how to use the Spring Boot RestTemplate, let’s create the different layers of application that will be required for running the application. This project will include the following layers: Controller, Service, Domain, and Application layer.
3.1. Application Layer
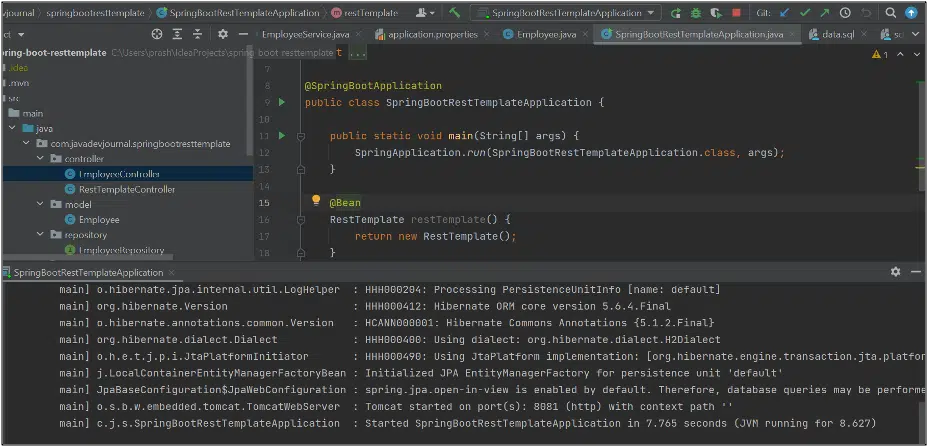
In the application layer, we have SpringbootRestTemplateApplication class, which is annotated with @SpringBootApplication annotation. This annotation marks the class as a configuration class in which we can declare one or more @Bean methods. It also triggers auto-configuration and component scanning. We are using @Bean annotation of Spring Boot to inject the RestTemplate bean into our application. We will @Autowire it in our controller layer.
import org.springframework.boot.SpringApplication;
import org.springframework.boot.autoconfigure.SpringBootApplication;
import org.springframework.context.annotation.Bean;
import org.springframework.web.client.RestTemplate;

@SpringBootApplication
public class SpringbootRestTemplateApplication {

    public static void main(String[] args) {
        SpringApplication.run(SpringbootRestTemplateApplication.class, args);
    }

    @Bean
    public RestTemplate restTemplate() {
        return new RestTemplate();
    }
}
3.2. Domain Object
Next, we will create our domain layer. We will create a POJO class called Employee, which will be our DTO(Data Transfer Object). It contains fields like id which will be the primary key for our employee table, name of the employee, and its salary. @Data annotation comes from project Lombok which generates the boiler plate code like–getters, setters, toString(), no-argument constructor.
@Data
@AllArgsConstructor
@NoArgsConstructor
@JsonIgnoreProperties(ignoreUnknown = true)
public class Employee implements Serializable {

    private static final long serialVersionUID = 1 L;

    int id;
    String name;
    Double salary;
}@AllArgsConstructor-This is a Lombok Annotation that is used for generating a constructor will all the member variables of the Employee class.@NoArgsConstructor–This is a Lombok annotation that will generate an empty constructor for the Employee Class.@Data– This is a Lombok Annotation that generates the getters and setters for all the member variables of the Employee class.
3.3. Controller Layer
We have created two controllers in this project. One is EmployeeController which contains REST endpoints to perform CRUD operations on Employee resources. The second one is the RestTemplateController which is the handler of all user requests. It uses different methods provided by RestTemplate bean to invoke the REST APIs in EmployeeController.
Below is the code for our controller class, which we will understand in steps. We have used @Autowired annotation to inject the dependency for RestTemplate in our controller class. We can use <a href="https://javadevjournal.com/spring/qualifier-annotation/" target="_blank" data-type="post" data-id="3741" rel="noreferrer noopener">@Qualifier annotation</a> in case we have RestTemplate with different configurations.
@RestController
public class EmployeeController {

    @Autowired
    EmployeeService employeeService;

    @GetMapping("/employees")
    private List getAllEmployees() {
        return employeeService.getAllEmployees();
    }

    @GetMapping("/employees/{id}")
    private Employee getEmployeeById(@PathVariable("id") int id) {
        return employeeService.getEmployeeById(id);
    }

    @PostMapping("/employees")
    private Employee createEmployee(@RequestBody Employee employee) {
        employeeService.saveOrUpdate(employee);
        return employee;
    }

    @PutMapping("/employees/{id}")
    private Employee updateEmployee(@PathVariable("id") int id, @RequestBody Employee employee) {
        Employee updatedEmployee = employeeService.getEmployeeById(id);
        updatedEmployee.setName(employee.getName());
        updatedEmployee.setSalary(employee.getSalary());
        employeeService.saveOrUpdate(updatedEmployee);
        return updatedEmployee;
    }

    @DeleteMapping("/employees/{id}")
    private Employee deleteById(@PathVariable("id") int id) {
        Employee employeeDeleted = employeeService.getEmployeeById(id);
        employeeService.delete(id);
        return employeeDeleted;
    }
}@RestController–This annotation marks the Employee Controller class as aRestController. Once this annotation is initialized, it will handle all the incoming and outgoing HTTP requests.- We have created a separate class for the RestTemplate controller below. This class will call the HTTP methods from the Employee Controller and return the result after fetching the response from the Employee Controller.
@RequestMapping()– This annotation adds the HTTP API path from where the resource needs to be accessed.- We have created 4 methods in the above controller class that will basically return the desired response.
- GET
- POST
- PUT
- DELETE
#RestTemplateController.java
@RestController
public class RestTemplateController {
private final String URI_EMPLOYEE = "http://localhost:8081/employees/";
private final String URI_EMPLOYEE_ID = "http://localhost:8081/employees/{id}";
@Autowired
RestTemplate restTemplate;
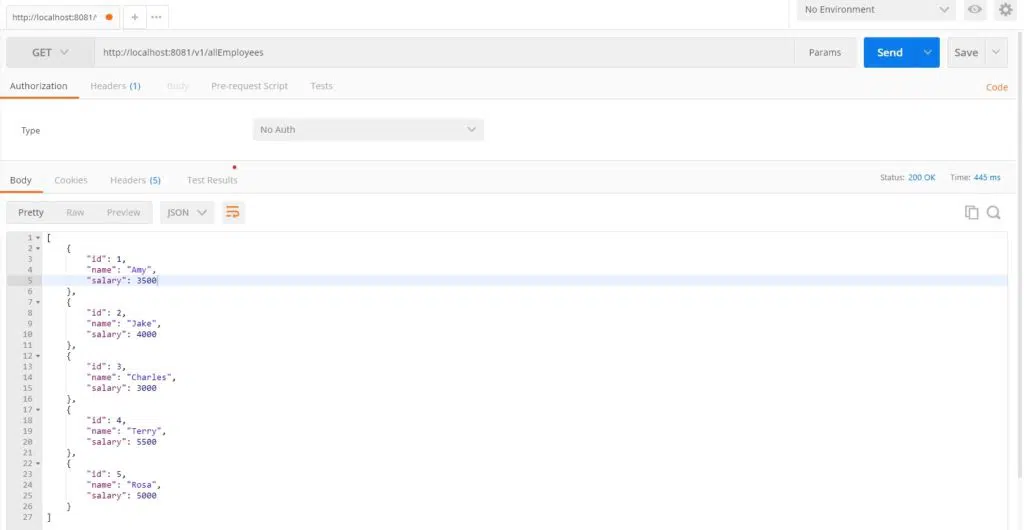
@GetMapping("/v1/allEmployees")
public ResponseEntity getAllV1() {
Employee[] EmployeesArray = restTemplate.getForObject(URI_EMPLOYEE, Employee[].class);
return new ResponseEntity < > (Arrays.asList(EmployeesArray), HttpStatus.OK);
}
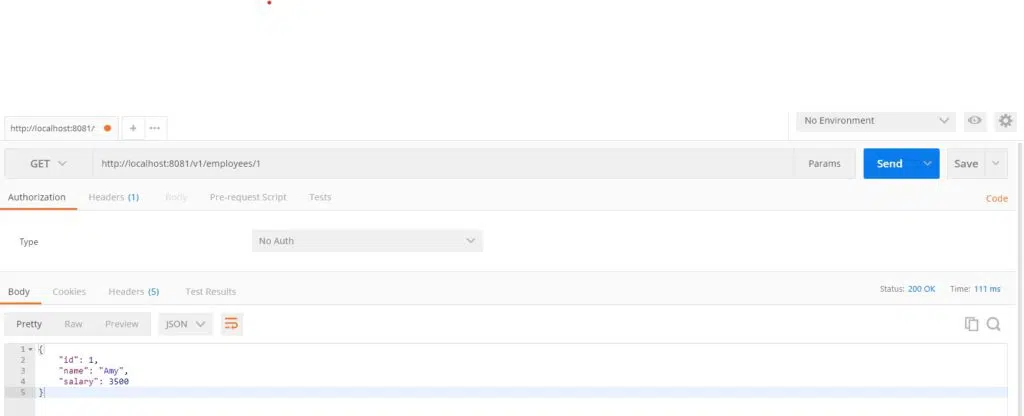
@GetMapping("/v1/employees/{id}")
public ResponseEntity getByIdV1(@PathVariable final Integer id) {
Map < String, String > params = new HashMap < > ();
params.put("id", String.valueOf(id));
Employee Employee = restTemplate.getForObject(URI_EMPLOYEE_ID, Employee.class, params);
return new ResponseEntity < > (Employee, HttpStatus.OK);
}
@GetMapping("/v2/allEmployees")
public ResponseEntity getAllV2() {
ResponseEntity < Employee[] > responseEntity = restTemplate.getForEntity(URI_EMPLOYEE, Employee[].class);
return responseEntity;
}
@GetMapping("/v2/employees/{id}")
public ResponseEntity getByIdV2(@PathVariable final Integer id) {
Map < String, String > params = new HashMap < > ();
params.put("id", String.valueOf(id));
ResponseEntity < Employee > responseEntity = restTemplate.getForEntity(URI_EMPLOYEE_ID, Employee.class, params);
return responseEntity;
}
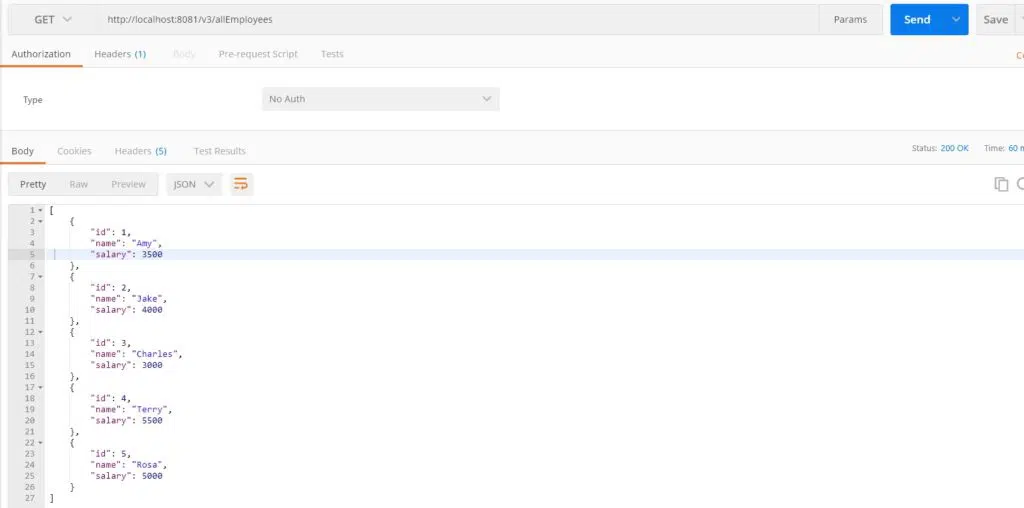
@GetMapping("/v3/allEmployees")
public ResponseEntity getAllV3() {
HttpHeaders httpHeaders = new HttpHeaders();
httpHeaders.setAccept(Collections.singletonList(MediaType.APPLICATION_JSON));
HttpEntity < String > entity = new HttpEntity < > (httpHeaders);
return restTemplate.exchange(URI_EMPLOYEE, HttpMethod.GET, entity, Employee[].class);
}
@GetMapping("/v3/employees/{id}")
public ResponseEntity getByIdV3(@PathVariable final Integer id) {
HttpHeaders httpHeaders = new HttpHeaders();
httpHeaders.setAccept(Collections.singletonList(MediaType.APPLICATION_JSON));
HttpEntity < String > entity = new HttpEntity < > (httpHeaders);
return restTemplate.exchange(URI_EMPLOYEE + id, HttpMethod.GET, entity, Employee.class);
}
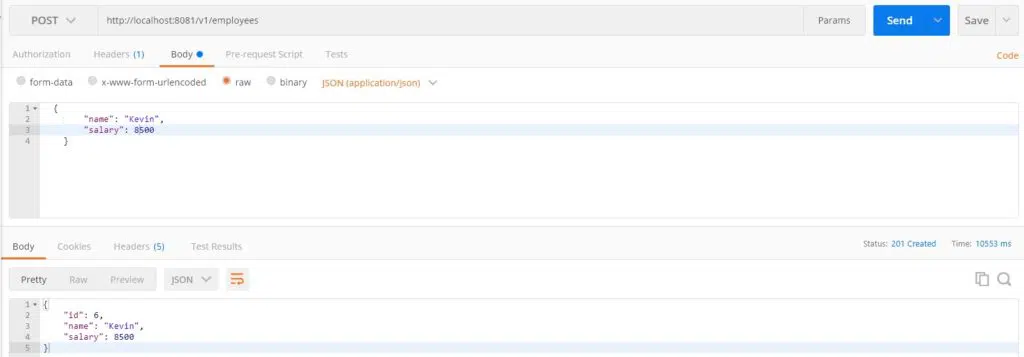
@PostMapping("/v1/employees")
public ResponseEntity createV1(@RequestBody final Employee newEmployee) {
Employee createdEmployee = restTemplate.postForObject(URI_EMPLOYEE, newEmployee, Employee.class);
return new ResponseEntity(createdEmployee, HttpStatus.CREATED);
}
@PostMapping("/v2/employees")
public ResponseEntity createV2(@RequestBody final Employee newEmployee) {
HttpHeaders httpHeaders = new HttpHeaders();
httpHeaders.setAccept(Collections.singletonList(MediaType.APPLICATION_JSON));
HttpEntity < Employee > entity = new HttpEntity < > (newEmployee, httpHeaders);
return restTemplate.exchange(URI_EMPLOYEE, HttpMethod.POST, entity, Employee.class);
}
@PutMapping("/v1/employees/{id}")
public ResponseEntity updateEmployeeV1(@PathVariable final Integer id, @RequestBody Employee newEmployee) {
Map < String, String > params = new HashMap < > ();
params.put("id", String.valueOf(id));
restTemplate.put(URI_EMPLOYEE_ID, newEmployee, params);
return new ResponseEntity("Employee Updated with id " + id, HttpStatus.OK);
}
@PutMapping("/v2/employees/{id}")
public ResponseEntity updateEmployeeV2(@PathVariable final Integer id, @RequestBody Employee newEmployee) {
HttpHeaders httpHeaders = new HttpHeaders();
httpHeaders.setAccept(Collections.singletonList(MediaType.APPLICATION_JSON));
HttpEntity < Employee > entity = new HttpEntity < > (newEmployee, httpHeaders);
return restTemplate.exchange(URI_EMPLOYEE + id, HttpMethod.PUT, entity, Employee.class);
}
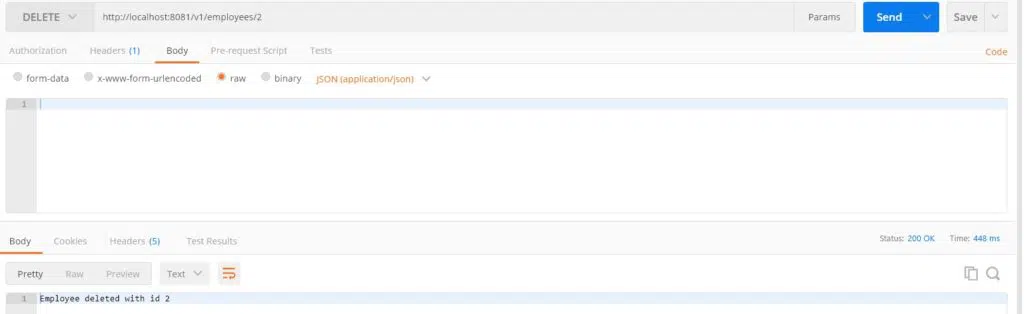
@DeleteMapping("/v1/employees/{id}")
public ResponseEntity deleteV1(@PathVariable final Integer id) {
Map < String, String > params = new HashMap < > ();
params.put("id", String.valueOf(id));
restTemplate.delete(URI_EMPLOYEE_ID, params);
return new ResponseEntity < > ("Employee deleted with id " + id, HttpStatus.OK);
}
@DeleteMapping("/v2/employees/{id}")
public ResponseEntity < Employee > deleteV2(@PathVariable final Integer id) {
HttpHeaders httpHeaders = new HttpHeaders();
httpHeaders.setAccept(Collections.singletonList(MediaType.APPLICATION_JSON));
HttpEntity < Employee > entity = new HttpEntity < > (httpHeaders);
return restTemplate.exchange(URI_EMPLOYEE + id, HttpMethod.DELETE, entity, Employee.class);
}
}4. Method API
Spring Boot RestTemplate provides 3 types of methods for invoking a GET API.
4.1. GET API
The getForObject() will fire a GET request and return the resource object directly. In code, we can wrap the output in a ResponseEntity object or just simply return the resource object as it is. We use it when we want to map response directly to resource DTO.
@GetMapping("/v1/allEmployees")
public ResponseEntity getAllV1() {
    Employee[] EmployeesArray = restTemplate.getForObject(URI_EMPLOYEE, Employee[].class);
    return new ResponseEntity < > (Arrays.asList(EmployeesArray), HttpStatus.OK);
}

@GetMapping("/v1/employees/{id}")
public ResponseEntity getByIdV1(@PathVariable final Integer id) {
    Map < String, String > params = new HashMap < > ();
    params.put("id", String.valueOf(id));
    Employee Employee = restTemplate.getForObject(URI_EMPLOYEE_ID, Employee.class, params);
    return new ResponseEntity < > (Employee, HttpStatus.OK);
}
The getForEntity() will fire a GET request and return ResponseEntity which contains both the status code and resource as an object. We can use it when we want to get a response like JSON.
@GetMapping("/v1/allEmployees")
public ResponseEntity getAllV1() {
    Employee[] EmployeesArray = restTemplate.getForObject(URI_EMPLOYEE, Employee[].class);
    return new ResponseEntity < > (Arrays.asList(EmployeesArray), HttpStatus.OK);
}

@GetMapping("/v1/employees/{id}")
public ResponseEntity getByIdV1(@PathVariable final Integer id) {
    Map < String, String > params = new HashMap < > ();
    params.put("id", String.valueOf(id));
    Employee Employee = restTemplate.getForObject(URI_EMPLOYEE_ID, Employee.class, params);
    return new ResponseEntity < > (Employee, HttpStatus.OK);
}
The exchange() method is the most generic API, which can invoke a GET/POST/PUT/DELETE request. Input to the API is the URI, request method, request HttpEntity containing headers and entity code (if any), and the response type class. The output is a ResponseEntity object containing the status code and resource as a body.
@GetMapping("/v3/allEmployees")
public ResponseEntity getAllV3() {
    HttpHeaders httpHeaders = new HttpHeaders();
    httpHeaders.setAccept(Collections.singletonList(MediaType.APPLICATION_JSON));
    HttpEntity < String > entity = new HttpEntity < > (httpHeaders);
    return restTemplate.exchange(URI_EMPLOYEE, HttpMethod.GET, entity, Employee[].class);
}

@GetMapping("/v3/employees/{id}")
public ResponseEntity getByIdV3(@PathVariable final Integer id) {
    HttpHeaders httpHeaders = new HttpHeaders();
    httpHeaders.setAccept(Collections.singletonList(MediaType.APPLICATION_JSON));
    HttpEntity < String > entity = new HttpEntity < > (httpHeaders);
    return restTemplate.exchange(URI_EMPLOYEE + id, HttpMethod.GET, entity, Employee.class);
}
4.2. POST API
Spring Boot RestTemplate provides 4 types of methods for invoking a POST API. Let’s look at each of them for clarity.
- postForLocation()–It will fire a POST request which will take URI, employee request body and return the location of the newly created resource.
- postForEntity() – It will fire a POST request which will take URI, employee request body, and
responseTypeas input and return the resource as JSON. - postForObject()–It will fire a POST request which will take URI, employee request body, and
responseTypeas input and return the resource object.
@PostMapping("/v1/employees")
public ResponseEntity createV1(@RequestBody final Employee newEmployee) {
    Employee createdEmployee = restTemplate.postForObject(URI_EMPLOYEE, newEmployee, Employee.class);
    return new ResponseEntity(createdEmployee, HttpStatus.CREATED);
}
The exchange() API
@PostMapping("/v2/employees")
public ResponseEntity createV2(@RequestBody final Employee newEmployee) {
    HttpHeaders httpHeaders = new HttpHeaders();
    httpHeaders.setAccept(Collections.singletonList(MediaType.APPLICATION_JSON));
    HttpEntity < Employee > entity = new HttpEntity < > (newEmployee, httpHeaders);
    return restTemplate.exchange(URI_EMPLOYEE, HttpMethod.POST, entity, Employee.class);
}
4.3. DELETE API
Spring Boot RestTemplate provides 2 types of methods for invoking a DELETE API. The delete() method will fire a delete request. Let’s see some code example for better clarity.
@DeleteMapping("/v1/employees/{id}")
public ResponseEntity deleteV1(@PathVariable final Integer id) {
    Map < String, String > params = new HashMap < > ();
    params.put("id", String.valueOf(id));
    restTemplate.delete(URI_EMPLOYEE_ID, params);
    return new ResponseEntity < > ("Employee deleted with id " + id, HttpStatus.OK);
}

@DeleteMapping("/v2/employees/{id}")
public ResponseEntity < Employee > deleteV2(@PathVariable final Integer id) {
    HttpHeaders httpHeaders = new HttpHeaders();
    httpHeaders.setAccept(Collections.singletonList(MediaType.APPLICATION_JSON));
    HttpEntity < Employee > entity = new HttpEntity < > (httpHeaders);
    return restTemplate.exchange(URI_EMPLOYEE + id, HttpMethod.DELETE, entity, Employee.class);
}
5. Running the Application
We can run the application from the main method in our application class. And then we can use Postman to test the endpoints.
6. Testing the endpoints using Spring Boot RestTemplate
Let’s test these endpoints using the Spring RestTemplate.
7. Configuring Timeout Using RestTemplate
We can configure RestTemplate by adding a timeout to the connection, using ClientHttpRequestFactory. We can also add more configurations using HttpClient. We have to add httpclient dependency for the same.
<dependency>
   <groupId>org.apache.httpcomponents</groupId>
   <artifactId>httpclient</artifactId>
</dependency>
We will create another bean of RestTemplate and will pass the ClinetHttpRequestFactory object as a dependency. We can give timeout duration to the ClientHttpRequestFactory bean.
@Bean("restTemplateWithTimeout")
RestTemplate restTemplateWithTimeout() {
    return new RestTemplate(getClientHttpRequestFactory());
}

ClientHttpRequestFactory getClientHttpRequestFactory() {
    int timeout = 5000;
    HttpComponentsClientHttpRequestFactory clientHttpRequestFactory
        = new HttpComponentsClientHttpRequestFactory();
    clientHttpRequestFactory.setConnectTimeout(timeout);
    return clientHttpRequestFactory;
}

ClientHttpRequestFactory getClientHttpRequestFactoryV1() {
    int timeout = 5000;
    RequestConfig config = RequestConfig.custom()
        .setConnectTimeout(timeout)
        .setConnectionRequestTimeout(timeout)
        .setSocketTimeout(timeout)
        .build();
    CloseableHttpClient client = HttpClientBuilder
        .create()
        .setDefaultRequestConfig(config)
        .build();
    return new HttpComponentsClientHttpRequestFactory(client);
}
Summary
In this article, we created an end-to-end Spring Boot application and called its endpoints using the Spring Boot rest template controller that was created. We went over the main HTTP methods and used the RestTemplate to orchestrate the requests using all these methods. The source for this article is available on out GitHub repository.