In this article, we will cover the famous Spring Boot Whitelabel error page. We are covering how to disable the default error page and how we can customize the Whitelabel error page in your Spring Boot application.
Introduction
Spring Boot uses a default Whitelabel error page in case server error. This is not very helpful and we may want to give more relevant information to the customer in a production environment. This article focuses on the Spring Boot whitelabel error page. We will learn how to disable this default behavior and how we can use our own custom error page to align with our UI.
1. Disabling Whitelabel Error Page
There are multiple ways to disable this behavior in your Spring Boot application. Let’s cover common options to do this.
1.1 Using Properties File
Spring Boot provides an application.properties (or YAML) file to easily configure/change your application. We can use the same property file to disable this error page globally. Set server.error.whitelabel.enabled to false to achieve this.
# Whether to enable the default error page displayed in browsers in case of a server error.
server.error.whitelabel.enabled=false
Please know that using the above configuration will restore the default of the servlet container you are using. This means that if you are not using any custom error page, the default servlet container error page shown to the customer (like default tomcat server error page).
Another option is to exclude ErrorMvcAutoConfiguration from your application using application.properties file.
spring.autoconfigure.exclude=org.springframework.boot.autoconfigure.web.servlet.error.ErrorMvcAutoConfigurationFor Spring Boot 1.x application use ErrorMvcAutoConfiguration in exclude the list.
1.2 Exclude using @EnableAutoConfiguration
In case you like to exclude using the code, you have the option to pass exclude configuration list to the @EnableAutoConfiguration annotation.
@SpringBootApplication
@EnableAutoConfiguration(exclude = {
 ErrorMvcAutoConfiguration.class
})
public class SpringBootApplication { //application code
}
2. Custom Error Page
As suggested, one of the first options is to Overriding the error page with your own template. For this post, we are taking Thymeleaf as our underlying templating engine. We create a custom error page with name error.html and save it under resources/templates directory. In case of error, Spring Boot system will automatically pick this custom error page. Let’s see how the page looks like before customizing error page.

Let’s create our custom error.html and place it under the <em>resources/templates</em> directory.
<!DOCTYPE html>
<html lang="en">
   <head>
      <title>We've got some trouble</title>
   </head>
   <body>
      <div class="cover">
         <h1>Our apologies.</h1>
         <p class="lead">This page stepped out for a quick ride.</p>
         <p>Please go back to our homepage to restart your browsing experience.</p>
      </div>
   </body>
</html>
If we run our application, this is how the output shown to the customer.

Once we add the error.html in the templates directory, Spring Boot BasicErrorController automatically pick our custom template.
3. Custom ErrorController
If the above options are not suitable for your need or if we want to have a better control on the error handling mechanism, we have the option to extend Spring’s ErrorController with our own implementation. We need to implement the ErrorController interface and overrides its getErrorPath()to return a custom path.
package com.javadevjournal.controller;

import org.springframework.boot.web.servlet.error.ErrorController;
import org.springframework.stereotype.Controller;
import org.springframework.web.bind.annotation.RequestMapping;

@Controller
public class CustomErrorController implements ErrorController {

 private static final String PATH = "/error";

 @RequestMapping(value = PATH)
 public String error() {
  return "customError";
 }

 @Override
 public String getErrorPath() {
  return PATH;
 }
}
Let’s have a look at the above code.
- Our controller creates a mapping for the path as returned by
getErrorPath()method. - ErrorController interface shows that a
@Controlleris used to render errors. - We have the option to use
getErrorPath()to return different error pages based on the error type.
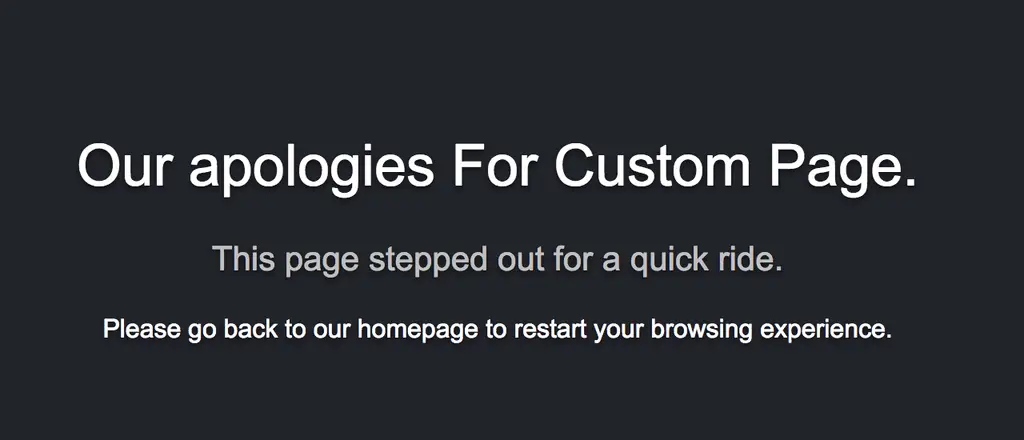
Let’s create a new error page which we will use in this new controller method.
<!DOCTYPE html>
<html lang="en">
   <head>
      <title>We've got some trouble</title>
   </head>
   <body>
      <div class="cover">
         <h1>Our apologies For Custom Page.</h1>
         <p class="lead">This page stepped out for a quick ride.</p>
         <p>Please go back to our homepage to restart your browsing experience.</p>
      </div>
   </body>
</html>
When we run our application this time, we will have a different error page displayed to the customer.
Summary
In this post, we cover how to disable Spring Boot Whitelabel error page and how we can customize the Whitelabel error page in your Spring Boot application. We learned how to extend the error handling mechanism by implementing ErrorController in the custom error handling controller.