In this article, we will see how to use Spring Boot with H2 Database.Just like other databases, there’s full intrinsic support for it in the Spring Boot ecosystem.
Spring Boot with H2 Database
H2 database is a relatively new and an open-source, in-memory relational database management system that is written in Java. Just like other in-memory databases, H2 database relies on system memory for loading and persisting the data, instead of physical disk storage. It is an embedded database which we can use in our java application or run in a client-server mode.In-memory databases are very fast as the data access is done from System memory, rather than disk storage. They are volatile, i.e., in case of application restart, all the data is lost.
We can use in-memory databases like H2 for POCs and during the development phase when iterating through schema changes without making changes to actual persistent databases like MYSQL. Another use case where H2 is used is during the unit testing of our applications. H2 database can’t be used for production application.
1. H2 Database Configuration With Spring Boot
To use Spring Boot with H2 Database, we need to configure H2 database in our application.Configuration is pretty straight forward if we are using Spring. We first need to add the required dependency for H2 in pom.xml if using maven as build tool. After the required dependency is added to the project, we need to add following properties to application.properties or application.yaml file. In this way, by adding required properties to the properties file, we can connect to any database. Here are some of the properties that are important while we setting up the H2 Database with Sprig Boot.
- data source URL: To establish a database connection, Java’s
Datasourceinterface uses a URL and some credentials. In the URL, we need to provide the names of in-memory database and schema. Since we are using H2 database, ‘mem’ is the name of the in-memory database and ‘testdb’ is the name of schema, provided by H2 by default. - driver class name: H2 is a java database and we can interact with it by using JDBC. For that first we need to register the JDBC database driver. Here we provide the driver class name.
- username: By default, the username provided is ‘
sa’. We can override this value by setting the appropriate name in theapplication.propertiesfile. - password: By default, the password provided is empty. We can override this value by setting the appropriate password in the
application.propertiesfile.
2. Dependencies
To use Spring Boot with H2 database, we need to add the required H2 dependency.Scope provided is runtime, as we are going to use H2 when running our unit test cases. If we are using maven as build tool, add the below dependency in pom.xml.
<dependency>
   <groupId>com.h2database</groupId>
   <artifactId>h2</artifactId>
   <scope>runtime</scope>
</dependency>
Alternatively, we can use gradle script as below:
dependencies {
    compile group: 'commons-collections', name: 'commons-collections', version: '3.2'
    testCompile group: 'junit', name: 'junit', version: '4.+'
    compile group: 'com.h2database', name: 'h2', version: '1.3.148'
}
3. H2 Database Configuration With Spring Boot
To be able to connect our application to a database, we need to add below configuration. By default, spring configures our application to connect to an in-memory database like H2 with default values for user as ‘sa’ and empty password. We can override these values in the application.properties or application.yaml file.
spring.datasource.url=jdbc:h2:mem:javadevjournal
spring.datasource.driverClassName=org.h2.Driver
spring.datasource.username=sa
spring.datasource.password=pass
spring.jpa.database-platform=org.hibernate.dialect.H2Dialect
Alternatively, we can use application.yaml file for the configuration:
spring:
   datasource:
      url: jdbc:h2:mem: javadevjournal
      username: sa
      password: pass
      driverClassName: org.h2.Driver
   jpa:
      spring.jpa.database-platform: org.hibernate.dialect.H2Dialect
H2 database supports two persistence modes. In-memory and file-based storage. Adding the above properties will provide an in-memory H2 implementation, which is volatile, i.e., data will be lost when application restarts.
If we need a file-based storage, then we can update the spring.datasource.url property in the application.properties or application.yaml file.
spring.datasource.url=jdbc:h2:file:/data/filenameWe can also use the yaml configuration for this:
spring:
  datasource:
    url:  jdbc:h2:file:/data/filename
4. Handling Database Operations
Let’s take a look at some database operations for our Spring Boot with H2 Database application.Performing the database operations like CRUD with H2 in a Spring boot project is similar as with other SQL databases.
4.1. Initializing the DataSource
To use a database like MYSQL, we first need to install them, then create the schemas, and then create the tables and populate data. When using an in-memory database, we don’t need to separately install a database. The database and the schema live inside the memory of the application we are running. Database schema is created looking at the configuration provided to the application. We can provide SQL scripts to initialize the database which can contain create table and insert to table queries. If we have a spring boot project and JPA dependency, then, by looking at the entities present, entire database will be created at application start up.
To populate the data in tables at application start up, we can add data.sql file in src/main/resources folder. By default, Spring boot will automatically pick this file and run it against our embedded H2 database instance. We can change this default behavior by setting spring.sql.init.mode to never.
INSERT INTO employee (id, name, salary) VALUES (1, 'Amy', 3500.0);
INSERT INTO employee (id, name, salary) VALUES (2, 'Jake', 4000.0);
INSERT INTO employee (id, name, salary) VALUES (3, 'Charles', 3000.0);
INSERT INTO employee (id, name, salary) VALUES (4, 'Terry', 5500.0);
INSERT INTO employee (id, name, salary) VALUES (5, 'Rosa', 5000.0);
4.2. Using Hibernate
The data.sql script executes before hibernate initialization by default. Since we are recreating the schema generated by Hibernate every time, we need to set one more property.
spring.jpa.defer-datasource-initialization=trueBy setting this property, data.sql will be executed after schema generation is done by hibernate. Also, we can use schema.sql to overwrite the schema generated by hibernate prior to data population using data.sql.
5. Building Spring Boot App Using H2 Database
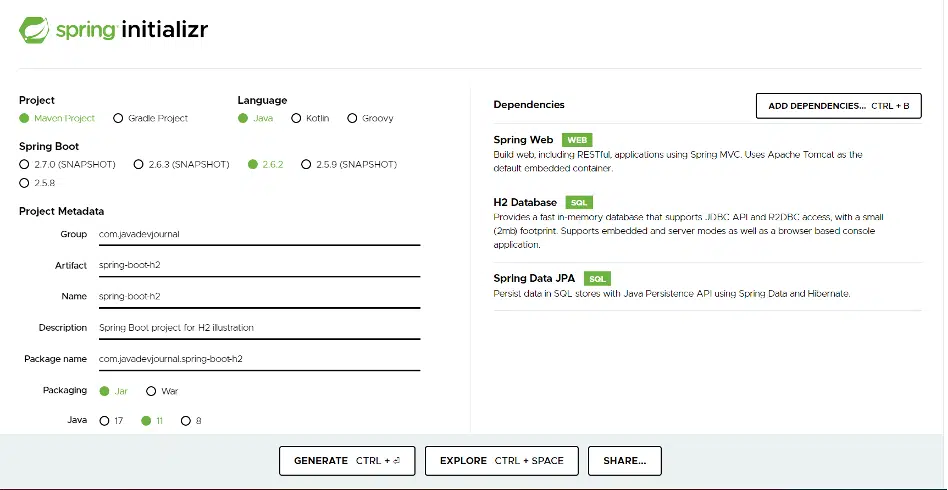
Let’s build an application using Spring Boot with H2 Database.We will create an employee entity and perform CRUD operations on it in a REST application.We are using spring initializr to get the project structure ready.
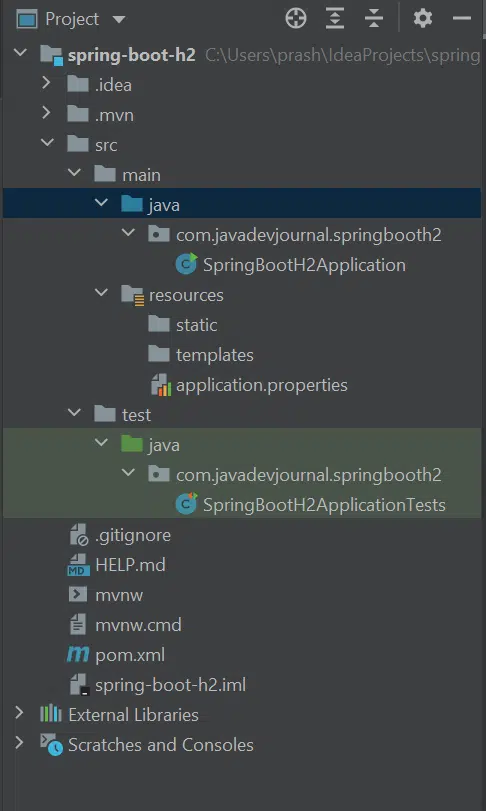
Here is how the project structure look like after we import it to the IDE of choice:
This is how the complete pom.xml look like. Please aware that it can change based on the dependencies used for your project.
<?xml version="1.0" encoding="UTF-8"?>
<project xmlns="http://maven.apache.org/POM/4.0.0" xmlns:xsi="http://www.w3.org/2001/XMLSchema-instance" xsi:schemaLocation="http://maven.apache.org/POM/4.0.0 https://maven.apache.org/xsd/maven-4.0.0.xsd">
   <modelVersion>4.0.0</modelVersion>
   <parent>
      <groupId>org.springframework.boot</groupId>
      <artifactId>spring-boot-starter-parent</artifactId>
      <version>2.6.2</version>
      <relativePath />
      <!-- lookup parent from repository -->
   </parent>
   <groupId>com.javadevjournal</groupId>
   <artifactId>spring-boot-h2</artifactId>
   <version>0.0.1-SNAPSHOT</version>
   <name>spring-boot-h2</name>
   <description>Spring Boot project for H2 illustration</description>
   <properties>
      <java.version>1.8</java.version>
   </properties>
   <dependencies>
      <dependency>
         <groupId>org.springframework.boot</groupId>
         <artifactId>spring-boot-starter-data-jpa</artifactId>
      </dependency>
      <dependency>
         <groupId>org.springframework.boot</groupId>
         <artifactId>spring-boot-starter-web</artifactId>
      </dependency>
      <dependency>
         <groupId>com.h2database</groupId>
         <artifactId>h2</artifactId>
         <scope>runtime</scope>
      </dependency>
      <dependency>
         <groupId>org.springframework.boot</groupId>
         <artifactId>spring-boot-starter-test</artifactId>
         <scope>test</scope>
      </dependency>
   </dependencies>
   <build>
      <plugins>
         <plugin>
            <groupId>org.springframework.boot</groupId>
            <artifactId>spring-boot-maven-plugin</artifactId>
            <configuration>
               <excludes>
                  <exclude>
                     <groupId>org.projectlombok</groupId>
                     <artifactId>lombok</artifactId>
                  </exclude>
               </excludes>
            </configuration>
         </plugin>
      </plugins>
   </build>
</project>
5.1. Defining Entity Model
First, we will create our Employee entity class annotated with @Entity to tell JPA that this will be mapped to a table in database.
package com.javadevjournal.springbooth2.model;

import javax.persistence.*;

@Entity
@Table(name = "EMPLOYEE")
public class Employee {

    @Id
    @GeneratedValue(strategy = GenerationType.IDENTITY)
    Integer id;
    String name;
    Double salary;

    public Integer getId() {
        return id;
    }

    public String getName() {
        return name;
    }

    public void setName(String name) {
        this.name = name;
    }

    public Double getSalary() {
        return salary;
    }

    public void setSalary(Double salary) {
        this.salary = salary;
    }
}
5.2. Creating Repository Interface
Since we are using spring data JPA starter to our project, we can create a repository interface and extend JpaRepository interface and provide the entity this repository needs to manage, which in this case is Employee along with the type of primary key.
package com.javadevjournal.springbooth2.repository;

import com.javadevjournal.springbooth2.model.Employee;
import org.springframework.data.jpa.repository.JpaRepository;
import org.springframework.stereotype.Repository;

@Repository
public interface EmployeeRepository extends JpaRepository < Employee, Integer > {

}
5.3. Creating Service
Then we will create our service class which will contain logic to perform CRUD operations to our employee entity.
package com.javadevjournal.springbooth2.service;

import com.javadevjournal.springbooth2.model.Employee;
import com.javadevjournal.springbooth2.repository.EmployeeRepository;
import org.springframework.beans.factory.annotation.Autowired;
import org.springframework.stereotype.Service;

import java.util.ArrayList;
import java.util.List;

@Service
public class EmployeeService {

    @Autowired
    EmployeeRepository employeeRepository;

    public List getAllEmployees() {
        List employees = new ArrayList();
        employeeRepository.findAll().forEach(employee - > employees.add(employee));
        return employees;
    }

    public Employee getEmployeeById(int id) {
        return employeeRepository.findById(id).get();
    }

    public void saveOrUpdate(Employee employee) {
        employeeRepository.save(employee);
    }

    public void delete(int id) {
        employeeRepository.deleteById(id);
    }
}
5.4. Rest Controller
To test Spring Boot with H2 Database, let’s create a simple REST controller to test our CURD methods.
package com.javadevjournal.springbooth2.controller;

import com.javadevjournal.springbooth2.model.Employee;
import com.javadevjournal.springbooth2.service.EmployeeService;
import org.springframework.beans.factory.annotation.Autowired;
import org.springframework.http.HttpStatus;
import org.springframework.http.ResponseEntity;
import org.springframework.web.bind.annotation.*;

import java.util.List;

@RestController
public class EmployeeController {

    @Autowired
    EmployeeService employeeService;

    @GetMapping("/employees")
    private List getAllEmployees() {
        return employeeService.getAllEmployees();
    }

    @GetMapping("/employees/{id}")
    private Employee getEmployeeById(@PathVariable("id") int id) {
        return employeeService.getEmployeeById(id);
    }

    @PostMapping("/employees")
    private ResponseEntity createEmployee(@RequestBody Employee employee) {
        try {
            employeeService.saveOrUpdate(employee);
        } catch (Exception exception) {
            return new ResponseEntity(HttpStatus.INTERNAL_SERVER_ERROR);
        }
        return new ResponseEntity("New employee created with id: " + employee.getId(), HttpStatus.CREATED);
    }

    @DeleteMapping("/employees/{id}")
    private ResponseEntity deleteById(@PathVariable("id") int id) {
        try {
            employeeService.delete(id);
        } catch (Exception exception) {
            return new ResponseEntity(HttpStatus.INTERNAL_SERVER_ERROR);
        }
        return new ResponseEntity("Employee deleted with id: " + id, HttpStatus.OK);
    }
}
6. Running Application
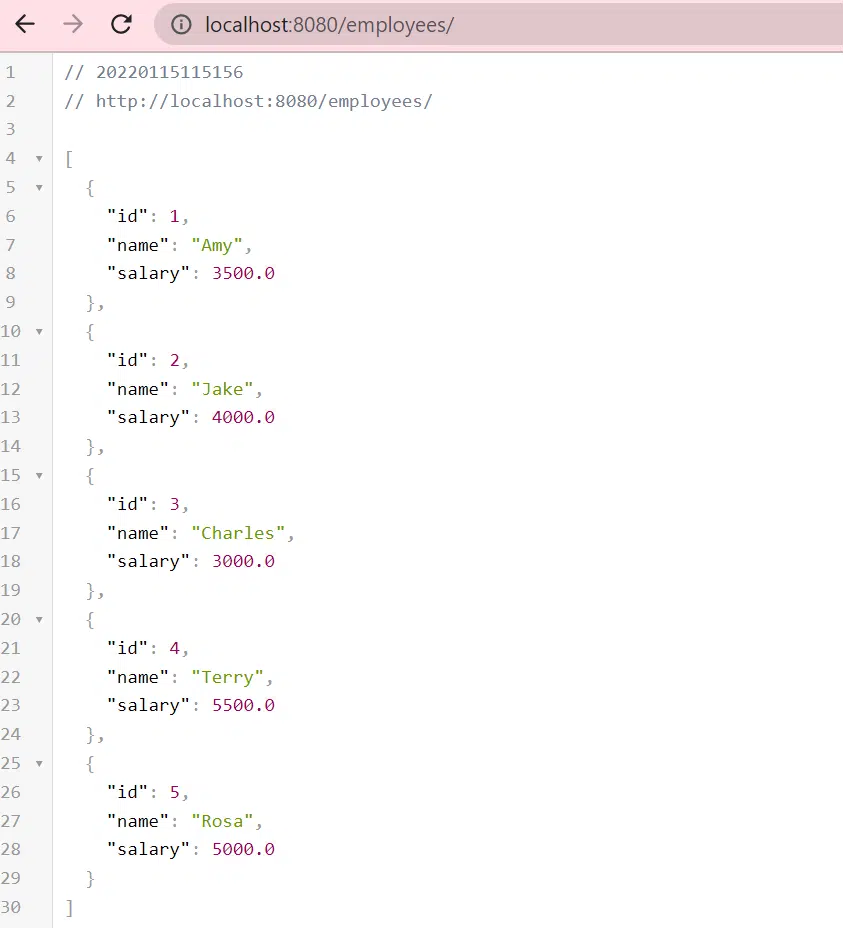
Let’s run our application to see how the overall configuration of H2 database with Spring Boot working.Run our application by hitting run on our main class. The embedded tomcat server will start on default port 8080

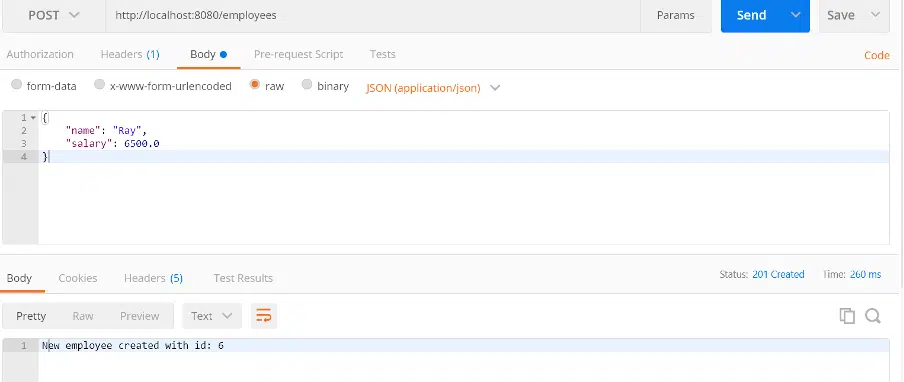
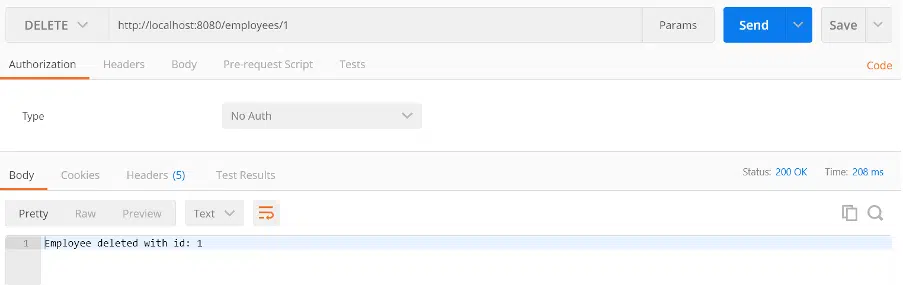
We will start hitting our end points from browser, alternatively, we can use postman.
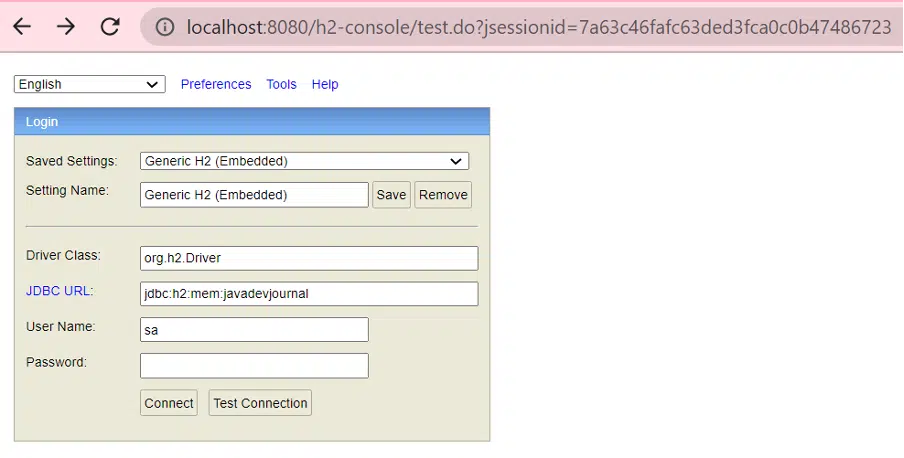
7. H2 Console With Spring Boot
H2 database has an embedded GUI console for browsing the contents of the database and running queries. To enable H2 console and use it with Spring Boot, we need to add the following property to application.properties: spring.h2.console.enabled=true.Open the URL in the browser and click on the connect to the database.
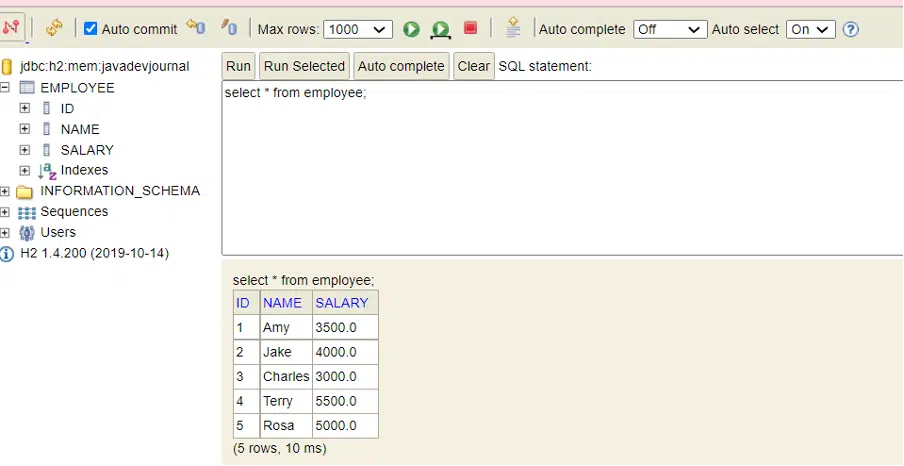
Once connected, we can see the database structure including details of our employee table and the contents which were populated at time of application start up using data.sql script.
Let’s try to delete an employee using H2 console and delete another employee using the Delete request using POSTMAN.
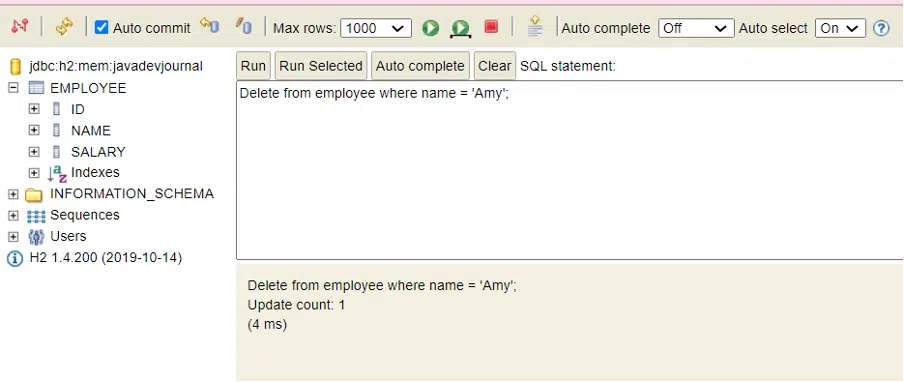
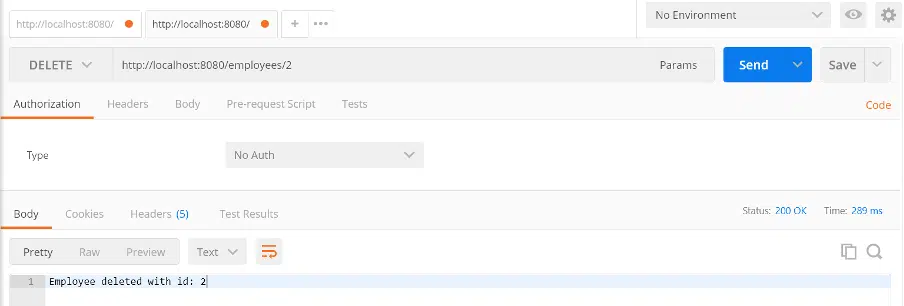
We can see that the employee table is updated and the two rows have been deleted.

Summary
In this article , we saw how to use Spring Boot With H2 Database. We saw how we can create a spring boot application and configure H2. We also accessed database using H2 console and manipulating data at runtime via our REST APIs.The source code for this article is available on our GitHub Repository.