Spring bean validation provides a powerful and flexible feature for data validation. In this article we will see how to configure custom validation MessageSource in Spring Boot.
Introduction
MessageSource is a powerful feature available in Spring applications. MessageSource is an interface that defines several methods for resolving messages. The ApplicationContext interface extends this interface so that all application contexts can resolve text messages. While working with validation API, we may want to display custom or user friendly messages to the customer. In this post, we will walk you through the steps to configure custom validation MessageSource in your application using Spring Boot.
1. Maven Configuration
We will create a Spring Boot web application in this post. Add the spring-boot-starter-web starter in your pom.xml to enable JSR 303 bean validation for your application. This is how our pom.xml look like:
<dependencies>
    <dependency>
        <groupId>org.springframework.boot</groupId>
        <artifactId>spring-boot-starter-thymeleaf</artifactId>
    </dependency>
    <dependency>
        <groupId>org.springframework.boot</groupId>
        <artifactId>spring-boot-starter-web</artifactId>
    </dependency>
    <dependency>
        <groupId>org.springframework.boot</groupId>
        <artifactId>spring-boot-starter-test</artifactId>
        <scope>test</scope>
    </dependency>
</dependencies>
If you are working on a Spring Boot standalone application, you need to add the spring-boot-starter-validation in your pom.xml file:
2. Custom Validation Application
To see custom validation MessageSource in action, let’s create a simple example with following use cases:
- Customer need to register with our application.
- To register, they need to fill up a form, in case of missing or invalid values, we want to show helpful error messages to the customer
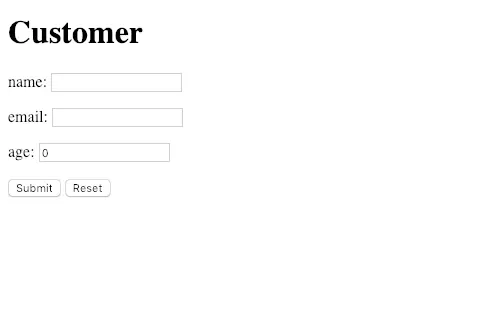
This is how our output will look like at the end of this post 
2.1 Customer Input Form
To accept the customer information, we need to create customer input form. We will add validation constraints to this form. The bean validator will read These constraints and return error in case input data is not meeting these constraints. Let’s have a look at our bean class:
public class Customer implements Serializable {

    @NotEmpty(message = "{name.not.empty}")
    private String name;

    @Email(message = "{email.not.valid}")
    private String email;

    @Min(value = 21,message = "{age.adult.only}")
    private int age;

    //getter and setters
}
Let’s inspect few important points:
- We added a custom property (e.g.
name.not.empty) the MessageSource configuration will resolve that.
3. The MessageSource Bean
Let’s define the MessageSource bean with detail about our resource bundle and encoding. You can define this bean in your application configuration class. We will use the ReloadableResourceBundleMessageSource that accesses resource bundles using specified base names:
@Bean
   public MessageSource messageSource() {
      ReloadableResourceBundleMessageSource messageSource = new ReloadableResourceBundleMessageSource();
      messageSource.setBasename("classpath:messages");
      messageSource.setDefaultEncoding("UTF-8");
      return messageSource;
   }
4. LocalValidatorFactoryBean
To use our custom message, we need to register our MessageSource bean with the LocalValidatorFactoryBean. We will define this bean in the same configuration class:
@Bean
 public LocalValidatorFactoryBean validator(MessageSource messageSource) {
    LocalValidatorFactoryBean bean = new LocalValidatorFactoryBean();
    bean.setValidationMessageSource(messageSource);
    return bean;
 }
5. Defining Property Files
The next step is to define the property files for our application. These properties file will contains the local specific message. Spring will automatically take care of referring the correct property file based on the locale. You need to create these files under src/resource directory. While creating these files, use the correct naming convention like messages_{locale}.properties.For this post, I will create two properties file (English and German).
This is how our properties file look like:
#English
name.not.empty=Please provide your name
email.not.valid=Plese provide valid email address
age.adult.only=You must be at least 21 for the registration
#German
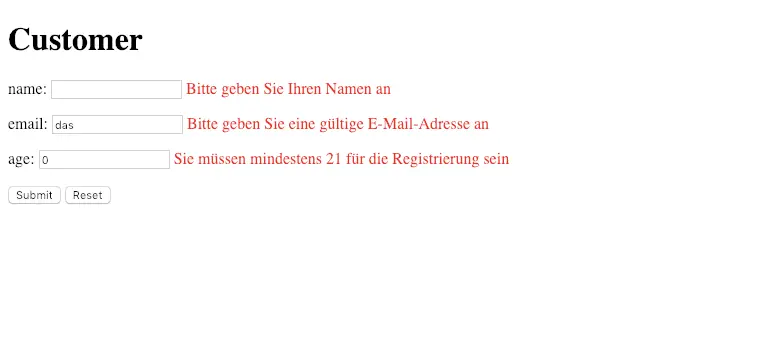
name.not.empty=Bitte geben Sie Ihren Namen an
email.not.valid=Bitte geben Sie eine gültige E-Mail-Adresse an
age.adult.only=Sie müssen mindestens 21 für die Registrierung sein[pullquote align=”normal”]I have used Google translator for this. Please correct me if something not translated correctly. [/pullquote]
6. Locale Resolver and Locale Change Interceptor
LocalResolver is required to decide which local is currently used. We will use session based LocalResolver in our sample code. We need to configure an interceptor which allows for changing the current locale on every request, via a configurable request parameter.
@Bean
 public LocaleResolver localeResolver() {
    SessionLocaleResolver localeResolver = new SessionLocaleResolver();
    localeResolver.setDefaultLocale(Locale.US);
    return localeResolver;
 }

 @Bean
 public LocaleChangeInterceptor localeChangeInterceptor() {
    LocaleChangeInterceptor localeChangeInterceptor = new LocaleChangeInterceptor();
    localeChangeInterceptor.setParamName("lang");
    return localeChangeInterceptor;
 }

 @Override
 public void addInterceptors(InterceptorRegistry registry) {
   registry.addInterceptor(localeChangeInterceptor());
 }
7. Sample Controller
Let’s create a simple controller to accept customer registration information and send it back in case there is any error reported by bean validation API. This is how our Spring MVC controller look like:
@Controller
public class CustomerController {

    @GetMapping("/customer")
    public String getCustomer(final Model model) {
        model.addAttribute("customer", new Customer());
        return "customer";
    }

    @PostMapping("/customer")
    public String createCustomer(@Valid Customer customer, BindingResult bindingResult,Model model){

        if(bindingResult.hasErrors()){
            return "customer";
        }
        model.addAttribute("msg", "Customer added");
        model.addAttribute("customer", customer);
        return "customer";
    }
}
8. Testing our Application
It’s time to see our application in action. You can either deploy your application or run your application using the main() method. Once we run our application, we will open the following link http://<<host>>:port/customer
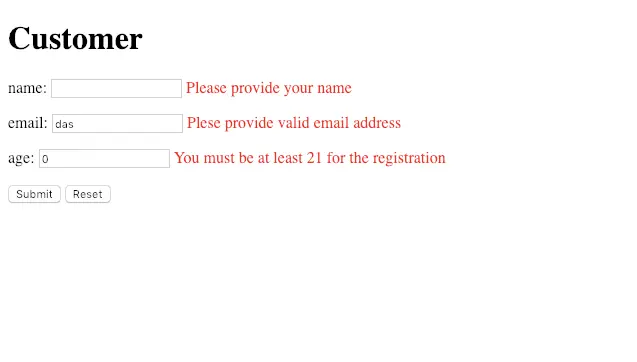
 Hit the submit button filling no value.Once you perform this action, from data will submitted to our controller. The
 @Valid annotation will help Spring MVC to kick in the underlying bean validation framework. Since we are not passing any value, the bean validation API will report validation error. This is how our form look like after validation:
 There are few important points to note:
- Bean validation picks up the English error messages. This happens because the default locale passed to the Spring is
en(my case). - If we pass different locale, Spring bean validation API will try to search messages on local specific messages property file.
To validate, let’s pass the language as DE in the request (http://localhost:8080/customer?lang=de). Since we have the message in German, Spring bean validation API should pick the messages accordingly.
 With above steps, we have configure custom validation MessageSource in Spring Boot. Let’s look at some additional use cases which are very handy
9. Handle Multiple Files and Messages in Spring
Let’s say you want to have multiple files to handle messages, have different messages file for validation, business rules and say for the UI. A layout like:
<code class=""language-java”"><span class="pln">resources
</span><span class="pun">`--</span><span class="pln"> messages
    </span><span class="pun">|--</span><span class="pln"> validation
    </span><span class="pun">|</span>   <span class="pun">|--</span><span class="pln"> validation</span><span class="pun">.</span><span class="pln">properties
    </span><span class="pun">|</span>   <span class="pun">`--</span><span class="pln"> validation_de</span><span class="pun">.</span><span class="pln">properties
    </span><span class="pun">|--</span><span class="pln"> business
    </span><span class="pun">|</span>   <span class="pun">|--</span><span class="pln"> business</span><span class="pun">.</span><span class="pln">properties
    </span><span class="pun">|</span>   <span class="pun">`--</span><span class="pln"> business_de</span><span class="pun">.</span><span class="pln">properties</span>
To handle such use cases, we have following two options:
- Use the
setBasenamesmethod of ReloadableResourceBundleMessageSource. - Create message resources per context
Let’s look at the code:
@Bean
public MessageSource messageSource() {
    ReloadableResourceBundleMessageSource messageSource = new ReloadableResourceBundleMessageSource();
    messageSource.setBasenames("classpath:/messages/business/message",
                               "classpath:/messages/validation/message");
    return messageSource;
}
Context base message resources:
@Bean
public MessageSource businessMessageSource() {
    ReloadableResourceBundleMessageSource messageSource = new ReloadableResourceBundleMessageSource();
    messageSource.setBasename("classpath:/messages/business/message");
    return messageSource;
}

@Bean
public MessageSource validationMessageSource() {
    ReloadableResourceBundleMessageSource messageSource = new ReloadableResourceBundleMessageSource();
    messageSource.setBasename("classpath:/messages/validation/message");
    return messageSource;
}
[pullquote align=”normal”]Spring Boot provides another mechanism to handle internationalization for your application. Read our article Internationalization in Spring Boot for more detail [/pullquote]
Summary
In this article, we saw how to configure custom validation MessageSource in Spring Boot. We saw how to handle these messages through property files and how to use the Spring build in feature to handle localized messages.Source code for this article is available on GitHub.
For @size how can i get max value in message by using placeholders
like size.limit = text can have max {0} characters . so in this message how can i get value of limit from @size.
I think this is what you are looking for https://docs.jboss.org/hibernate/validator/7.0/reference/en-US/html_single/#_examples