In this post, we will look at the Spring REST Docs. We have already covered the Swagger 2 with Spring Boot in the previous post. In this post, we will inspect the advantage of using the Spring REST Docs for documenting your RESTful API.
Introduction
When working on the REST API’s it’s very important that we have an accurate and well-structured documentation. This documentation is the reference point for anyone who want to use our API. Spring REST Docs produce documentation that is accurate, concise, and well-structured. This documentation then allows your users to get the information they need with a minimum of fuss.
1. Spring REST Docs Advantages
Spring REST docs takes a different approach than other tool like Swagger2. It takes documentation work to the different place thus avoid the need to add the documentation information in the controller or other places (Like Swagger2). Spring use the test to produce the REST services documentation, this approach helps to generate the accurate documentation which is very close to the behaviour of the API. It uses the Asciidoctor, to produce the final documentation.
Here are some advantages and benefits of using the Spring API to generate your REST services documentation:
- It supports Hypermedia.
- It always generated based on the tests, it will ensure that your documentation is always accurate and updated. When we update the test criteria, your REST API documentation will get updated automatically.
- Support both XML and JSON format.
- It supports both curl and HTTP.
- It allows everyone to be a developer, not a writer. 🙂
- No need to add annotation and description text to the controller methods.
We can use any of the following framework to create our test cases.
- Spring MVC
- REST-Assured
- Webflux
2. Maven Dependencies
To enable the Spring REST Docs support, add spring-restdocs-mockmvc as an additional dependency in your application. To see the Spring REST Docs documentation in action, let’s create a simple REST API application. We will use the Spring Boot for our example project. You can use your Java IDE or Spring Boot initializer to bootstrap the project. As we are creating a web project, add the following dependencies in the project. This is how our pom.xml will look like
<?xml version="1.0" encoding="UTF-8"?>
<dependencies>
   <dependency>
      <groupId>org.springframework.boot</groupId>
      <artifactId>spring-boot-starter-web</artifactId>
   </dependency>
   <dependency>
      <groupId>org.springframework.boot</groupId>
      <artifactId>spring-boot-starter-test</artifactId>
      <scope>test</scope>
   </dependency>
   <dependency>
      <groupId>org.springframework.restdocs</groupId>
      <artifactId>spring-restdocs-mockmvc</artifactId>
      <scope>test</scope>
   </dependency>
</dependencies>
2.1. Creating REST Controller
Let’s create a REST controller to serve product data to the client API.
package com.javadevjournal.controller;

import com.javadevjournal.data.Product;
import org.springframework.web.bind.annotation.GetMapping;
import org.springframework.web.bind.annotation.PathVariable;
import org.springframework.web.bind.annotation.RestController;

import java.util.Arrays;
import java.util.List;
import java.util.stream.Collectors;

@RestController("/v2")
public class ProductController {

    List products = Arrays.asList(
        new Product("1","G Tech", "G Tech Hard drive", 230.45, 25),
        new Product("2","WD SSD", "WD HDD", 150, 15),
        new Product("3","Samsung SSD", "Samsung Solid State Drive", 100, 12),
        new Product("5","Sandisk Pen Drive", "Sandisk Pen Drive", 12, 200)
    );


    @GetMapping("/products/{code}")
    public Product getProduct(@PathVariable("code") String code){
        return products.stream()
                .filter(p->p.getCode().equalsIgnoreCase(code))
                .collect(Collectors.toList()).get(0); // we know this can throw NPE but let's keep our example simple
    }

    @GetMapping("/products")
    public List getProducts(){
        return products;
    }
}
Our REST controller is a simple controller with only 2 methods:
- Return product based on the product code
- Return all available products
This is how the Product class look like:
public class Product {

    private String code;
    private String name;
    private String description;
    private double price;
    private long stock;


    public Product(String code, String name, String description, double price, long stock) {
        this.code = code;
        this.name = name;
        this.description = description;
        this.price = price;
        this.stock = stock;
    }

    //get and set methods
}
3. Spring REST Docs Configuration
We will use Spring MVC Test framework to write our unit test cases, as outlines earlier, Spring REST Docs use the test cases to generate accurate and updated documentation for the REST API. Let’s create unit test cases for our REST example and see the REST Docs generation in action.
3.1. Unit Test Case
Let’s write a unit test case to validate our getProductMethod() in the ProductController. We will test the HTTP request cycle in our Spring MVC application to make sure it is returning the expected value back to the client API. Here is the unit test case:
@RunWith(SpringRunner.class)
@WebMvcTest(ProductController.class)
public class ProductControllerTest {

    @Autowired
    private MockMvc mockMvc;

    @Test
    public void shouldReturnProductCode() throws Exception{
        this.mockMvc.perform(get("/products/2"))
                .andExpect(status().isOk())
                .andExpect(MockMvcResultMatchers.content().string(containsString("WD SSD")));
    }
}
There is nothing specific in the above unit test case and most of our applications are writing such unit test cases to make sure our application or code works as expected
3.2. Generating The Documentation
Once our test cases are ready, the next step is to generate the documentation for our API. This is where the Spring REST Docs provides the real benefits. As we are working on the REST API, which means we already working on the dynamic contents and Spring REST Docs will use this for documentation. Let’s change our unit test case as below:
@RunWith(SpringRunner.class)
@WebMvcTest(ProductController.class)
@AutoConfigureRestDocs(outputDir = "target/snippets")
public class ProductControllerTest {

    @Autowired
    private MockMvc mockMvc;

    @Test
    public void shouldReturnProductCode() throws Exception{
        this.mockMvc.perform(get("/products/2"))
                .andExpect(status().isOk())
                .andExpect(MockMvcResultMatchers.content().string(containsString("WD SSD"))).andDo(document("product/get-product-by-id"));
    }
}
Let’s discuss few important points in above code
- The
@AutoConfigureRestDocstakes as an argument a directory location for the generated snippets. - The
MockMvcRestDocumentation.documentfor the documentation location.
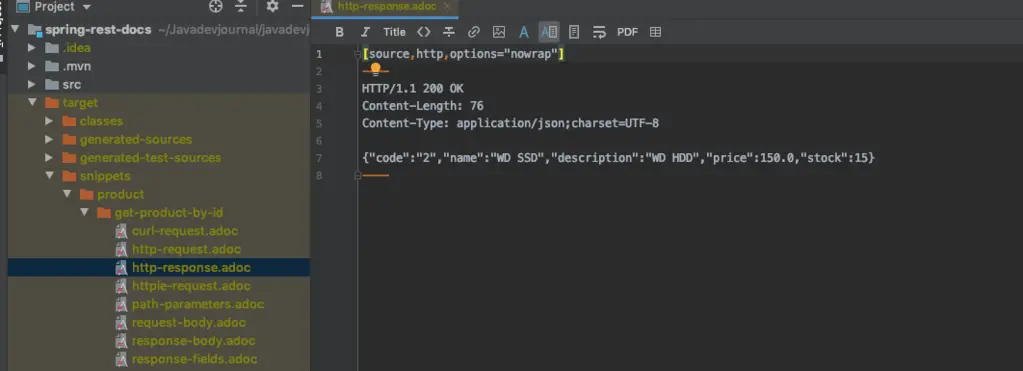
Now if you run the unit tests for your application and if all tests pass with no issue, it will generate a sub-folder under the target/snippets with a name matching with the argument passed to the document method (in our case it is product/get-product-by-id).We will have several .adoc files.
3.3. Converting AsciiDoc
One of the limitation with the AsciiDoc doc is the inability of the browser to render it. We need to convert our AsciiDoc in to browser friendly format like HTML or some other friendly format. To convert our documentation in the HTML format, we will use AsciiDoctor maven plugin. This is how our updated maven configuration look like:
<build>
    <plugins>
        <plugin>
            <groupId>org.asciidoctor</groupId>
            <artifactId>asciidoctor-maven-plugin</artifactId>
            <version>1.5.8</version>
            <executions>
                <execution>
                    <id>generate-docs</id>
                    <phase>prepare-package</phase>
                    <goals>
                        <goal>process-asciidoc</goal>
                    </goals>
                    <configuration>
                        <sourceDocumentName>index.adoc</sourceDocumentName>
                        <backend>html</backend>
                        <attributes>
                            <snippets>${project.build.directory}/snippets</snippets>
                        </attributes>
                    </configuration>
                </execution>
            </executions>
            <dependencies>
                <dependency>
                    <groupId>org.springframework.restdocs</groupId>
                    <artifactId>spring-restdocs-asciidoctor</artifactId>
                    <version>${spring-restdocs.version}</version>
                </dependency>
            </dependencies>
        </plugin>
        <plugin>
            <groupId>org.springframework.boot</groupId>
            <artifactId>spring-boot-maven-plugin</artifactId>
        </plugin>
    </plugins>
</build>
We need to bind this plugin with one of the maven life-cycle to make sure it generate the documentation.
3.4. Joining The Generated Snippets
To make sure generated .adoc snippets and AsciiDoctor Maven plugin working together to generate the documentation, we need to glue together the generated .adoc files. This file works as one stop check for our plugin to find out all details and generate the documentation. To complete this step, let’s follow these steps.
- Create a directory
src/main/asciidoc - Create a new file
index.adocunder this new directory.

This is how our index.adoc file look like:
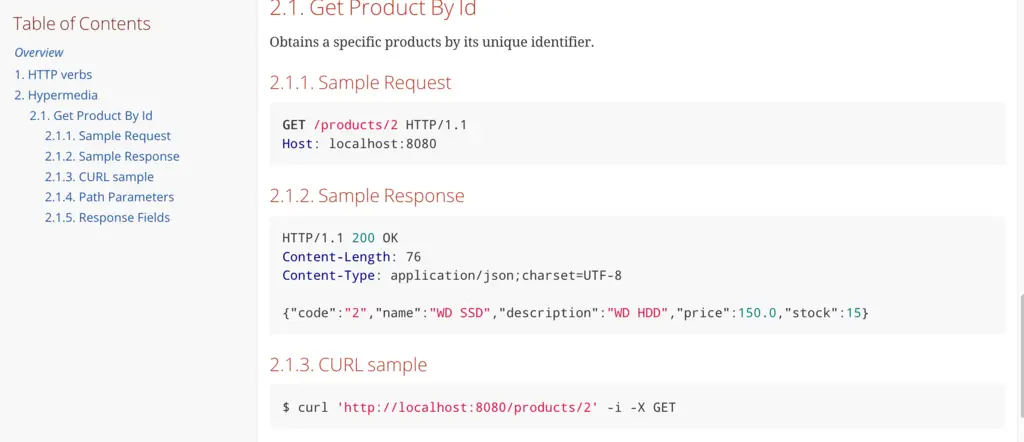
=== Get Product By Id
Obtains a specific products by its unique identifier.

==== Sample Request
include::{snippets}/product/get-product-by-id/http-request.adoc[]

==== Sample Response
include::{snippets}/product/get-product-by-id/http-response.adoc[]

==== CURL sample
include::{snippets}/product/get-product-by-id/curl-request.adoc[]

==== Path Parameters
include::{snippets}/product/get-product-by-id/path-parameters.adoc[]


==== Response Fields
include::{snippets}/product/get-product-by-id/response-fields.adoc[]
In this file, we are linking the .adoc files generated when we were running our unit test cases.There are several benefits of this:
- You can add any additional documentation (Check the final file available on the GitHub).
- You can omit any information which might not be relevant for the documentation.
- It’s a combination of API end points documentation and any additional information. (We will cover shortly)
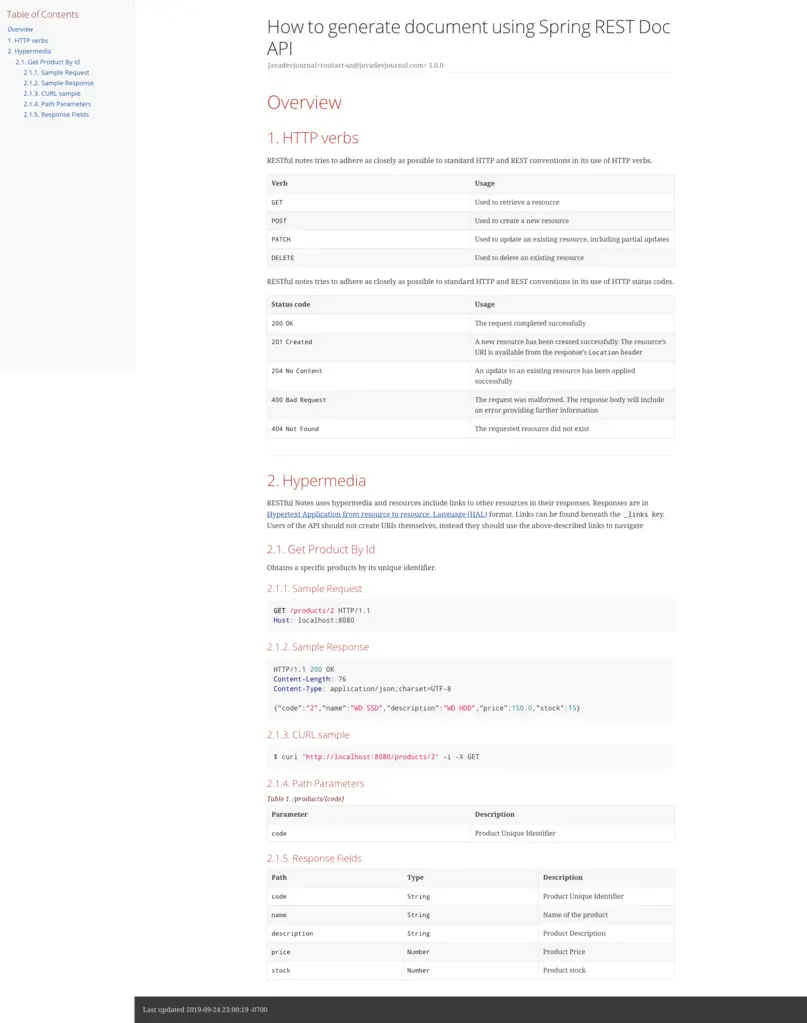
In our example, we are using 4 snippets using the Asciidoctor include directive (the colons in our file).We are using the {snippets}as placeholder to include the path. Let’s run the mvn package command to generate the final HTML in the target/generated-docs folder. This is how our HTML file look like:
3.5. Add Additional Information
The above screenshot represents the output based on our unit test cases (This shows the HTTP request and response from our unit test cases). One of the flexibility of the Spring Rest docs is to include additional information outside of our test cases. To add this change your index.adoc file. Let’s add following information to the final output.
- Author information.
- Overview of HTTP verbs
This is how our index.adoc file look like:
= How to generate document using Spring REST Doc API
Javadevjournal<[email protected]> 1.0.0;
:doctype: book
:icons: font
:source-highlighter: highlightjs
:toc: left
:toclevels: 4
:sectlinks:
:sectnums:

[[overview]]
= Overview

[[overview-http-verbs]]
== HTTP verbs

RESTful notes tries to adhere as closely as possible to standard HTTP and REST conventions in its
use of HTTP verbs.

|===
| Verb | Usage

| `GET`
| Used to retrieve a resource

| `POST`
| Used to create a new resource
If we run the build, we will have updated HTML output with the author and other additional information:
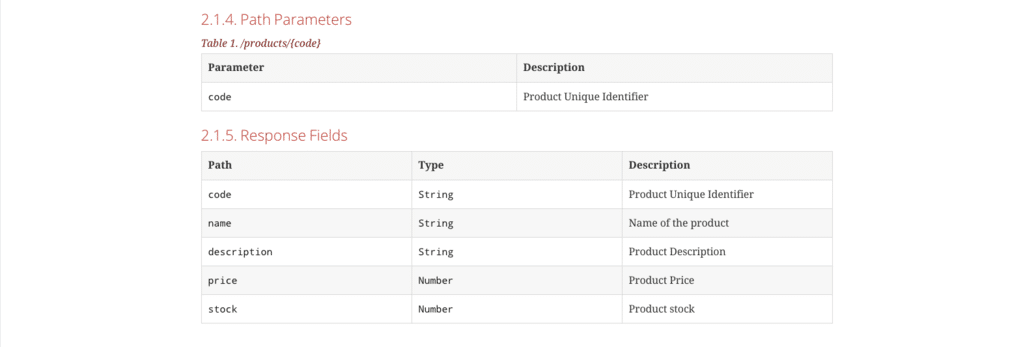
4. Documenting Path Variables
Our documentation only contains the request and response data but spring rest docs API is more powerful and provides other features. Let’s take an example where we want to document the path variables and other information. Let’s improve our unit test case:
@Test
public void getProductByIdResponseFieldDocumentation() throws Exception{
    this.mockMvc.perform(RestDocumentationRequestBuilders.get("/products/{code}", 2))
            .andExpect(status().isOk())
            .andExpect(MockMvcResultMatchers.content().string(containsString("WD SSD")))
            .andDo(document("product/get-product-by-id",pathParameters(parameterWithName("code")
                    .description("Product Unique Identifier")),responseFields(
                            fieldWithPath("code").description("Product Unique Identifier"),
                            fieldWithPath("name").description("Name of the product"),
                            fieldWithPath("description").description("Product Description"),
                            fieldWithPath("price").description("Product Price"),fieldWithPath("stock").description("Product stock"))));
}
When we run the unit test cases, a new snippet called path-parameters.adoc, will be generated. To include this in our HTML output, we need to add this file to our index.adoc file.
==== Path Parameters include::{snippets}/product/get-product-by-id/path-parameters.adoc[]Once we run the maven build, we will get the updated HTML:
Summary
Spring REST docs provides a lot of features and flexibility to generate documentation for your REST APIs. One of the power of REST docs is its ability to generate the documentation based on the unit tests which ensure that documentation is accurate, concise, and well-structured. You can download the source code for this post from GitHub.
List products not works for me . I have used List.
List
Hi Rakesh,
Can you provide more information when you saying “not working”