Spring Controllers are the core concept of Spring MVC application.In this post, we will cover Spring MVC Controllers.
Introduction
Before we dive into the Spring controllers internals, let’s have a look at request workflow in Spring MVC application.
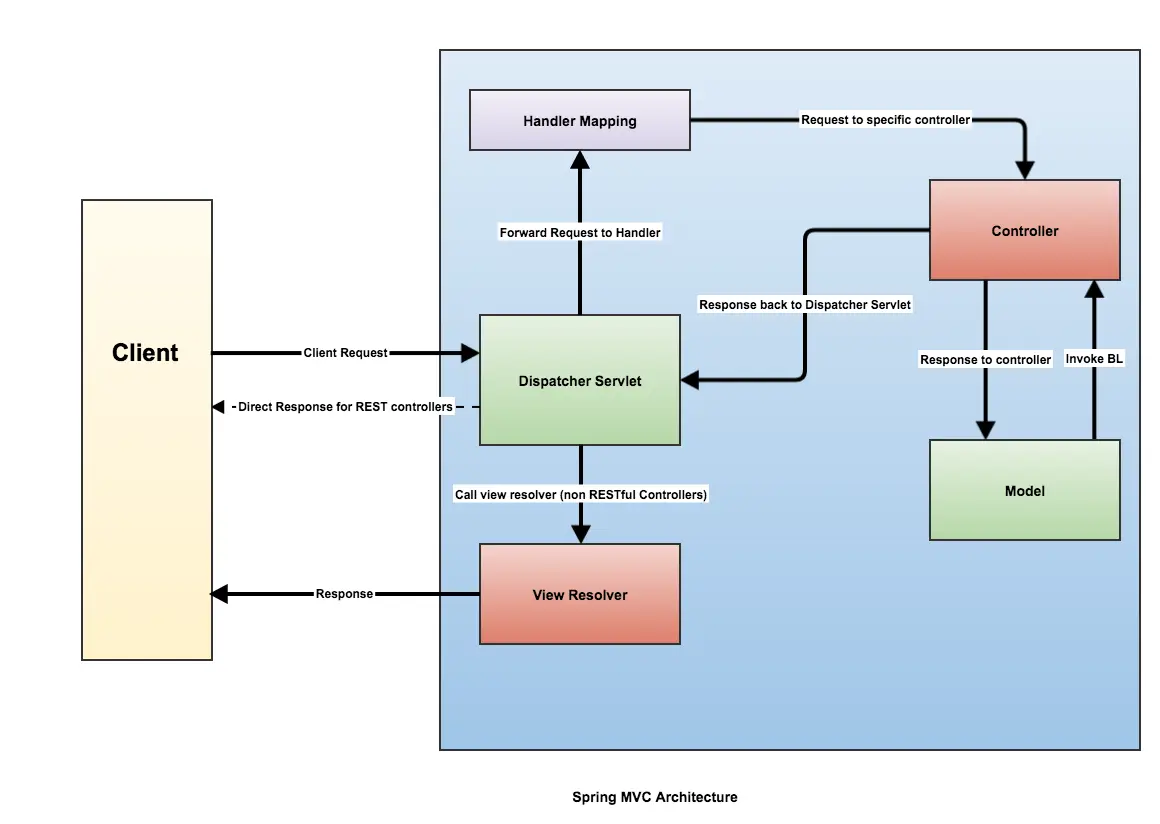
On a high level, Spring MVC workflow move around following points.
- Dispatcher Servlet intercepts all incoming requests.
- Converts payload of the request to Spring MVC data structure.
- Send a request to the specific controller for processing.
- Invoke business rule/ processing from the controller.
- Send a response to the view for rendering (using view resolver.)
- For RESTful controllers, send the response directly to customer skipping view resolver.
One of the central points in Spring MVC architecture is the DispatcherServlet which works as Front Controller. Our architecture diagram represents two different workflows.
- Traditional Spring MVC applications, which send the response using view resolver based on the data sent by the controller.
- RESTful application which returns raw data (JSON/ XML etc).This workflow does not involve any view rendering and the client will be responsible for the view.
- In the above picture, for RESTful application, DispactherServlet is sending the response directly to the client without going through ViewResolver
1. Traditional Spring MVC Setup
Let’s start with the traditional Spring MVC application setup
1.1 Maven Dependencies
To add the required jar to our Spring MVC, application, we need to add spring-webmvc dependency using POM.xml file.
<!-- https://mvnrepository.com/artifact/org.springframework/spring-webmvc -->
<dependency>
    <groupId>org.springframework</groupId>
    <artifactId>spring-webmvc</artifactId>
    <version>4.3.14.RELEASE</version>
</dependency>
1.2 DispatcherServlet
Before we start with our application, we need to configure DispatcherServlet for our application. DispatcherServlet is a Servlet which needs setup configuration.Java configuration based registration and initialization of the DispactherServlet is the recommended way.
public class CustomWebApplicationInitializer implements WebApplicationInitializer {

    @Override
    public void onStartup(ServletContext servletCxt) {

        // Load Spring web application configuration
        AnnotationConfigWebApplicationContext applicationCtx = new AnnotationConfigWebApplicationContext();
        applicationCtx.register(ApplicationConfig.class);
        applicationCtx.refresh();
        servletCxt.addListener(new ContextLoaderListener(applicationCtx));

       // Create and register the DispatcherServlet
        DispatcherServlet servlet = new DispatcherServlet(applicationCtx);
        ServletRegistration.Dynamic registration = servletCxt.addServlet("mvc", servlet);
        registration.setLoadOnStartup(1);
        registration.addMapping("/mvc/*");
    }
}
[pullquote align=”normal”]We need servlet-API 3.x.x for no XML based configuration [/pullquote]
If you like to configure your DispatcherServlet using the traditional web.xml, your web.xml will be similar to
<web-app>
    <listener>
        <listener-class>org.springframework.web.context.ContextLoaderListener</listener-class>
    </listener>

    <context-param>
        <param-name>contextConfigLocation</param-name>
        <param-value>/WEB-INF/app-context.xml</param-value>
    </context-param>

    <servlet>
        <servlet-name>mvc</servlet-name>
        <servlet-class>org.springframework.web.servlet.DispatcherServlet</servlet-class>
        <init-param>
            <param-name>contextConfigLocation</param-name>
            <param-value></param-value>
        </init-param>
        <load-on-startup>1</load-on-startup>
    </servlet>

    <servlet-mapping>
        <servlet-name>mvc</servlet-name>
        <url-pattern>/mvc/*</url-pattern>
    </servlet-mapping>
</web-app>
2. Spring Web MVC Configuration
To configure/ customize MVC components, Spring MVC provides an option to handle it either through Java Config or XML
@Configuration
@EnableWebMvc
@ComponentScan(basePackages = {"com.javadevjournal"})
public class CustomWebConfig extends WebMvcConfigurerAdapter {

    @Override
    public void configureDefaultServletHandling(
        DefaultServletHandlerConfigurer configurer) {
        configurer.enable();
    }

    @Bean
    public ViewResolver viewResolver() {
        InternalResourceViewResolver resolver =new InternalResourceViewResolver();
        resolver.setPrefix("/WEB-INF/view/");
        resolver.setSuffix(".jsp");
        return resolver;
    }
}
Adding @EnableWebMvc will import the Spring MVC configuration from WebMvcConfigurationSupport.Above configuration in XML is equivalent to
<?xml version="1.0" encoding="UTF-8"?>
<beans xmlns="http://www.springframework.org/schema/beans"
    xmlns:mvc="http://www.springframework.org/schema/mvc"
    xmlns:xsi="http://www.w3.org/2001/XMLSchema-instance"
    xsi:schemaLocation="
        http://www.springframework.org/schema/beans
        http://www.springframework.org/schema/beans/spring-beans.xsd
        http://www.springframework.org/schema/mvc
        http://www.springframework.org/schema/mvc/spring-mvc.xsd">
    <context:component-scan base-package="com.javadevjournal" />
    <mvc:annotation-driven/>
    <bean class="org.springframework.web.servlet.view.InternalResourceViewResolver">
        <property name="prefix">
            <value>/WEB-INF/view/</value>
        </property>
        <property name="suffix">
            <value>.jsp</value>
        </property>
  </bean>
</beans>
[pullquote align=”normal”]If you are using Spring 5.x, WebMvcConfigurerAdapter class has been marked Deprecated. We can directly implement WebMvcConfigurer without the need for this adapter. [/pullquote]
3. Spring Controller
We have finished our infrastructure setup to build our controller.In the last part of this traditional application build up, we will create our Spring Controller with following features
- The method will handle GET request.
- It will store a welcome message in the model.
- The controller will return a view which will display our welcome message.
@Controller
@RequestMapping("/greeting")
public class GreetingController {

    @GetMapping
    public String greeting(final Model model){
        model.addAttribute("message", "Welcome to our sample controller");
        return "greeting";
    }
}
Let’s try to understand different features of our MVC Controller
@Controllerannotation registers our class as Controller with Spring.@RequestMapping("/greeting")will ensure that our class will process any request mapped to /greeting URI.- Our greeting method is annotated with
@GetMappingwhich means we will call this method when a GET request will be sent to /greeting URI. - Once greeting method is called, it is saving a message in the Model class and returning a view (in our example view name is “greeting”).
- In our viewResolver, we configured following properties
prefix = <em>/WEB-INF/view/</em>suffix = <em>.jsp</em>
- ViewResolver will try to resolve view information sent from our controller by combining prefix and suffix configured in our application.
- Final information about the view will be
/WEB-INF/view/greeting.jsp.Spring will try to find greeting.jsp in the /WEB-INF/view/ which will display output on the front-end.
If you run your application, and open following URL on the browser http://localohost:port/mvc/greeting, you should be able to see “Welcome to our sample controller” message on your browser window.
4. Spring MVC Setup using Spring Boot
In the first section, we created our controller in Spring.There were numbers of steps which were required before started working on our controller.
- We setup required dependencies using
pom.xml. - Created our DispatcherServlet Configurations.
- Performed required MVC configurations
It can become more complicated once we use different API’s in our application which involves
- Setting up required dependencies correctly.
- Making sure all configurations are correct and compatible.
To handle our these infrastructure tasks, Spring team has introduced Spring Boot framework.
4.1 Spring MVC Application using Spring Boot
Read our article Creating a Web Application with Spring Boot
5. The REST Controller
Setting up RESTful application is like the normal Spring MVC application setup, however, there are few fundamental differences between RESTful application and Spring MVC application
- RESTful API does not require view resolver as they will send the response directly to the client.
- RESTful API send raw data(JSON, XML etc) to the client application.
- We typically use
@RestControllerannotation for our REST controller.
@RestController
public class GreetingController {

    @GetMapping(value = "/greeting")
    public String greeting(final Model model){
        model.addAttribute("message", "Welcome to our sample controller");
        return "greeting";
    }
}
Read Building Restful Web Services to get more understanding about REST controllers.
Summary
In this post, we covered Spring Controllers. We discussed different options to create Spring MVC Controller.
Comments are closed.