In this post, we will look at how to activate a new account via email using spring security. We will learn the steps and process to create this feature for your spring security application.
Introduction
It’s always recommended that we verify the customer account (the email) before allowing them to access the account. One of the common way is to send out a verification email to the customer email account with some token to make sure that provided email belongs to the customer and they have access to the email.
This will add one additional level of security to the account. In this article, we will look at the steps to activate a new account via email using spring security during registration process.
1. Application Setup
To start the application, create project structure using Spring Initializr. You can also use your IDE to generate the initial project structure. Add the following dependencies in your setup.
- Web starter.
- Spring Security starter.
- Thymeleaf
- email stater
We are using Thymeleaf to send out email and create registration page. You can choose different email template engine as per your need.
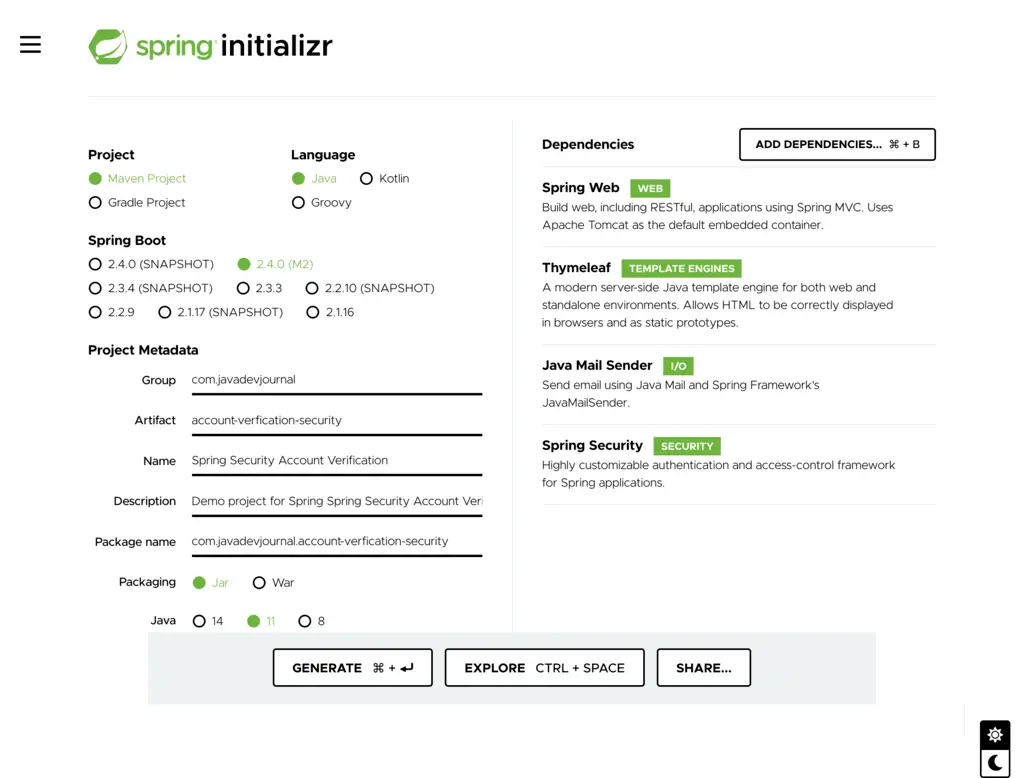
This is how the pom.xml look like:
<?xml version="1.0" encoding="UTF-8"?>
<project xmlns="http://maven.apache.org/POM/4.0.0" xmlns:xsi="http://www.w3.org/2001/XMLSchema-instance"
	xsi:schemaLocation="http://maven.apache.org/POM/4.0.0 https://maven.apache.org/xsd/maven-4.0.0.xsd">
	<modelVersion>4.0.0</modelVersion>
	<parent>
		<groupId>org.springframework.boot</groupId>
		<artifactId>spring-boot-starter-parent</artifactId>
		<version>2.4.0-M2</version>
		<relativePath/> <!-- lookup parent from repository -->
	</parent>
	<groupId>com.javadevjournal</groupId>
	<artifactId>account-verfication-security</artifactId>
	<version>0.0.1-SNAPSHOT</version>
	<name>Spring Security Account Verification</name>
	<description>Demo project for Spring Spring Security Account Verification</description>

	<properties>
		<java.version>11</java.version>
	</properties>

	<dependencies>
		<dependency>
			<groupId>org.springframework.boot</groupId>
			<artifactId>spring-boot-starter-mail</artifactId>
		</dependency>
		<dependency>
			<groupId>org.springframework.boot</groupId>
			<artifactId>spring-boot-starter-security</artifactId>
		</dependency>
		<dependency>
			<groupId>org.springframework.boot</groupId>
			<artifactId>spring-boot-starter-thymeleaf</artifactId>
		</dependency>
		<dependency>
			<groupId>org.springframework.boot</groupId>
			<artifactId>spring-boot-starter-web</artifactId>
		</dependency>

		<dependency>
			<groupId>org.springframework.boot</groupId>
			<artifactId>spring-boot-starter-test</artifactId>
			<scope>test</scope>
		</dependency>
		<dependency>
			<groupId>org.springframework.security</groupId>
			<artifactId>spring-security-test</artifactId>
			<scope>test</scope>
		</dependency>
	</dependencies>

	<build>
		<plugins>
			<plugin>
				<groupId>org.springframework.boot</groupId>
				<artifactId>spring-boot-maven-plugin</artifactId>
			</plugin>
		</plugins>
	</build>
</project>
2. User Entity
We need to store the customer information in the database. Let’s create our customer entity to store customer profile information in the database.
@Entity
@Table(name = “user”)
public class UserEntity {

    @Id
    @GeneratedValue(strategy = GenerationType.IDENTITY)
    private Long id;
    private String firstName;
    private String lastName;
    @Column(unique = true)
    private String email;
    private String password;
    private boolean accountVerified;
    //getter and setter methods
}
This is very similar to the standard registration process except we added a boolean field as accountVerified. This field will be false on the registration and will be true once user confirms the identity by clicking on the link in the email.
3. UserDetailsService
For the spring security login, we need to change the process to only allow verified user login to the application. Spring security provides multiple options to load customer information, we will use the Spring Security UserDetailsService to change the login process.
@Service(
public class CustomUserDetailService implements UserDetailsService{

    @Autowired
    UserRepository userRepository;

    @Override
    public UserDetails loadUserByUsername(String email) throws UsernameNotFoundException {
        final UserEntity customer = userRepository.findByEmail(email);
        if (customer == null) {
            throw new UsernameNotFoundException(email);
        }
        boolean enabled = !customer.isAccountVerified();
        UserDetails user = User.withUsername(customer.getEmail())
                .password(customer.getPassword())
                .disabled(enabled)
                .authorities(“USER”).build();

        return user;
    }
}
Spring security has build in feature to disallow login for disabled account and we use that feature. With !customer.isAccountVerified();, we are telling spring security if an account is active or not and rest of the workflow taken care automatically by Spring security.
4. Secure Token Service
To verify the account, here is the high level standard process.
- Customer perform registration.
- Create account and mark account as pending verification.
- Generate a security token with defined validity
- Send out email to customer with the token to verify the email.
- Customer click on the verification link on the email.
- Verify if the token is valid and not expired.
- Verify if the token belongs are the correct user
- Activate the user account.
There are multiple ways to generate the security token, and it’s up to the application you are building. There is no single algorithm for all use cases. On a high level there are 2 approaches.
- Create token by embedding user and time information and hash this before sending out the email. Store the token on the customer table. Once customer click on the URL, decode the token to get user information and time to validate the token.
- Create a separate table to store the token information and a relation with the user table
I am using the second option for this post. Here is how our token generation service looks like:
package com.javadevjournal.core.security.token;

import com.javadevjournal.core.security.jpa.SecureToken;
import com.javadevjournal.core.security.token.repository.SecureTokenRepository;
import org.apache.tomcat.util.codec.binary.Base64;
import org.springframework.beans.factory.annotation.Autowired;
import org.springframework.beans.factory.annotation.Value;
import org.springframework.security.crypto.keygen.BytesKeyGenerator;
import org.springframework.security.crypto.keygen.KeyGenerators;
import org.springframework.stereotype.Service;

import java.nio.charset.Charset;
import java.time.LocalDateTime;

@Service
public class DefaultSecureTokenService implements SecureTokenService {

    private static final BytesKeyGenerator DEFAULT_TOKEN_GENERATOR = KeyGenerators.secureRandom(15);
    private static final Charset US_ASCII = Charset.forName(“US-ASCII”);

    @Value(“${jdj.secure.token.validity}”)
    private int tokenValidityInSeconds;

    @Autowired
    SecureTokenRepository secureTokenRepository;

    @Override
    public SecureToken createSecureToken(){
        String tokenValue = new String(Base64.encodeBase64URLSafe(DEFAULT_TOKEN_GENERATOR.generateKey()), US_ASCII); // this is a sample, you can adapt as per your security need
        SecureToken secureToken = new SecureToken();
        secureToken.setToken(tokenValue);
        secureToken.setExpireAt(LocalDateTime.now().plusSeconds(getTokenValidityInSeconds()));
        this.saveSecureToken(secureToken);
        return secureToken;
    }

    @Override
    public void saveSecureToken(SecureToken token) {
        secureTokenRepository.save(token);
    }

    @Override
    public SecureToken findByToken(String token) {
        return secureTokenRepository.findByToken(token);
    }

    @Override
    public void removeToken(SecureToken token) {
        secureTokenRepository.delete(token);
    }

    @Override
    public void removeTokenByToken(String token) {
        secureTokenRepository.removeByToken(token);
    }

    public int getTokenValidityInSeconds() {
        return tokenValidityInSeconds;
    }
}
Let’s talk about few important points:
- We generating token using Base64. You can always use the other way to generate the token
- Every token should have an expire value, to make it more flexible, we are storing the token expire value.
- We configure the expire duration in the
application.propertiesfile (set to 8 hours). - Storing the expire date in the database is helpful in case you want to delete all the expired unused token.
- We have the methods to remove the token from the database (we will remove the token once we verify it to save some space).
- Our design assuming that token will be unique but change it if you are working on a high transactional site and believe that it can cause collision (use token and email id as composite key)
5. TokenEntity
This is how our token entity look like:
@Entity
@Table(name = “secureTokens”)
public class SecureToken{
    @Id
    @GeneratedValue(strategy = GenerationType.IDENTITY)
    private Long id;

    @Column(unique = true)
    private String token;

    @CreationTimestamp
    @Column(updatable = false)
    private Timestamp timeStamp;

    @Column(updatable = false)
    @Basic(optional = false)
    private LocalDateTime expireAt;

    @ManyToOne
    @JoinColumn(name = “customer_id”, referencedColumnName ="id")
    private UserEntity user;

    @Transient
    private boolean isExpired;

    public boolean isExpired() {
        return getExpireAt().isBefore(LocalDateTime.now()); // this is generic implementation, you can always make it timezone specific
    }
    //getter an setter
}
We are adding a relation with the user to get the user information once we have the token. This also needs a modification to the user Entity:
@Entity
@Table(name = “user”)
public class UserEntity {
  @Id
    @GeneratedValue(strategy = GenerationType.IDENTITY)
    private Long id;
    private String firstName;
    private String lastName;
    @Column(unique = true)
    private String email;
    private String password;
    private boolean accountVerified;

    @OneToMany(mappedBy = “user”)
    private Set tokens;
}
6. Email Service
Next, we need an email service to send out verification email to the customer. Here is how our email service looks like:
@Service
public class DefaultEmailService implements EmailService{

    @Autowired
    private JavaMailSender emailSender;

    @Autowired
    private SpringTemplateEngine templateEngine;

    @Override
    public void sendMail(AbstractEmailContext email) throws MessagingException {
        MimeMessage message = emailSender.createMimeMessage();
        MimeMessageHelper mimeMessageHelper = new MimeMessageHelper(message,
                MimeMessageHelper.MULTIPART_MODE_MIXED_RELATED,
                StandardCharsets.UTF_8.name());
        Context context = new Context();
        context.setVariables(email.getContext());
        String emailContent = templateEngine.process(email.getTemplateLocation(), context);

        mimeMessageHelper.setTo(email.getTo());
        mimeMessageHelper.setSubject(email.getSubject());
        mimeMessageHelper.setFrom(email.getFrom());
        mimeMessageHelper.setText(emailContent, true);
        emailSender.send(message);
    }
}
Read Send Email Using Spring to learn how to send out emails using Spring Boot.
We need to send out this email during the registration process. Let’s change our registration process to send out the email to the customer.
@Service(“userService”)
public class DefaultUserService implements UserService{

    @Autowired
    private UserRepository userRepository;

    @Autowired
    private PasswordEncoder passwordEncoder;

    @Autowired
    private EmailService emailService;

    @Autowired
    private SecureTokenService secureTokenService;

    @Autowired
    SecureTokenRepository secureTokenRepository;

    @Value(“${site.base.url.https}”)
    private String baseURL;

    @Override
    public void register(UserData user) throws UserAlreadyExistException {
        if(checkIfUserExist(user.getEmail())){
            throw new UserAlreadyExistException(“User already exists for this email”);
        }
        UserEntity userEntity = new UserEntity();
        BeanUtils.copyProperties(user, userEntity);
        encodePassword(user, userEntity);
        userRepository.save(userEntity);
        sendRegistrationConfirmationEmail(userEntity);

    }

    @Override
    public void sendRegistrationConfirmationEmail(UserEntity user) {
        SecureToken secureToken= secureTokenService.createSecureToken();
        secureToken.setUser(user);
        secureTokenRepository.save(secureToken);
        AccountVerificationEmailContext emailContext = new AccountVerificationEmailContext();
        emailContext.init(user);
        emailContext.setToken(secureToken.getToken());
        emailContext.buildVerificationUrl(baseURL, secureToken.getToken());
        try {
            emailService.sendMail(emailContext);
        } catch (MessagingException e) {
            e.printStackTrace();
        }

    }
    private void encodePassword(UserData source, UserEntity target){
        target.setPassword(passwordEncoder.encode(source.getPassword()));
    }


    @Override
    public boolean checkIfUserExist(String email) {
        return userRepository.findByEmail(email)!=null ? true : false;
    }

}
We are doing multiple things:
- Once the User profile saved, we are generating the token and storing it.
- Passing the token to create email context.
- Calling send email method with the email context.
7. Email Context
We need to prepare the email context to before sending out the email to the customer. This is how we are setting up the email context.
package com.javadevjournal.core.email.context;

import com.javadevjournal.core.user.jpa.data.UserEntity;
import org.springframework.web.util.UriBuilder;
import org.springframework.web.util.UriComponentsBuilder;

public class AccountVerificationEmailContext extends AbstractEmailContext {

    private String token;


    @Override
    public  void init(T context){
        //we can do any common configuration setup here
        // like setting up some base URL and context
        UserEntity customer = (UserEntity) context; // we pass the customer informati
        put(“firstName”, customer.getFirstName());
        setTemplateLocation(“emails/email-verification”);
        setSubject(“Complete your registration”);
        setFrom(“[email protected]”);
        setTo(customer.getEmail());
    }

    public void setToken(String token) {
        this.token = token;
        put(“token”, token);
    }

    public void buildVerificationUrl(final String baseURL, final String token){
        final String url= UriComponentsBuilder.fromHttpUrl(baseURL)
                .path(“/register/verify”).queryParam(“token”, token).toUriString();
        put(“verificationURL”, url);
    }
}

package com.javadevjournal.core.email.context;

import java.util.HashMap;
import java.util.Map;

public abstract class AbstractEmailContext {

    private String from;
    private String to;
    private String subject;
    private String email;
    private String attachment;
    private String fromDisplayName;
    private String emailLanguage;
    private String displayName;
    private String templateLocation;
    private Map<String, Object> context;


    public AbstractEmailContext() {
        this.context = new HashMap<>();
    }

    public  void init(T context){
        //we can do any common configuration setup here
        // like setting up some base URL and context
    }

    public String getFrom() {
        return from;
    }

    public void setFrom(String from) {
        this.from = from;
    }

    public String getTo() {
        return to;
    }

    public void setTo(String to) {
        this.to = to;
    }

    public String getSubject() {
        return subject;
    }

    public void setSubject(String subject) {
        this.subject = subject;
    }

    public String getEmail() {
        return email;
    }

    public void setEmail(String email) {
        this.email = email;
    }

    public String getAttachment() {
        return attachment;
    }

    public void setAttachment(String attachment) {
        this.attachment = attachment;
    }

    public String getFromDisplayName() {
        return fromDisplayName;
    }

    public void setFromDisplayName(String fromDisplayName) {
        this.fromDisplayName = fromDisplayName;
    }

    public String getEmailLanguage() {
        return emailLanguage;
    }

    public void setEmailLanguage(String emailLanguage) {
        this.emailLanguage = emailLanguage;
    }

    public String getDisplayName() {
        return displayName;
    }

    public void setDisplayName(String displayName) {
        this.displayName = displayName;
    }

    public Map<String, Object> getContext() {
        return context;
    }

    public Object put(String key, Object value) {
        return key ==null ? null : this.context.put(key.intern(),value);
    }

    public String getTemplateLocation() {
        return templateLocation;
    }

    public void setTemplateLocation(String templateLocation) {
        this.templateLocation = templateLocation;
    }

    public void setContext(Map<String, Object> context) {
        this.context = context;
    }
}
Our AccountVerificationEmailContext class we are performing few important points:
- Creating a verification URL and appending the token to the
URL. - Setting some other information required for the email process
8. Account Verification Controller
In the AccountVerificationEmailContext class, we are setting up an URL which will be sent to the customer on the email. Once customer click on the URL, we need a controller which knows how to validate the token from the URL. Let’s add a new method to our register controller.
@Controller
@RequestMapping(“/register”)
public class RegistrationController {

    private static final String REDIRECT_LOGIN= “redirect:/login”;

    @Autowired
    private UserService userService;

    @Autowired
    private MessageSource messageSource;

    @GetMapping(“/verify”)
    public String verifyCustomer(@RequestParam(required = false) String token, final Model model, RedirectAttributes redirAttr){
        if(StringUtils.isEmpty(token)){
            redirAttr.addFlashAttribute(“tokenError”, messageSource.getMessage(“user.registration.verification.missing.token”, null,LocaleContextHolder.getLocale()));
            return REDIRECT_LOGIN;
        }
        try {
              userService.verifyUser(token);
        } catch (InvalidTokenException e) {
            redirAttr.addFlashAttribute(“tokenError”, messageSource.getMessage(“user.registration.verification.invalid.token”, null,LocaleContextHolder.getLocale()));
            return REDIRECT_LOGIN;
        }

        redirAttr.addFlashAttribute(“verifiedAccountMsg”, messageSource.getMessage(“user.registration.verification.success”, null,LocaleContextHolder.getLocale()));
        return REDIRECT_LOGIN;
    }
}
9. Account Verification Method
Let’s add the method in our UserService. This method will accept the incoming token and perform the following tasks.
- Verify if the token is valid.
- Check token expiry.
- Validate user and token.
- Activate account if token is valid and belongs to the correct user.
@Override
public boolean verifyUser(String token) throws InvalidTokenException {
    SecureToken secureToken = secureTokenService.findByToken(token);
    if (Objects.isNull(secureToken) || !StringUtils.equals(token, secureToken.getToken()) || secureToken.isExpired()) {
        throw new InvalidTokenException(“Token is not valid”);
    }
    UserEntity user = userRepository.getOne(secureToken.getUser().getId());
    if (Objects.isNull(user)) {
        return false;
    }
    user.setAccountVerified(true);
    userRepository.save(user); // let’s same user details

    // we don’t need invalid password now
    secureTokenService.removeToken(secureToken);
    return true;
}
10. Testing Application
Our major configuration work is complete. Let’s start and run the application. Once the application is up and running, we will perform the following tests.
- Register new account.
- Check if got verification email.
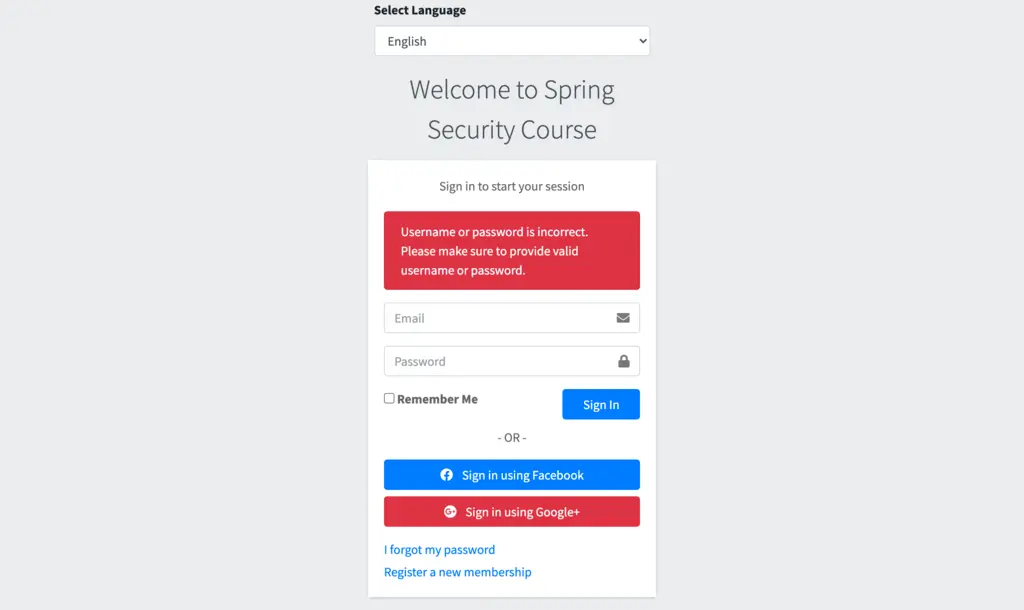
- Try to login without verification (System should not allow to login).
- Verify email by clicking on the link.
- Try login after verification
New Account Registration: 
Once the registration done, let’s check if we are able to login without verification:
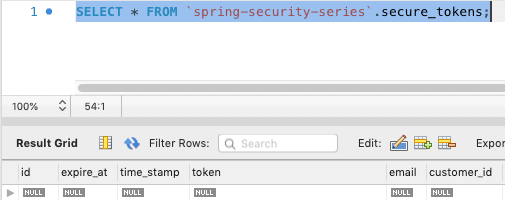
Let’s check if the security token got created in the database:
Token Creation: Secure token created for the user registration:

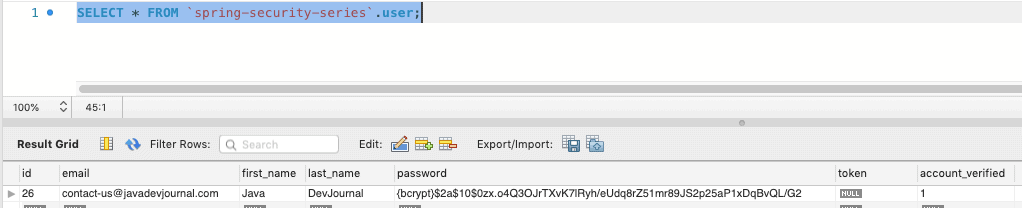
Account Status: Customer Account is not active (as account not verified yet)

Email Verification:
Let’s check if we got the email for the account verification:
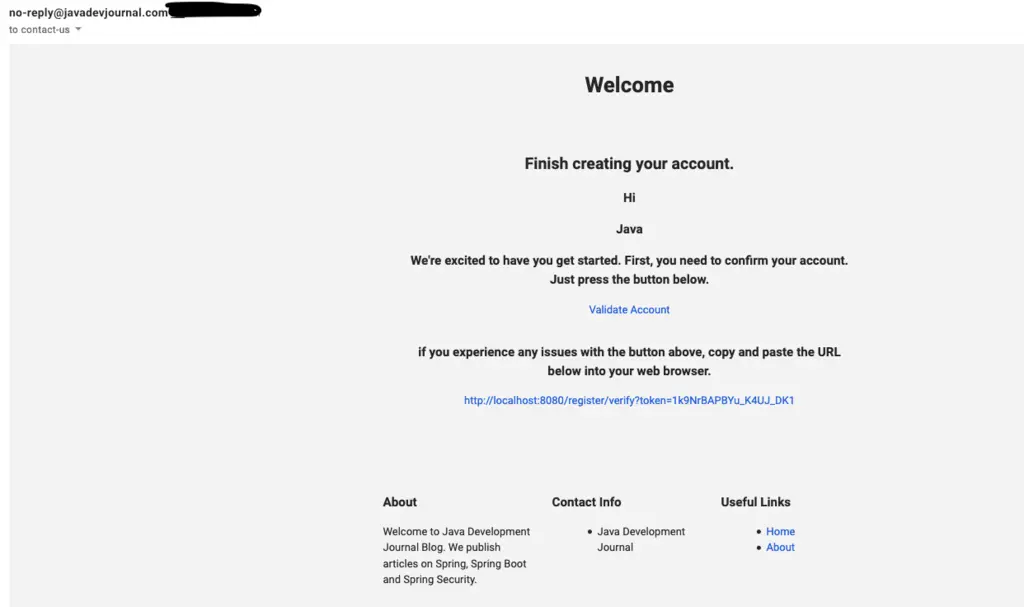
Look at the URL in this email, it contains the security token generated by the token service. Let’s verify the account by clicking on the “Validate Account” or using the URL directly in the browser window.
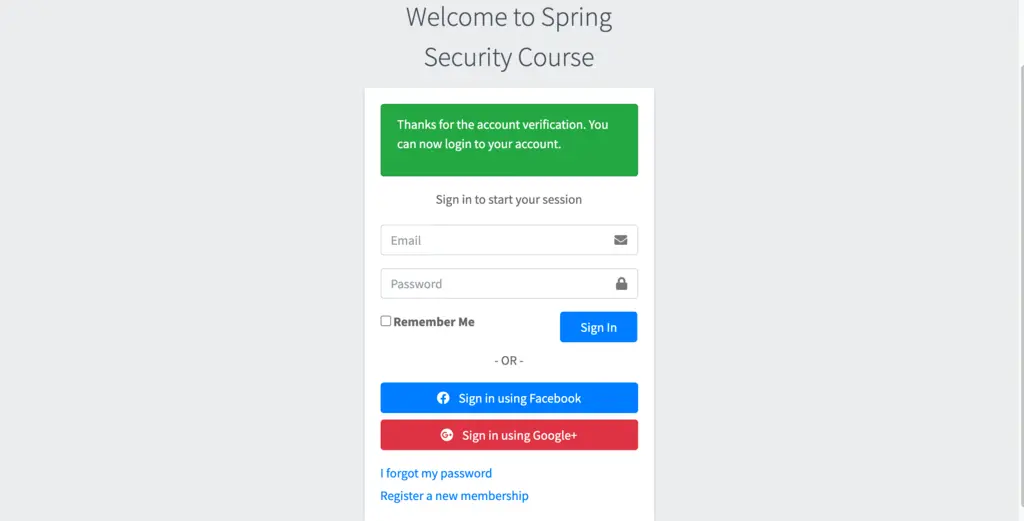
Now if we try to login, system will allow us to login in the system. Successful verification will perform following additional tasks.
- Set the account status as verified.
- Remove the verified token from the database
Summary
In this post, we extended our registration process and added a layer of security to allow only login to the verified customers only. We saw how to activate a new account via email using spring security. This post is part of our Spring security course and the source code is available on the GitHub.