Before we move ahead with our Spring security tutorial, let’s build our application and add spring security features along this series. In this post, we will create and perform user registration using spring security and spring boot.
User Registration using Spring Security and Spring Boot
Spring security provides a mechanism to secure our application by authenticating incoming request and make sure user is authorized to execute the requested action. We will start building our application and will apply these spring security features throughout the spring security course. We will perform the following actions during this series.
- Add registration feature to our application.
- Enable database backed user authentication.
- Add different roles based on user types and make sure user can only access only allowed resources.
- Check how the security context work and how it used by spring security.
- Customize our login process.
- Check how success handler works and how to customize these handlers.
- Session management in Spring security.
Let’s start by user registration using spring security and spring boot. We will start with a simple setup but keep on adding additional features to the application as we cover more advance topics.
1. Application Setup
We will build our application using Spring Initializr. If you like you can use the IDE to generate the project structure, most IDE have build in integration with Initializr. Fill all the details and click on the download button to get it on your local machine.
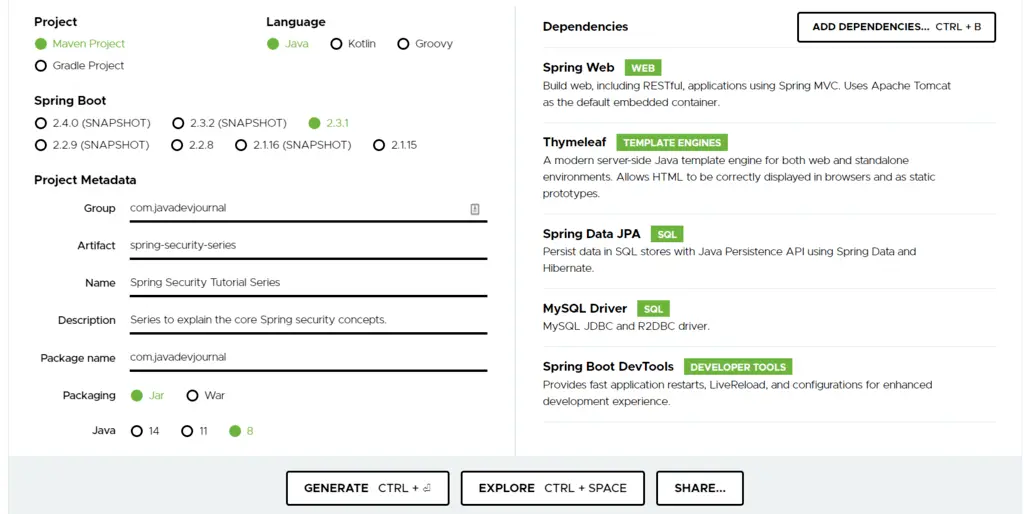
Following dependencies are added in our application (Will add more during this course).
- Spring Boot Web Starter – Need this to build our web application.
- Thymeleaf – We are using Thymeleaf as our templating engine. We will build our view layer using this.
- Spring JPA – Need this to store user and other information (like password, user roles etc.) In the database.
- MySQL Driver – We are using
MySQLas our database, you can change it based on your preference.
You can download the sample application from GitHub. Start building application along this series.
Here is how the initial pom.xml look like:
<?xml version="1.0" encoding="UTF-8"?>
<project xmlns="http://maven.apache.org/POM/4.0.0" xmlns:xsi="http://www.w3.org/2001/XMLSchema-instance" xsi:schemaLocation="http://maven.apache.org/POM/4.0.0 https://maven.apache.org/xsd/maven-4.0.0.xsd">
   <modelVersion>4.0.0</modelVersion>
   <parent>
      <groupId>org.springframework.boot</groupId>
      <artifactId>spring-boot-starter-parent</artifactId>
      <version>2.3.1.RELEASE</version>
      <relativePath />
      <!-- lookup parent from repository -->
   </parent>
   <groupId>com.javadevjournal</groupId>
   <artifactId>spring-security-series</artifactId>
   <version>0.0.1-SNAPSHOT</version>
   <name>Spring Security Tutorial Series</name>
   <description>Series to explain the core Spring security concepts.</description>
   <properties>
      <java.version>1.8</java.version>
   </properties>
   <dependencies>
      <dependency>
         <groupId>org.springframework.boot</groupId>
         <artifactId>spring-boot-starter</artifactId>
      </dependency>
      <dependency>
         <groupId>org.springframework.boot</groupId>
         <artifactId>spring-boot-starter-security</artifactId>
      </dependency>
      <dependency>
         <groupId>org.springframework.boot</groupId>
         <artifactId>spring-boot-starter-web</artifactId>
      </dependency>
      <dependency>
         <groupId>org.springframework.boot</groupId>
         <artifactId>spring-boot-starter-thymeleaf</artifactId>
      </dependency>
      <dependency>
         <groupId>org.springframework.boot</groupId>
         <artifactId>spring-boot-starter-test</artifactId>
         <scope>test</scope>
         <exclusions>
            <exclusion>
               <groupId>org.junit.vintage</groupId>
               <artifactId>junit-vintage-engine</artifactId>
            </exclusion>
         </exclusions>
      </dependency>
   </dependencies>
   <build>
      <plugins>
         <plugin>
            <groupId>org.springframework.boot</groupId>
            <artifactId>spring-boot-maven-plugin</artifactId>
         </plugin>
      </plugins>
   </build>
</project>
3. Application Configuration
Before moving ahead, let’s complete the following setup for our application.
- JPA and DB configuration using
application.properties. - Setting up database.
3.1. Database Configuration
Spring Boot JPA auto-configuration will do most of the work for us. Let’s define the database property to help Spring Boot connect with the database.
#database configuration.Change these based on your setup
spring.jpa.generate-ddl=true
spring.datasource.url=jdbc:mysql://localhost:3306/spring-security-series?useJDBCCompliantTimezoneShift=true&useLegacyDatetimeCode=false&serverTimezone=UTC
spring.datasource.username=root
spring.datasource.password=root
spring.datasource.driver-class-name=com.mysql.jdbc.Driver
We are setting the spring.jpa.generate-ddl properties to true. This will help us generate the initial DDL script on startup. The next step is to define our JPA entity to store customer information during registration.
3.2. Customer Entity
Customer entity represents the customer data stored in the database. Will start with the simple domain object but continue to add new relations throughout this series. (when we will talk about roles privileges)
@Entity
@Table(name = "user")
public class UserEntity {

    @Id
    @GeneratedValue(strategy = GenerationType.IDENTITY)
    private Long id;

    private String firstName;
    private String lastName;
    @Column(unique = true)
    private String email;
    private String password;

    public UserEntity() {
    }
  //getter and setter
}
Adding a unique constraint to the email to not allow customer do multiple registration with same email id.
3.3 Customer JPA Repository
One of the benefit of using Spring JPA is the ability to use Spring JPA repositories. It makes it easy to connect to the database layer, avoiding the boilerplate code to create JDBC connection and other activities. To save the customer information, let’s create a user JPA repository.
package com.javadevjournal.jpa.user.repository;

import com.javadevjournal.jpa.user.data.UserEntity;
import org.springframework.data.jpa.repository.JpaRepository;

@Repository
public interface UserRepository extends JpaRepository<UserEntity, Long > {
}
Our custom repository does not contain any method as most of the operation required already available through the JpaRepository. Don’t worry, we will add quite a few methods to this later in the series.
4. User Service
We need a service which takes the user information during registration, process it and store it in the database. Let’s define our user service class. Let’s start with 2 method to register customer.
package com.javadevjournal.user.service;

import com.javadevjournal.system.exception.UserAlreadyExistException;
import com.javadevjournal.user.jpa.data.UserEntity;
import com.javadevjournal.user.jpa.repository.UserRepository;
import com.javadevjournal.web.data.user.UserData;
import org.springframework.beans.BeanUtils;
import org.springframework.beans.factory.annotation.Autowired;
import org.springframework.dao.DataIntegrityViolationException;
import org.springframework.security.crypto.password.PasswordEncoder;
import org.springframework.stereotype.Service;

@Service("userService")
public class DefaultUserService implements UserService {

    @Autowired
    private UserRepository userRepository;

    @Autowired
    PasswordEncoder passwordEncoder;


    @Override
    public void register(UserData user) throws UserAlreadyExistException {

        //Let's check if user already registered with us
        if(checkIfUserExist(user.getEmail())){
            throw new UserAlreadyExistException("User already exists for this email");
        }
        UserEntity userEntity = new UserEntity();
        BeanUtils.copyProperties(user, userEntity);
        encodePassword(userEntity, user);
        userRepository.save(userEntity);
    }


    @Override
    public boolean checkIfUserExist(String email) {
        return userRepository.findByEmail(email) !=null ? true : false;
    }

    private void encodePassword( UserEntity userEntity, UserData user){
        userEntity.setPassword(passwordEncoder.encode(user.getPassword()));
    }
}
Before moving ahead, let’s check few important points:
- Our
DefaultUserServicecheck if a user already exists and throw an exception if it exists. - We are using the
findByEmailmethod to check if user exists. There is other option to handle this.- Catch the constraint violation exception thrown by Spring in case email already exists.
- I believe catching exception is not a good solution as it can cause issue in future (let’s say exception changed in future release).
- Avoid storing the password in plain text, before saving user information, encoding the password using Password encoder.
We are keeping this class simple. Will add lot more methods to user service throughout this spring security course. Stay tuned.
5. User Registration Controller
Our registration controller will perform following tasks:
- Validate incoming data.
- Show an error message on front-end (if any).
- Call user service for registration.
- Show error in we find a duplicate user or any other issue while saving the user profile.
This is how our controller look like:
package com.javadevjournal.web.controller.user;

import com.javadevjournal.system.exception.UserAlreadyExistException;
import com.javadevjournal.user.service.UserService;
import com.javadevjournal.web.data.user.UserData;
import org.springframework.beans.factory.annotation.Autowired;
import org.springframework.stereotype.Controller;
import org.springframework.ui.Model;
import org.springframework.validation.BindingResult;
import org.springframework.web.bind.annotation.GetMapping;
import org.springframework.web.bind.annotation.PostMapping;
import javax.validation.Valid;
import static com.javadevjournal.ApplicationConstant.REDIRECT;

@Controller
public class RegistrationController {

    @Autowired
    private UserService userService;

    @GetMapping("/register")
    public String register(final Model model){
        model.addAttribute("userData", new UserData());
        return "account/register";
    }

    @PostMapping("/register")
    public String userRegistration(final @Valid  UserData userData, final BindingResult bindingResult, final Model model){
        if(bindingResult.hasErrors()){
            model.addAttribute("registrationForm", userData);
            return "account/register";
        }
        try {
            userService.register(userData);
        }catch (UserAlreadyExistException e){
            bindingResult.rejectValue("email", "userData.email","An account already exists for this email.");
            model.addAttribute("registrationForm", userData);
            return "account/register";
        }
        return REDIRECT+"/starter";
    }
}
We are performing multiple actions:
@Validannotation will trigger bean validation on ourUserData.- If there is any validation error, we will show the error on the front end for correction.
- While saving the customer profile, with duplicate user exception, we are setting a message and sending it back for correction.
- On successful registration, redirecting user to our starter page.
5.1 User Data
We map the incoming user data to UserData class and validated using the bean validation API.
import javax.validation.constraints.Email;
import javax.validation.constraints.NotEmpty;
import javax.validation.constraints.NotNull;
import java.io.Serializable;

public class UserData implements Serializable {

    @NotEmpty(message = "First name can not be empty")
    private String firstName;

    @NotEmpty(message = "Last name can not be empty")
    private String lastName;

    @NotEmpty(message = "Email can not be empty")
    @Email(message = "Please provide a valid email id")
    private String email;

    @NotEmpty(message = "Password can not be empty")
    private String password;

    //getter and setter
}
In above code, we are using pre-defined messaged for the front end display.For configurable messages and internationalization, please read Internationalization in Spring Boot.
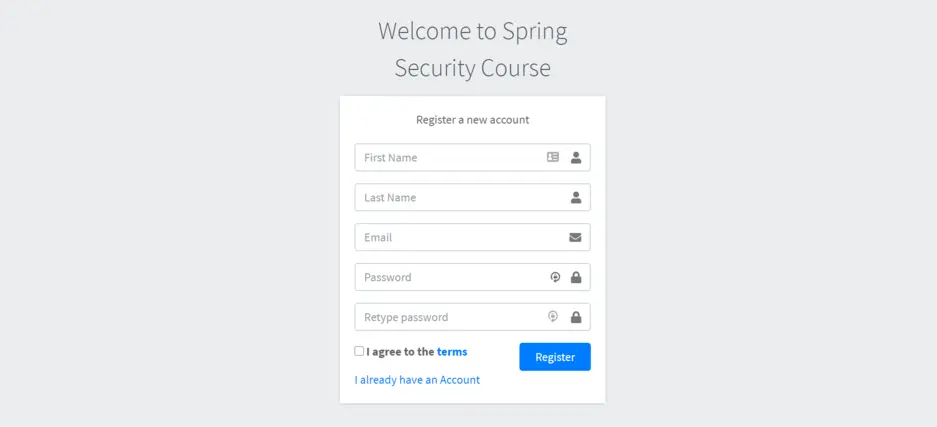
6. Registration Page Template
Let’s create our registration page template. We are building our page using Thymeleaf.
<!DOCTYPE html>
<html xmlns:th="http://www.thymeleaf.org" lang="en">
<head>
</head>
<body class="hold-transition register-page">
  <div class="register-box">
    <div class="card">
      <div class="card-body register-card-body">
        <p class="login-box-msg">Register a new account</p>

        <form action="#" th:action="@{/register}" th:object="${userData}" method="post">
          <div class="alert alert-danger" th:if="${#fields.hasErrors('*')}">
          <p th:each="err : ${#fields.errors('*')}" th:text="${err}"></p>
        </div>
        <div class="input-group mb-3">
        <input type="text" class="form-control"  th:field="*{firstName}" placeholder="First Name" th:errorclass="is-invalid">
        <div class="input-group-append">
          <div class="input-group-text">
            <span class="fas fa-user"></span>
          </div>
        </div>
      </div>
        <div class="input-group mb-3">
          <input type="text" class="form-control"  th:field="*{lastName}" placeholder="Last Name" th:errorclass="is-invalid">

          <div class="input-group-append">
            <div class="input-group-text">
              <span class="fas fa-user"></span>
            </div>
          </div>
        </div>
       <div class="input-group mb-3">
          <input type="email" class="form-control" th:field="*{email}" placeholder="Email" th:errorclass="is-invalid">

          <div class="input-group-append">
            <div class="input-group-text">
              <span class="fas fa-envelope"></span>
            </div>
          </div>
        </div>
        <div class="input-group mb-3">
          <input type="password" class="form-control" th:field="*{password}" placeholder="Password" th:errorclass="is-invalid">

          <div class="input-group-append">
            <div class="input-group-text">
              <span class="fas fa-lock"></span>
            </div>
          </div>
        </div>
        <div class="input-group mb-3">
          <input type="password" class="form-control" placeholder="Retype password">
          <div class="input-group-append">
            <div class="input-group-text">
              <span class="fas fa-lock"></span>
            </div>
          </div>
        </div>
    </div>
    <!-- /.form-box -->
  </div><!-- /.card -->
</div>
</body>
</html>
It’s a standard Thymeleaf template. I want to highlight few important items in this.
- We have mapped the form with
userDataobject. Make sure we are setting the object in initial request. - We map form submission to the register controller.
7. Testing Registration Process
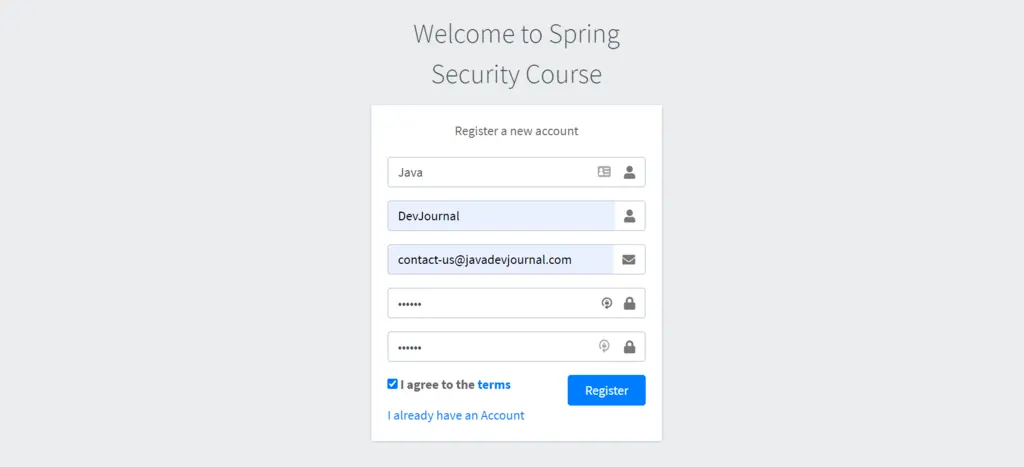
Let’s see the registration process in action. Build and run the application. Once the application is up and running, hit the https://localhost:8080/register URL on your browser. We will have our registration page:
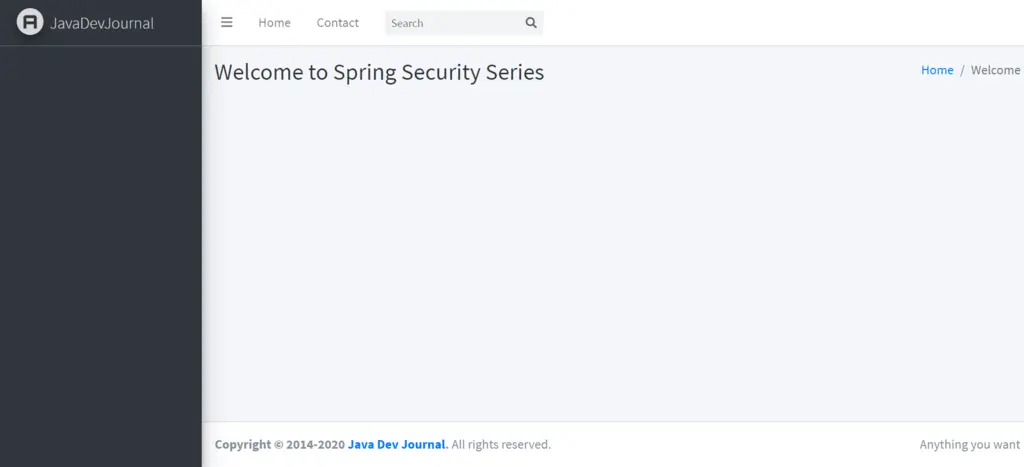
Fill out all the details and click on the “Register button”. If everything filled correctly, it will display a welcome screen:
7.1 Registration Validations:
We are using bean validation to validate the incoming data before saving customer profile in the system. If we fill wrong details or incomplete values, our validation will throw an error message to the customer. Let’s test the validation workflow by filling incomplete details and hit “Register” button:
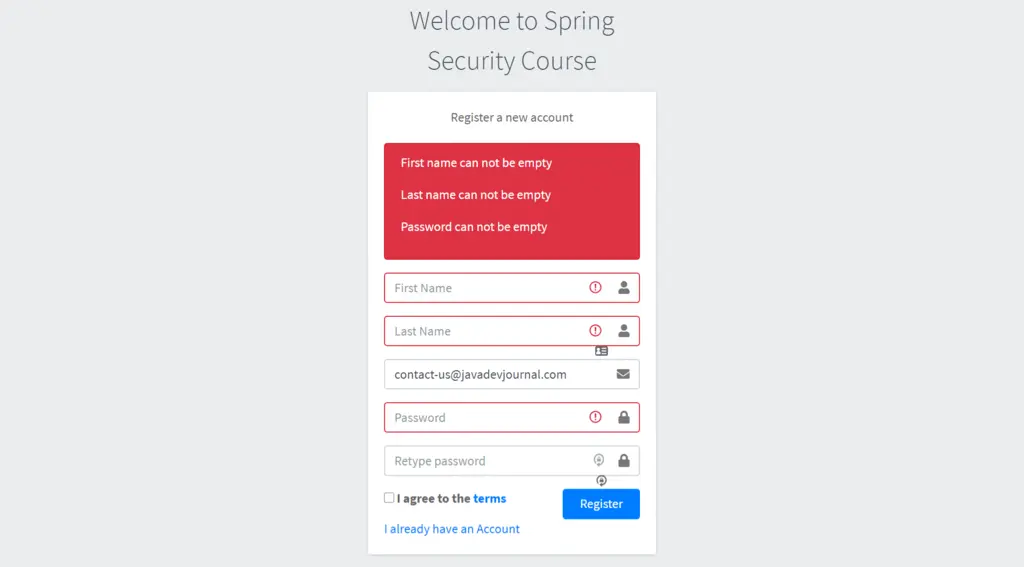
We submitted the form with only email and our bean validation displaying the error messages to the customer for correction.
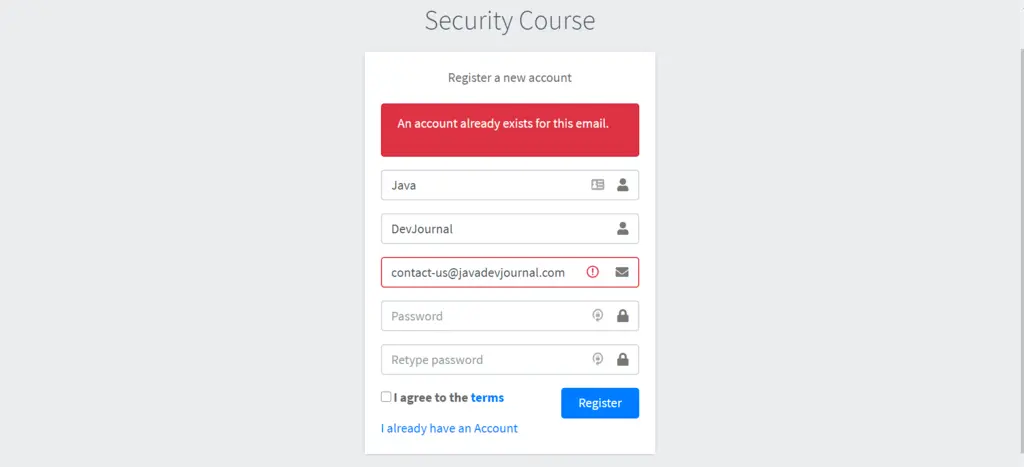
7.2 Duplicate User Error
Email is our login id and not allowing the same email id for other registration. The service class is validating duplicate emails in the DefaultUserService.
if(checkIfUserExist(user.getEmail())){
    throw new UserAlreadyExistException("User already exists for this email");
}
We don’t want to display any exception message to the customer but like to show a message to indicate why registration is failing.To handle this, we are mapping this exception as validation error in our controller.
try {
    userService.register(userData);
} catch (UserAlreadyExistException e) {
    bindingResult.rejectValue("email", "userData.email", "An account already exists for this email.");
    model.addAttribute("registrationForm", userData);
    return "account/register";
}
Let’s check this workflow by providing the same email id for second registration:
Click on the “Register” button and we will get the error message:
8. Additional Notes:
I am not covering the login part in the article. Outlining the reason why login is not part of this article.
- Login needs understanding of the authentication process.
- We are working on a step-by-step guide and I don’t want to jump to another topic.
- Need an understanding of how request mapping works in Spring security.
Our customer entity is simple. It does not contain any information about the roles or if the customer is active, etc. As said earlier I will add these features during the course.
Summary
In this article of spring security tutorial, we worked on the user registration using spring security and spring boot. We covered the following points:
- How registration process work.
- Saving customer profile in the database.
- Validate duplicate user before registration.
The source code for this series is available on the GitHub.
you don’t create UserService.Have you noticed that.
Thanks for your feedback Ishita. It’s a part of the Spring security so I am not repeating the common concepts. You can download the complete example from our GitHub repo:
https://github.com/javadevjournal/javadevjournal/tree/master/spring-security/spring-security-series