In this article of build REST API with Spring, we learn how to Secure a REST API using Spring Security with token based authentication. We will see the steps to secure a REST API with Spring Security and Spring Boot.
Introduction
In our previous article we saw how to build a basic authentication with Spring Security for REST API. Basic authentication has a certain limitation and it might not fit in to all use cases. We will extend this article to see how to implement a token bases security feature with Spring. Let’s look at the workflow for a better understanding:
- User send a request with a username and password.
- Spring security return token back to client API.
- Client API sends token in each request as part of authentication.
- Token invalidated on log out.
Let’s see how this workflow looks like:
1. Maven Setup
We will use Spring Boot and Maven to handle the dependencies. As we are building the Spring Boot web application, we will use following staters for our application.
- Spring Boot Web starter
- Spring Boot Security starter.
- JPA starter
This is now our pom.xml looks like:
<dependencies>
    <dependency>
        <groupId>org.springframework.boot</groupId>
        <artifactId>spring-boot-starter-security</artifactId>
    </dependency>
    <dependency>
        <groupId>org.springframework.boot</groupId>
        <artifactId>spring-boot-starter-web</artifactId>
    </dependency>
    <dependency>
        <groupId>org.springframework.boot</groupId>
        <artifactId>spring-boot-starter-data-jpa</artifactId>
    </dependency>
    <dependency>
        <groupId>mysql</groupId>
        <artifactId>mysql-connector-java</artifactId>
    </dependency>
    <dependency>
        <groupId>org.apache.commons</groupId>
        <artifactId>commons-lang3</artifactId>
        <version>3.8.1</version>
    </dependency>
    <dependency>
        <groupId>org.springframework.boot</groupId>
        <artifactId>spring-boot-starter-test</artifactId>
        <scope>test</scope>
    </dependency>
    <dependency>
        <groupId>org.springframework.security</groupId>
        <artifactId>spring-security-test</artifactId>
        <scope>test</scope>
    </dependency>
</dependencies>
2. Database layout
I am keeping this application simple at the database level, I will use a single table to store user details and token. There will be no token against user profile till they request application to create one and return this token. This is how the table structure look like:
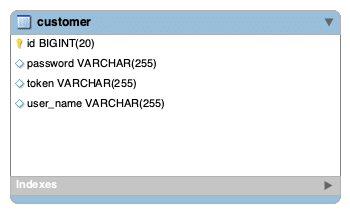
This is not a production ready table, but the main idea is to store the token for the customer profile and use this token for authentication and authorization. You can change / adapt this workflow based on your requirement.
3. JPA Repository
To save and get the token information for customer profile, we need to create a custom repository. This repository is responsible to get customer information based on the token. Customer service will use our customer repository to get the customer details based on the token or to perform the login.
@Repository
public interface CustomerRepository extends CrudRepository<Customer, Long> {

    @Query(value = "SELECT u FROM Customer u where u.userName = ?1 and u.password = ?2 ")
    Optional login(String username,String password);
    Optional findByToken(String token);
}
4. Customer Validation Service
Our customer validation service follows two core operations
- Provide login feature to return token to the client.
- Validate customer based on the provided token.
This is how our customer service looks like:
@Service("customerService")
public class DefaultCustomerService implements CustomerService {

    @Autowired
    CustomerRepository customerRepository;

    @Override
    public String login(String username, String password) {
        Optional customer = customerRepository.login(username,password);
        if(customer.isPresent()){
            String token = UUID.randomUUID().toString();
            Customer custom= customer.get();
            custom.setToken(token);
            customerRepository.save(custom);
            return token;
        }

        return StringUtils.EMPTY;
    }

    @Override
    public Optional findByToken(String token) {
        Optional customer= customerRepository.findByToken(token);
        if(customer.isPresent()){
            Customer customer1 = customer.get();
            User user= new User(customer1.getUserName(), customer1.getPassword(), true, true, true, true,
                    AuthorityUtils.createAuthorityList("USER"));
            return Optional.of(user);
        }
        return  Optional.empty();
    }
}
Let’s inspect what we are doing in the above code:
- Login method accepts the user name and password and will return a token for successful credential.
- We will use the second method for all secured resources
5. Spring Security Configurations
These are the main configuration classes to secure a REST API using Spring Security with token based authentication.In this section, we will talk about following classes:
AuthenticationProvider: Find the user by its authentication token.AuthenticationFilter:Extract the authentication token from the request headersSecurityConfiguration: Spring Security Configuration
5.1 Token Authentication Provider
The AuthenticationProvider is responsible to find user based on the authentication token sent by the client in the header. This is how our Spring based token authentication provider looks like:
@Component
public class AuthenticationProvider extends AbstractUserDetailsAuthenticationProvider {

 @Autowired
 CustomerService customerService;

 @Override
 protected void additionalAuthenticationChecks(UserDetails userDetails, UsernamePasswordAuthenticationToken usernamePasswordAuthenticationToken) throws AuthenticationException {
  //
 }

 @Override
 protected UserDetails retrieveUser(String userName, UsernamePasswordAuthenticationToken usernamePasswordAuthenticationToken) throws AuthenticationException {

  Object token = usernamePasswordAuthenticationToken.getCredentials();
  return Optional
   .ofNullable(token)
   .map(String::valueOf)
   .flatMap(customerService::findByToken)
   .orElseThrow(() -> new UsernameNotFoundException("Cannot find user with authentication token=" + token));
 }
Our AuthenticationProvider use the CustomerService to find a customer based on the token.
5.2 Token Authentication Filter
The token authentication filter is responsible to get the authentication filter from the header and call the authentication manager for authentication. This is how the authentication filter looks like:
public class AuthenticationFilter extends AbstractAuthenticationProcessingFilter {

    AuthenticationFilter(final RequestMatcher requiresAuth) {
        super(requiresAuth);
    }

    @Override
    public Authentication attemptAuthentication(HttpServletRequest httpServletRequest, HttpServletResponse httpServletResponse) throws AuthenticationException, IOException, ServletException {

        Optional tokenParam = Optional.ofNullable(httpServletRequest.getHeader(AUTHORIZATION)); //Authorization: Bearer TOKEN
        String token= httpServletRequest.getHeader(AUTHORIZATION);
        token= StringUtils.removeStart(token, "Bearer").trim();
        Authentication requestAuthentication = new UsernamePasswordAuthenticationToken(token, token);
        return getAuthenticationManager().authenticate(requestAuthentication);

    }

    @Override
    protected void successfulAuthentication(final HttpServletRequest request, final HttpServletResponse response, final FilterChain chain, final Authentication authResult) throws IOException, ServletException {
        SecurityContextHolder.getContext().setAuthentication(authResult);
        chain.doFilter(request, response);
    }
}
Let’s highlight few important points in this:
- This filter delegates Authentication to the
- This filter is only enable for specific URLS (explained in next section)
5.3 Spring Security Configurations
This is responsible to club everything together.Let’s see how our Spring security configuration looks like:
@Configuration
@EnableWebSecurity
@EnableGlobalMethodSecurity(prePostEnabled = true)
public class SecurityConfiguration extends WebSecurityConfigurerAdapter {


 private static final RequestMatcher PROTECTED_URLS = new OrRequestMatcher(
  new AntPathRequestMatcher("/api/**")
 );

 AuthenticationProvider provider;

 public SecurityConfiguration(final AuthenticationProvider authenticationProvider) {
  super();
  this.provider = authenticationProvider;
 }

 @Override
 protected void configure(final AuthenticationManagerBuilder auth) {
  auth.authenticationProvider(provider);
 }

 @Override
 public void configure(final WebSecurity webSecurity) {
  webSecurity.ignoring().antMatchers("/token/**");
 }

 @Override
 public void configure(HttpSecurity http) throws Exception {
  http.sessionManagement()
   .sessionCreationPolicy(SessionCreationPolicy.STATELESS)
   .and()
   .exceptionHandling()
   .and()
   .authenticationProvider(provider)
   .addFilterBefore(authenticationFilter(), AnonymousAuthenticationFilter.class)
   .authorizeRequests()
   .requestMatchers(PROTECTED_URLS)
   .authenticated()
   .and()
   .csrf().disable()
   .formLogin().disable()
   .httpBasic().disable()
   .logout().disable();
 }

 @Bean
 AuthenticationFilter authenticationFilter() throws Exception {
  final AuthenticationFilter filter = new AuthenticationFilter(PROTECTED_URLS);
  filter.setAuthenticationManager(authenticationManager());
  //filter.setAuthenticationSuccessHandler(successHandler());
  return filter;
 }

 @Bean
 AuthenticationEntryPoint forbiddenEntryPoint() {
  return new HttpStatusEntryPoint(HttpStatus.FORBIDDEN);
 }
}
Let’s inspect some important points:
- All the URL matching with request pattern
/api/**are secure and need a valid token for the access. - The
webSecurity.ignoring().antMatchers("/token/**")shows all requests excluded from the security check. - We have registered the
AuthenticationProviderwith the Spring security. Spring security will it to check token validation. - The configure method includes basic configuration along with disabling the form based login and other standard features
This step concludes the steps to secure a REST API using Spring Security with token based authentication. In the next step, we will setup a simple Spring Boot web application to test our workflow.
6. Spring Boot Controller
Let’s create a simple Spring Boot controller to test our application:
6.1 Token Controller
This controller is responsible to return a token for valid credentials:
@RestController
public class TokenController {

    @Autowired
    private CustomerService customerService;

    @PostMapping("/token")
    public String getToken(@RequestParam("username") final String username, @RequestParam("password") final String password){
       String token= customerService.login(username,password);
       if(StringUtils.isEmpty(token)){
           return "no token found";
       }
       return token;
    }
}
6.2 Secure User Profile Controller
This is the secure controller. It will return user profile for a valid token.This controller is only accessible on passing a valid token:
@RestController
public class UserProfileController {

    @Autowired
    private CustomerService customerService;

    @GetMapping(value = "/api/users/user/{id}",produces = "application/json")
    public Customer getUserDetail(@PathVariable Long id){
        return customerService.findById(id);
    }
}
7. Testing Application
Let’s build and deploy our application.Once the application is running, let’s use any REST client to test our application (I am using Postman):
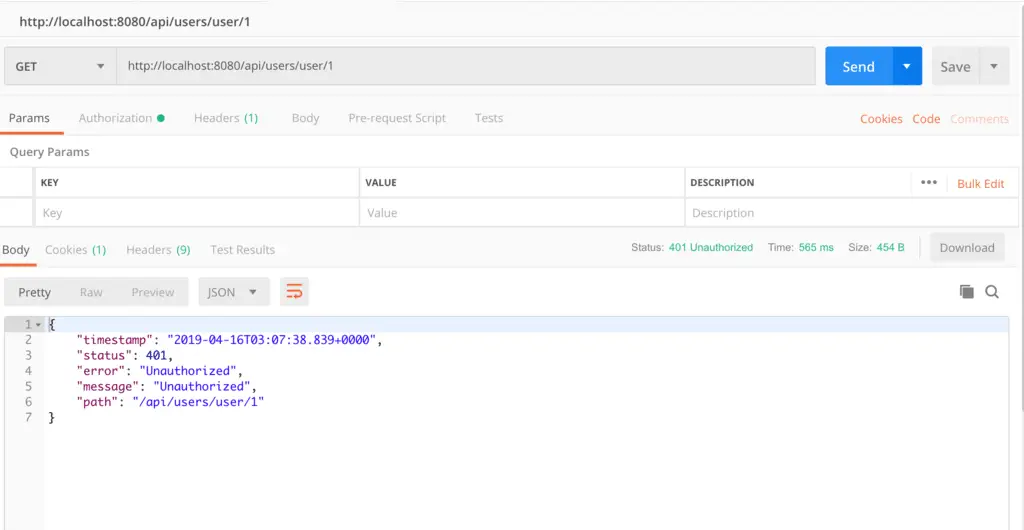
Without Access Token:
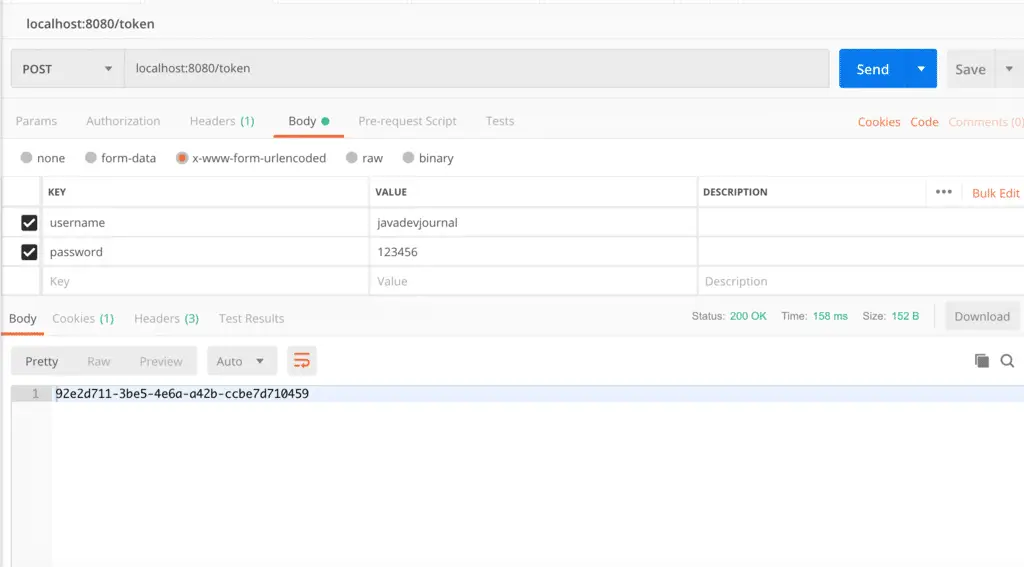
Let’s get a token from the API:
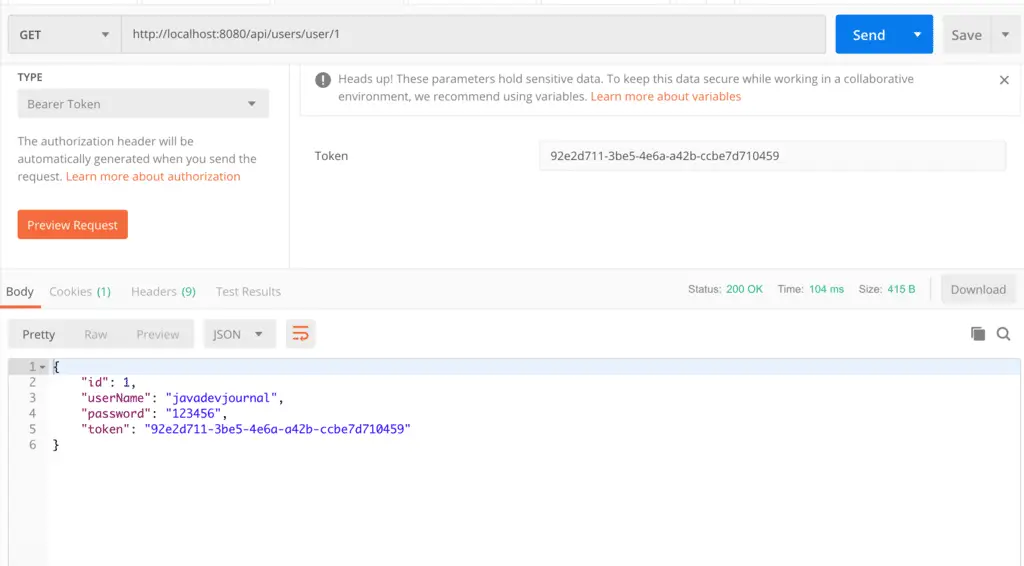
Use the Token for the secure URL’s
Summary
In this article, we saw how to use token based approach to secure a REST API using Spring Security. We covered the different configurations and setup to secure our REST API. The source code for this post is available on the GitHub.
Thanks a lot for the clear explanation!
Hi,
i am not using Spring boot. i use Spring code and i combined these configs with CXF as below:
<!– CXF configuration for resful webservices –>
<servlet>
<servlet-name>CXFServlet</servlet-name>
<servlet-class>org.apache.cxf.transport.servlet.CXFServlet</servlet-class>
<load-on-startup>1</load-on-startup>
</servlet>
<servlet-mapping>
<servlet-name>CXFServlet</servlet-name>
<url-pattern>/services/*</url-pattern>
</servlet-mapping>
and
<!– configure for restful endpoint for application services as web authentication… –>
<jaxrs:server id=”ApplicationServices”
address=”/Application”>
<jaxrs:serviceBeans>
<ref bean=”ControllerImpl” />
</jaxrs:serviceBeans>
<jaxrs:providers>
<ref bean=”jsonProvider” />
</jaxrs:providers>
<jaxrs:features>
<bean id=”loggingFeature”
class=”org.apache.cxf.feature.LoggingFeature”>
<property name=”prettyLogging” value=”true” />
</bean>
<ref bean=”swagger2Feature” />
</jaxrs:features>
</jaxrs:server>
=======
@Configuration
@EnableWebSecurity
@EnableGlobalMethodSecurity(prePostEnabled = true)
public class SecurityConfiguration extends WebSecurityConfigurerAdapter {
private static final RequestMatcher PROTECTED_URLS = new OrRequestMatcher(
new AntPathRequestMatcher(“/services/**”));
=======
then it doesn’t work. there is no exception or error but all request will allow without bearer token.
How can we combine CXF with spring security ?
thank’s for you tutorial, i have a question plz what is the difference between authentication with just token (like in your example) and authentication with jwt token ?
JWT is an encoding standard for tokens that contains a JSON data payload that can be signed and encrypted.The one in the example is a simple key use case (Think of this as a developer version). The process will not change but JWT token generation follow certain alogo and encryption process.
The key in this example is simple string used for authorization but JWT is authorization and also usedencode and verify claims.
How can i customize the errror object when the exception arisises when a user does not pass the token or an invalid token.
Can you provide more information as what you meant by customization? Do you want to add additional details to the object or you are looking for some other customization?
Hi, thanks for the example. I have a question, exist a way to get the customer with just sending the token(without the id) in the “Authorization” postman?
Hi, thanks for the example. I have a question. Exist a way to get the customer without sending the “id” and just get it with the token that already have?
If you want to work purely based on authorization and token, I will look in to Oauth2 workflow which is more streamline and geared towards such requirement.s
POST localhost:8080/token with paramters doesn’t work (like in example). I don’t know why. I’m took on method break point and nothing.. What I can doing wrong? Any ideas?
Did you tried to download and run the example? Are you facing the same issue with the example?
Thank you so much. I was following your post and it worked fine but I have registration as well, so if I save the user using
user.setPassword(bCryptPasswordEncoder().encode(user.getPassword())); while registration.
The line
Optional customer = customerRepository.login(username,password);
always return null.
I think its because the query is check for plain password, but I have encoded it while saving.
As I have to encode the password while saving, I cannot save it in plain text.
Can you please show us how we can use encoded password and check the login query using user name and password.
@Override
public User login(String email, String password) {
Optional user = userRepository.findByEmail(email);
if(user.isPresent() && (bCryptPasswordEncoder().matches(password, user.get().getPassword()))){
I changed logic to check only for email and then check the password and its working fine.
Hello Nongthonbam,
If you like to use it in the registration, I believe using the Spring security build in feature will be more helpful, you can always create and inject your custom userservice to authenticate user based on your requirement.Please have a look at the following post to see how you can use Spring security with Spring Boot to accomplish this.
https://www.javadevjournal.com/spring/password-encoding-in-spring-security/
Incredible tutorial, thanks, just a doubt how you could implement the password Encoder to encrypt the passwords, thanks again
The simple solution is to use the BCryptPasswordEncoder which use the BCrypt algorithms to hash the password.If you are using Spring Security there are other way to do it but BCryptPasswordEncoder is the recommended one.
Hi Umesh,
I’ve noticed the tutorial on this page differs substantially from the git repo you’ve provided … I’m not going to have the audacity to ask for a synchronisation of the two, just please let us know which of the two is the functional version. Can I assume the git version is correct ?
Thanks and best regards,
your tutorials are like oxygen to lots of us 🙂
Hi Paul,
The Github code is updated and working, however let me know what are the difference you saw in both places as I want to revisit the article to avoid such confusion and make sure it is helpful.
Hi, how would a production ready table look like ?
Hi Antonica,
This is more related to your application.For a simple application this table structure is ok, but for a other application (e.g. Ecommerce), this is not sufficient, we may need to consider multiple use cases before finalizing the table structure. What kind of application you are referring to ?
How tom impement user role?
Hi Gautam,
That needs a separate post, I will let you know once we published the post on user based security
Hi,
@Override
protected UserDetails retrieveUser(String userName, UsernamePasswordAuthenticationToken usernamePasswordAuthenticationToken) throws AuthenticationException {
Object token = usernamePasswordAuthenticationToken.getCredentials();
return Optional
.ofNullable(token)
.map(String::valueOf)
.flatMap(customerService::findByToken)
.orElseThrow(() -> new UsernameNotFoundException(“Cannot find user with authentication token=” + token));
}
This method is present in AuthenticationProvider class and showing error that”Cannot convert objects to UserDetails”
Can you provide input on this.
did you downloaded the complete example available on the GitHub?
Nice post, was easy to understand in one straight read! Thanks Umesh!
You are welcome Kiran 🙂
Hi, I am not getting any errors but the project didn’t give the desired output. I am not able to get the token when I sent a post request with the username and password, instead, i just got the string “no token found”. This indicates that the customerRepository.login() method just gave back a null Optional object rather than one containing a Customer object. I suspect the error point is at the part dealing with the database. I am not sure whether should I insert some initial data into the table before doing the call. But if it is the case, then I am wondering what the annotation @GeneratedValue really did. I am new to spring, and I guess the data should be populated directly when the server gets running, but I am not sure if this is the exact way it works. So what should I do for now? I have double-checked that all codes match your source code, so I suppose if there is something wrong, it should be the database.
Did you tried the sample code? System should create and send the token back in case the username and password matches.You need not create it upfront and it is taken care automatically.
Look at the class DefaultCustomerService and method login for details
Good example to understand the spring security concept.
Thanks Siddharth
Hello,
Incase the token is invalid i want to output a custom message to the client.How can i achieve that.
Hi, I have an application where to use all rest calls, the user should be logged in as a normal application, and also I need to add api calls secured by token because those are going to be called by an external service. I’m trying to mix both so the app can function normally with a login page, and the api calls can be called by external services using the token. I’m using jdbcAuthentication for the calls from the application and I want to use this tutorial to add the secure external calls and I got to the point I get the token but then I’, unable to make the calls with the token.
This is my SpringSecurityConfig.java
@Configuration
@EnableWebSecurity
@EnableGlobalMethodSecurity(prePostEnabled = true)
public class SpringSecurityConfig extends WebSecurityConfigurerAdapter {
@Autowired
private BCryptPasswordEncoder bCryptPasswordEncoder;
@Autowired
private DataSource dataSource;
@Autowired
private AccessDeniedHandler accessDeniedHandler;
@Value(“${spring.queries.users-query}”)
private String usersQuery;
@Value(“${spring.queries.role-query}”)
private String roleQuery;
private static final RequestMatcher PROTECTED_URLS = new OrRequestMatcher(
new AntPathRequestMatcher(“/api/**”)
);
private AuthenticationProvider provider;
public SpringSecurityConfig(final AuthenticationProvider authenticationProvider) {
super();
this.provider=authenticationProvider;
}
@Override
protected void configure(AuthenticationManagerBuilder auth) throws Exception {
auth.jdbcAuthentication()
.dataSource(dataSource)
.usersByUsernameQuery(usersQuery)
.authoritiesByUsernameQuery(roleQuery)
.passwordEncoder(bCryptPasswordEncoder).and();
}
@Override
protected void configure(HttpSecurity http) throws Exception {
http.csrf().disable() //Disables CSRF protection
.authorizeRequests()
.antMatchers(“/company/**”,
“/user/**”,
“/dashboard/table/**”,
“/leaderboard”,
“/leaderboard/leaders/campaigns/company/”).hasAuthority(“ADMIN”)
.antMatchers(“/dashboard”,
“/campaign/**”,
“/question/**”,
“/leaderboard/**”).hasAnyAuthority(“ADMIN”, “USER”)
.antMatchers(“/”, “/login”, “/error”, “/error-page”).permitAll()
.anyRequest().authenticated() //All requests to the endpoint must be authorized or else they should be rejected
.and().httpBasic().disable()
.formLogin()
.loginPage(“/login”).failureUrl(“/login?error=true”)
.defaultSuccessUrl(“/dashboard”, true)
.usernameParameter(“email”)
.passwordParameter(“password”)
.and()
.authenticationProvider(provider)
.addFilterBefore(authenticationFilter(), AnonymousAuthenticationFilter.class)
.authorizeRequests()
.requestMatchers(PROTECTED_URLS)
.authenticated().and()
.logout()
.logoutRequestMatcher(new AntPathRequestMatcher(“/logout”))
.logoutSuccessUrl(“/”)
.and()
.exceptionHandling().accessDeniedHandler(accessDeniedHandler);
}
@Override
public void configure(WebSecurity web) throws Exception {
web.ignoring()
.antMatchers(“/resources/**”, “/static/**”, “/css/**”, “/js/**”, “/img/**”, “/token/**”);
}
@Bean
AuthenticationFilter authenticationFilter() throws Exception {
final AuthenticationFilter filter = new AuthenticationFilter(PROTECTED_URLS);
filter.setAuthenticationManager(authenticationManager());
return filter;
}
@Bean
AuthenticationEntryPoint forbiddenEntryPoint() {
return new HttpStatusEntryPoint(HttpStatus.FORBIDDEN);
}
}
What do you think I have missing to get the calls with the token working?
Thanks a lot
Can you provide more information about ” I’, unable to make the calls with the token.”Also my recommendation is to keep the API and web application separate as REST API and web application do not mix well together since web work closely with session.
Sir you have a creating a Jason web token in spring boot ?
Not sure if I got your question.
in a rest api project, i make a call in endpoint with a Bearer Token with program: postman it works with token. but in ajax doesen’t work.
i tried to insert token inside the ajax code, but ii doesen’t works.
Set a header ajax in in this way : headers: { “Authorization”: “Bearer adba71d8-3657-4614-9abd-4e2b2c0ecb8e”}.
and recieve : “status”: 401,”error”: “Unauthorized”,
What do you think about this kind of error ?
I believe this should work, let me to try this.
good day sir why when I’am in the postman the result is no token found
are you sending the token in the request or not?
me too, i’m request at /token with username and password but result no token found
hii ur tutorial worked for me a lot , but i wanted to connect this to one of my database table that i already have , how can i do it can u please explain cause every time i try changing the table name and column it gives error
If this is a production system than it can be a little tricky, but for the application in test, you need to extend your exisiting table.I need some additional information before we can suggest something
1. What is the table name and can you share some details?
2. What is the error you are facing?
3. Are you using JPA or something else for DB operations?
this is a production system bt right now i m testing , i m using JPA right now , my table name is users which have different fields of id username password thn user email . the error i m facing is that i cannot change table name and thn this code uses customerDetailsService and i have to use UserDetailsService for my application which i am unable to do. plz help me
Hi Pooja,
The table name is for the demo purpose only, you can always extend your existing user table and add these additional fields.For the services and DAO, you can use the same technique, either add those additional method in the class or if you do not have access to source code, extend the class and use the Spring alias to inject it.
Hi, In the tuto you said that “This is the secure controller. It will return user profile for a valid token.This controller is only accessible on passing a valid token:”, but how could I expire a token after, let’s say 120s. I red on internet that I should add server.servlet.session.timeout=120s in the properties file, but still get no verification. Please can you help me ?
You need to set the token expirary as part of the database field and store the token expiry time while creating the token.(Similar to the Oath 2 based logic).When someone pass the token, you need to check the coupon and validity.
Session timeout will only going to invalidate the user HTTP session and not the token.Hope this will help
Hello. Thanks for the tuto.
I got an error when I test the example with api/users/user1 but I got a null pointer exception in attemptAuthentication.
Why dou you have this line ? Optional tokenParam = Optional.ofNullable(httpServletRequest.getHeader(AUTHORIZATION)); //Authorization: Bearer TOKEN
And AUTHORIZATION is not recognized so I change it with : Optional tokenParam = Optional.ofNullable(httpServletRequest.getHeader(“AUTHORIZATION”)); //Authorization: Bearer TOKEN.
tokenParam is never used in this function and after String token= httpServletRequest.getHeader(“AUTHORIZATION”);, tokenParam is always null
That is Good catch.I will be updating the code base to remove the tokenParam from the code. there is a static import for the AUTHORIZATION.
Your tuto is very good, but without the import, it is very difficult to follow. I still have nullpointer exception when I call my apis.
Hello,
The full source code of all posts are available on the Github.Here is the link to this post.This is complete working example, please ensure to setup the DB for this example to work.
https://github.com/umeshawasthi/javadevjournal/tree/master/Spring-Boot/spring-security-rest-api
Thanks
Umesh
Thank you very much. I followed a lot of tutos over the internet. Yours is so very well explained. Once again, thanks.
Happy to help!!!
not able to download git clone, getting below error https://github.com/umeshawasthi/javadevjournal/tree/master/Spring-Boot/spring-security-rest-api
Cloning into ‘spring-security-rest-api’…
fatal: repository ‘https://github.com/umeshawasthi/javadevjournal/tree/master/Spring-Boot/spring-security-rest-api/’ not found
my bad, found code
🙂
why AuthorizationFIlter twice call?
Not sure if I understood your question.Can you provide more information ?
same problem, AuthorizationFilter.doFilter is called twice.
remove the @Bean of “AuthenticationFilter authenticationFilter() throws Exception”