In this article, we will look at the Spring security success handler and how to write custom success handler. In this post, let’s see how to redirect user after login using Spring security. Redirecting user to a different page is a very common requirement for any web application. We will use Spring Boot for this article, but most of the concepts and code base holds true for simple Spring application.
1. Application Setup
Let’s start by creating the web application. We can use the IDE or Spring Initializr to bootstrap our application. We are using Spring Initializr for this post as it offer a fast way to pull the dependencies to build our application.
- Go to https://start.spring.io/.
- Select the web, Spring security, Thymeleaf and MySQL as dependencies.
- Fill information for the group and artifact and click on the “Generate” button.

If you like to use the Spring Boot CLI to generate the project structure, run the following command from the terminal.
spring init --name spring-security-success-handler --dependencies=web,thymeleaf,security spring-security-success-handler
Using service at https://start.spring.io
Project extracted to '/Users/spring-security-success-handler'
Here is our pom.xml file:
<?xml version="1.0" encoding="UTF-8"?>
<project xmlns="http://maven.apache.org/POM/4.0.0" xmlns:xsi="http://www.w3.org/2001/XMLSchema-instance" xsi:schemaLocation="http://maven.apache.org/POM/4.0.0 https://maven.apache.org/xsd/maven-4.0.0.xsd">
   <modelVersion>4.0.0</modelVersion>
   <parent>
      <groupId>org.springframework.boot</groupId>
      <artifactId>spring-boot-starter-parent</artifactId>
      <version>2.2.4.RELEASE</version>
      <relativePath />
      <!-- lookup parent from repository -->
   </parent>
   <groupId>com.javadevjournal</groupId>
   <artifactId>spring-security-success-handler</artifactId>
   <version>0.0.1-SNAPSHOT</version>
   <name>spring-security-success-handler</name>
   <description>How to redirect user to different page on login success</description>
   <properties>
      <java.version>1.8</java.version>
   </properties>
   <dependencies>
      <dependency>
         <groupId>org.springframework.boot</groupId>
         <artifactId>spring-boot-starter-data-jpa</artifactId>
      </dependency>
      <dependency>
         <groupId>org.springframework.boot</groupId>
         <artifactId>spring-boot-starter-security</artifactId>
      </dependency>
      <dependency>
         <groupId>org.springframework.boot</groupId>
         <artifactId>spring-boot-starter-thymeleaf</artifactId>
      </dependency>
      <dependency>
         <groupId>org.springframework.boot</groupId>
         <artifactId>spring-boot-starter-web</artifactId>
      </dependency>
      <dependency>
         <groupId>mysql</groupId>
         <artifactId>mysql-connector-java</artifactId>
         <scope>runtime</scope>
      </dependency>
      <dependency>
         <groupId>org.springframework.boot</groupId>
         <artifactId>spring-boot-starter-test</artifactId>
         <scope>test</scope>
         <exclusions>
            <exclusion>
               <groupId>org.junit.vintage</groupId>
               <artifactId>junit-vintage-engine</artifactId>
            </exclusion>
         </exclusions>
      </dependency>
      <dependency>
         <groupId>org.springframework.security</groupId>
         <artifactId>spring-security-test</artifactId>
         <scope>test</scope>
      </dependency>
   </dependencies>
   <build>
      <plugins>
         <plugin>
            <groupId>org.springframework.boot</groupId>
            <artifactId>spring-boot-maven-plugin</artifactId>
         </plugin>
      </plugins>
   </build>
</project>
We are adding MySQL as the dependencies to store user login details in the database and will customize the user service to get user login details from the DB.
2. Spring Security Configuration.
The next step for our application is to complete the Spring Security configuration. To use the Spring security success handler, we will complete following configuration setup.
- Create Customer JPA entity (we will use it in the User Service class).
- Crete a custom UserService class.
- Inject the UserService class in the Spring Authentication.
- Create and inject custom Spring Security Success handler.
2.1. Customer JPA Entity.
To store the data in the database, Create a CustomerEntity.
@Entity
public class CustomerEntity {

    @Id
    @GeneratedValue(strategy = GenerationType.IDENTITY)
    private Long id;
    private String firstName;
    private String lastName;
    private String email;
    private String password;

    public Customer() {}
    //getter & setters methods
}
2.2. Database Configurations.
Spring Boot JPA staters provides multiple features to support the integration with the underlying database.Let’s define the database property to help Spring Boot JPA connect with the database.
spring.jpa.generate-ddl=true
spring.datasource.url=jdbc:mysql://localhost:3306/spring-security-success-handler?useJDBCCompliantTimezoneShift=true&useLegacyDatetimeCode=false&serverTimezone=UTC
spring.datasource.username=root
spring.datasource.password=root
spring.datasource.driver-class-name=com.mysql.jdbc.Driver
When we start the application, Spring Boot will generate the DDL and create a database schema for us:
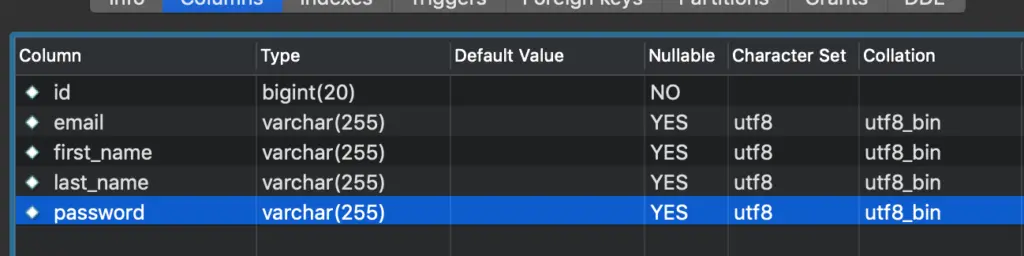
If you like to run the DDL yourself, here is the sample DDL SQL script for your reference:
CREATE TABLE `customer_entity` (
  `id` bigint(20) NOT NULL AUTO_INCREMENT,
  `email` varchar(255) COLLATE utf8_bin DEFAULT NULL,
  `first_name` varchar(255) COLLATE utf8_bin DEFAULT NULL,
  `last_name` varchar(255) COLLATE utf8_bin DEFAULT NULL,
  `password` varchar(255) COLLATE utf8_bin DEFAULT NULL,
  PRIMARY KEY (`id`)
) ENGINE=InnoDB DEFAULT CHARSET=utf8 COLLATE=utf8_bin
2.3. Spring JPA Respository.
To enable the database operations on the Customer entity, let’s define a CustomerRepositoty class. Please read Spring JPA for more details on sophisticated support to build repositories based on Spring and JPA.
import com.javadevjournal.jpa.entities.CustomerEntity;
import org.springframework.data.jpa.repository.JpaRepository;
import org.springframework.stereotype.Repository;

@Repository
public interface CustomerRepository extends JpaRepository < CustomerEntity, Long > {
    CustomerEntity findByEmail(String email);
}
3. Custom UserService
Spring Security use UserDetailsService interface is used in order to lookup the username, password and GrantedAuthorities for any user. We will provide a custom implementation to load the user for our application.
import com.javadevjournal.jpa.entities.CustomerEntity;
import com.javadevjournal.jpa.repository.CustomerRepository;
import org.springframework.beans.factory.annotation.Autowired;
import org.springframework.security.core.userdetails.User;
import org.springframework.security.core.userdetails.UserDetails;
import org.springframework.security.core.userdetails.UserDetailsService;
import org.springframework.security.core.userdetails.UsernameNotFoundException;
import org.springframework.stereotype.Service;

@Service("customUserService")
public class CustomUserDetailService implements UserDetailsService {

    @Autowired
    private CustomerRepository customerRepository;

    @Override
    public UserDetails loadUserByUsername(String username) throws UsernameNotFoundException {
        final CustomerEntity customer = customerRepository.findByEmail(username);
        if (customer == null) {
            throw new UsernameNotFoundException(username);
        }
        UserDetails user = User.withUsername(customer.getEmail()).password(customer.getPassword()).authorities("USER").build();
        return user;
    }
}
4. Spring Security Configuration
Let’s connect all these services to ensure they work together during user login process. This is how our Spring security config file looks like:
import org.springframework.context.annotation.Bean;
import org.springframework.context.annotation.Configuration;
import org.springframework.security.authentication.dao.DaoAuthenticationProvider;
import org.springframework.security.config.annotation.authentication.builders.AuthenticationManagerBuilder;
import org.springframework.security.config.annotation.web.builders.HttpSecurity;
import org.springframework.security.config.annotation.web.configuration.EnableWebSecurity;
import org.springframework.security.config.annotation.web.configuration.WebSecurityConfigurerAdapter;
import org.springframework.security.core.userdetails.UserDetailsService;
import org.springframework.security.crypto.bcrypt.BCryptPasswordEncoder;
import org.springframework.security.crypto.password.PasswordEncoder;

import javax.annotation.Resource;

@Configuration
@EnableWebSecurity
public class WebSecurityConfig extends WebSecurityConfigurerAdapter {

    @Resource(name = "customUserService")
    private UserDetailsService userDetailsService;

    @Override
    protected void configure(HttpSecurity http) throws Exception {
        http.authorizeRequests()
                .antMatchers("/**")
                .permitAll().and()
                .formLogin()
                .defaultSuccessUrl("/welcome", true);
    }


    @Bean
    public DaoAuthenticationProvider authProvider() {
        DaoAuthenticationProvider authProvider = new DaoAuthenticationProvider();
        authProvider.setUserDetailsService(userDetailsService);
        authProvider.setPasswordEncoder(passwordEncoder());
        return authProvider;
    }

    @Bean
    public PasswordEncoder passwordEncoder() {
        return new BCryptPasswordEncoder();
    }

    @Override
    protected void configure(AuthenticationManagerBuilder auth) throws Exception {
        auth.authenticationProvider(authProvider());
    }
}
There are few important things happening in the above code.
- We are injecting a custom
DaoAuthenticationProviderin theAuthenticationManager. - Our custom
DaoAuthenticationProvideruse the customUserDetailsServiceservice.
The most important point is the configure method, which includes a default success handler. In our example, it will always redirect the authenticated user to the welcome page. This is great, but it has few limitations.
- How to handle the situation where we want to redirect the user to a different page based on the profile.
- In enterprise application, we like the user to be redirected to the same page where he clicked on the login (e.g. In ecommerce application we will return the user to the same page before the login.)
5. Custom Success Handler
Let’s create and configure our custom success handler. I am keeping the logic simple in Spring security custom handler but you can add the custom logic as per your requirement. To give you an idea, here is what I did in one of our ecommerce platform.
- Added the auto-login feature in success handler.
- Restored the customer cart on login success.
- Setting currency and language based on the login site.
import org.apache.commons.collections4.CollectionUtils;
import org.apache.commons.lang3.StringUtils;
import org.slf4j.Logger;
import org.slf4j.LoggerFactory;
import org.springframework.security.core.Authentication;
import org.springframework.security.core.GrantedAuthority;
import org.springframework.security.core.authority.SimpleGrantedAuthority;
import org.springframework.security.core.context.SecurityContextHolder;
import org.springframework.security.web.DefaultRedirectStrategy;
import org.springframework.security.web.RedirectStrategy;
import org.springframework.security.web.authentication.SavedRequestAwareAuthenticationSuccessHandler;
import org.springframework.security.web.savedrequest.HttpSessionRequestCache;
import org.springframework.security.web.savedrequest.RequestCache;
import org.springframework.security.web.savedrequest.SavedRequest;

import javax.servlet.ServletException;
import javax.servlet.http.HttpServletRequest;
import javax.servlet.http.HttpServletResponse;
import java.io.IOException;


public class CustomSuccessHandler extends SavedRequestAwareAuthenticationSuccessHandler {

    private static final Logger LOG = LoggerFactory.getLogger(CustomSuccessHandler.class);
    private final GrantedAuthority adminAuthority = new SimpleGrantedAuthority(
            "ROLE_ADMIN");

    private RedirectStrategy redirectStrategy = new DefaultRedirectStrategy();

    @Override
    public void onAuthenticationSuccess(HttpServletRequest request, HttpServletResponse response, Authentication authentication) throws IOException, ServletException {

        //if redirected from some specific url, need to remove the cachedRequest to force use defaultTargetUrl
        final RequestCache requestCache = new HttpSessionRequestCache();
        final SavedRequest savedRequest = requestCache.getRequest(request, response);
        if (!isAdminAuthority(authentication))
        {
            String targetUrl = super.determineTargetUrl(request, response);
           // this logic is only for demo purpose, please do not use it on production application.
           if(StringUtils.isBlank(targetUrl) || StringUtils.equals(targetUrl, "/"))
            {
                targetUrl ="/home"; // we can build custom logic
            }
            clearAuthenticationAttributes(request);
            LOG.info("Redirecting customer to the following location {} ",targetUrl);
            redirectStrategy.sendRedirect(request, response, targetUrl);

            //You can let Spring security handle it for you.
            // super.onAuthenticationSuccess(request, response, authentication);

        }
        else{
            // we invalidating the session for the admin user.
            invalidateSession(request, response);
        }
        clearAuthenticationAttributes(request);
    }

    protected void invalidateSession(final HttpServletRequest request, final HttpServletResponse response) throws IOException
    {
        SecurityContextHolder.getContext().setAuthentication(null);
        request.getSession().invalidate();
        redirectStrategy.sendRedirect(request, response, "/admin");
    }

    protected boolean isAdminAuthority(final Authentication authentication)
    {
        return CollectionUtils.isNotEmpty(authentication.getAuthorities())
                && authentication.getAuthorities().contains(adminAuthority);
    }
}
You have few options while creating custom success handler in your Spring security configuration.
- Implement the
AuthenticationSuccessHandlerand provide the implementation of all methods. - Extends one of the class provided by Spring security. In our case we extended our class from
SavedRequestAwareAuthenticationSuccessHandler. This is a recommended approach as it will give you a jump start without writing everything yourself. - Override the
onAuthenticationSuccessmethod with your custom logic.
The last step is to configure the success handler in the Spring security. To add this, let’s change our previous Spring security configuration class.
@Override
protected void configure(HttpSecurity http) throws Exception {
    http.authorizeRequests()
        .antMatchers("/**")
        .permitAll().and()
        .formLogin()
        .successHandler(successHandler());
}

@Bean
public CustomSuccessHandler successHandler() {
    return new CustomSuccessHandler();
}
With this, our configuration and setup is complete for the Spring security custom success handler. I am not including the HTML part in this post as you can download it from the GitHub. Let’s run and test our application.
6. Running and Testing Application.
Let’s run our application. Once the application is up and running, register your account by visiting http://localhost:8080/register URL. This page will register you as a front-end customer. Once registered, login to the site by visiting the following URL: http://localhost:8080/login.
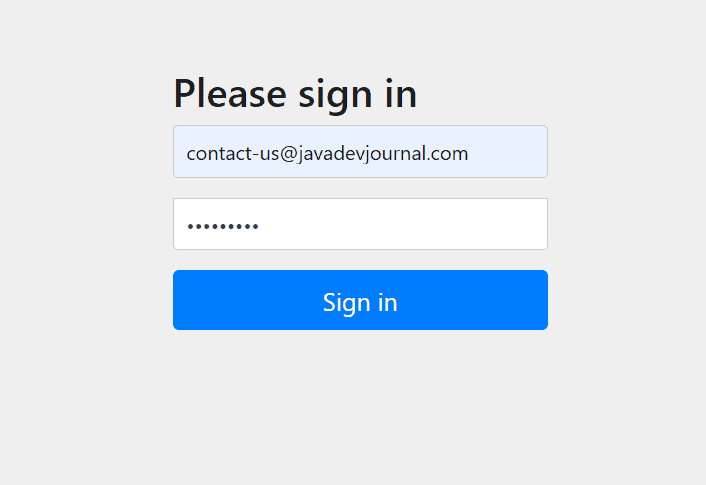
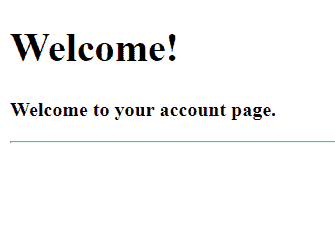
Once you fill the correct details, it will redirect you to the welcome page (as per our custom success handler).
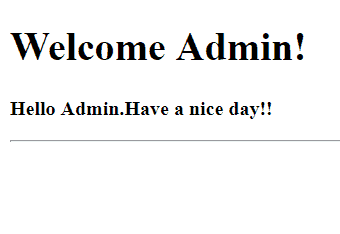
In case admin login to the system, we will redirect the admin to a different welcome screen (as per our code)
else {
    // we invalidating the session for the admin user.
    invalidateSession(request, response);
}

protected void invalidateSession(final HttpServletRequest request, final HttpServletResponse response) throws IOException {
    SecurityContextHolder.getContext().setAuthentication(null);
    request.getSession().invalidate();
    redirectStrategy.sendRedirect(request, response, "/admin");
}
Let’s login as admin to validate if our custom success handler works as expected or not:
Summary
In this post, we saw how to write a custom success handler in Spring security. Having a custom handler is a very common requirement for any web application and it provides a lot of flexibility to perform post authentication work. We also saw what are the different classes available in the Spring framework which can help us bootstrap the process.The source code for this article is available on GitHub.