In this article, we will look at using Spring Session with Redis. Spring Session makes it trivial to support clustered sessions without being tied to an application container specific solution.
1. Spring Session with Redis
Redis is a fast and easily scalable option. With sharding and clustering, Redis scales easily when the user base scales, also since session will expire after sometime, Redis expiring keys makes it a powerful and flexible solution. Spring session with Redis is a powerful and flexible solution in you are looking for:
- A fast database.
- Ability for clustering and sharding.
If you are working on a smaller application and like to use Spring Session for the session management, you can consider JDBC based session management. Also, you need to install the Redis server separately. Refer to the following video for installing Redis server on your local machine.
1. Application Setup
For this post, we will use our Spring security application to show how to delegate the session management to the Spring Session with Redis server. For any web application, session management is very critical and with standard web application, it is being managed by your application servers. Spring security use the session to perform multiple things. Let’s see how to pass the spring security session management to the central location using the Spring session. This is how our pom.xml looks like:
<?xml version="1.0" encoding="UTF-8"?>
<project xmlns="http://maven.apache.org/POM/4.0.0" xmlns:xsi="http://www.w3.org/2001/XMLSchema-instance" xsi:schemaLocation="http://maven.apache.org/POM/4.0.0 https://maven.apache.org/xsd/maven-4.0.0.xsd">
   <modelVersion>4.0.0</modelVersion>
   <parent>
      <groupId>org.springframework.boot</groupId>
      <artifactId>spring-boot-starter-parent</artifactId>
      <version>2.3.1.RELEASE</version>
      <relativePath />
      <!-- lookup parent from repository -->
   </parent>
   <groupId>com.javadevjournal</groupId>
   <artifactId>spring-security-series</artifactId>
   <version>0.0.1-SNAPSHOT</version>
   <name>Spring Security Tutorial Series</name>
   <description>Series to explain the core Spring security concepts.</description>
   <properties>
      <java.version>1.8</java.version>
   </properties>
   <dependencies>
      <!-- we need dev tool only for development and not for the production -->
      <dependency>
         <groupId>org.springframework.boot</groupId>
         <artifactId>spring-boot-devtools</artifactId>
      </dependency>
      <dependency>
         <groupId>org.springframework.boot</groupId>
         <artifactId>spring-boot-starter</artifactId>
      </dependency>
      <dependency>
         <groupId>org.springframework.boot</groupId>
         <artifactId>spring-boot-starter-security</artifactId>
      </dependency>
      <dependency>
         <groupId>org.springframework.boot</groupId>
         <artifactId>spring-boot-starter-web</artifactId>
      </dependency>
      <dependency>
         <groupId>org.springframework.boot</groupId>
         <artifactId>spring-boot-starter-validation</artifactId>
      </dependency>
      <dependency>
         <groupId>org.springframework.boot</groupId>
         <artifactId>spring-boot-starter-thymeleaf</artifactId>
      </dependency>
      <dependency>
         <groupId>org.springframework.boot</groupId>
         <artifactId>spring-boot-starter-data-jpa</artifactId>
      </dependency>
      <dependency>
         <groupId>org.springframework.boot</groupId>
         <artifactId>spring-boot-starter-actuator</artifactId>
      </dependency>
      <dependency>
         <groupId>mysql</groupId>
         <artifactId>mysql-connector-java</artifactId>
         <version>8.0.18</version>
      </dependency>
      <dependency>
         <groupId>org.springframework.boot</groupId>
         <artifactId>spring-boot-starter-mail</artifactId>
      </dependency>
      <dependency>
         <groupId>org.apache.commons</groupId>
         <artifactId>commons-lang3</artifactId>
         <version>3.11</version>
      </dependency>
      <!-- https://mvnrepository.com/artifact/org.thymeleaf.extras/thymeleaf-extras-springsecurity5 -->
      <dependency>
         <groupId>org.thymeleaf.extras</groupId>
         <artifactId>thymeleaf-extras-springsecurity5</artifactId>
         <version>3.0.4.RELEASE</version>
      </dependency>
      <!-- Spring security session management using the Spring Session and Redis -->
      <dependency>
         <groupId>org.springframework.session</groupId>
         <artifactId>spring-session-data-redis</artifactId>
      </dependency>
      <dependency>
         <groupId>org.springframework.boot</groupId>
         <artifactId>spring-boot-starter-data-redis</artifactId>
      </dependency>
      <dependency>
         <groupId>org.springframework.boot</groupId>
         <artifactId>spring-boot-starter-test</artifactId>
         <scope>test</scope>
         <exclusions>
            <exclusion>
               <groupId>org.junit.vintage</groupId>
               <artifactId>junit-vintage-engine</artifactId>
            </exclusion>
         </exclusions>
      </dependency>
   </dependencies>
   <build>
      <plugins>
         <plugin>
            <groupId>org.springframework.boot</groupId>
            <artifactId>spring-boot-maven-plugin</artifactId>
         </plugin>
      </plugins>
   </build>
</project>
You can download the application from our GitHub Repository.
1.1 Application Properties Setup
One of the benefit of using the Spring Boot auto-configuration is it’s default setup.Once Spring auto configurations sense specific jars in our class-path, it will automatically get in to picture and create default configurations and setup for us. In this case, once it finds the Redis Session and spring-boot-starter-data-redis starter in the class-path, it will start working on the following things automatically:
- Spring Session default setup will be in place and the Spring security session management will be taken care centrally by the Spring Session API.
- It will also create the default connection and integration with the Redis server to store and retrieve the session information from the Redis server.
To make sure Spring session with Redis is working as expected, we need to tell Spring Boot about the following additional details:
- What is the storage type – Spring session need this information to store the data in the database (e.g. JDBC, Redis, MongoDB etc.)
- Redis server host (IP or DNS).
- Redis server password (to connect with the server).
- Redis server port number
We can configure these using the application.properties file or through yaml:
spring.redis.host=localhost
spring.redis.password=
spring.redis.port=6379
spring.session.store-type=redis
Make sure the Redis Server is up and running before we start our application.
If you are using Spring Boot, that’s the only setup required and rest of the configuration will be handled automatically by Spring Boot auto configuration process.
We are also including the Spring Boot actuator dependency in our application. This is not required but we will use it to check the Session metrics during this tutorial. With the spring.session.store-type=redis, spring session will automatically start wring the session information in the Redis server. This is how the overall workflow looks like:
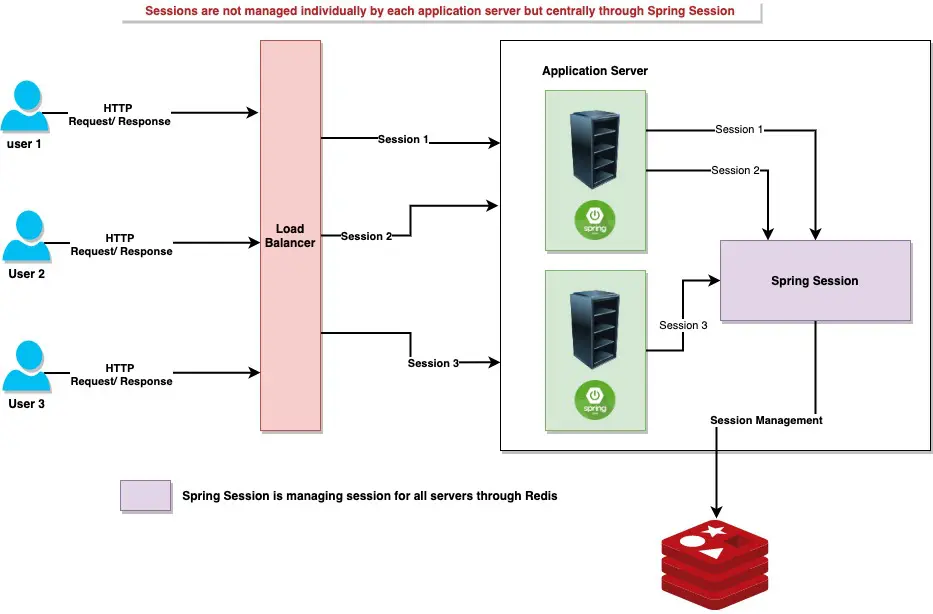
There are few important points:
- Session is not managed individually by each application server.
- Spring Session is responsible to manage the sessions centrally using the Redis server.
- Spring session transparently handling the session management for entire application.
2. Login Application and Demo
To demonstrate the session management, I am going to use the spring security login example from our Spring security course. This is a high level workflow of a login process using Spring MVC and Spring Security.
- Customer provides login credentials on the login page.
- Spring security will perform authentication and authorization based on the given credentials.
- If the provided details are corrected, Spring security will create authentication object and store it in the security context.
- A cookie with name “SESSION” is generated and the session id is stored in the cookie.
- For all future communication, Spring security will use the session cookie to identify if the user is authenticated or not.
- This session id represents the underlying session created by the application server.
Most of the workflow will be same but in above case the session generation and management will be taken care by the Spring session and storing all the session details in the Redis server.Please download the application from the GitHub and start the application.Once application started, create an account using the registration process.

2.1. Check the Redis Server
Before we start the application, check the Redis server using the Cli tool and any other too of your choice. Run the following command:
redis-cli keys '*'
This is how the output looks like:

These are the default session keys generated for our application.Let’s fill in the login details, once you are authenticated, system will take you to the account page.
Run the redis-cli keys '*' command again and check the output, you will see some additional data in the output (we are running command against Redis database to fetch the data).

There are few important things:
- We can see additional information and session details.
- Our username was “contact-us@javadevjournal“, Spring session created session for this user and same details is stored in the Redis database.
- For every session , Spring session manage two separate keys.
- An “expiration notification” key. This key expire every 30 minutes (default).
- Actual session key which expire after 5 minute (5 minutes after notification key expire)
2.2. Delete Session Information in Redis
To validate if the sessions are actually managed and handeled in Redis by Spring session and not by Tomcat, let’s delete the data from the Redis server.You can run the following command on the Redis Cli:
redis-cli keys '*' | xargs redis-cli delOnce the command execute, run the following command again redis-cli keys '*' to check the output.You will see the following output (empty array) as we removed all the keys.Now go back to the application and reload the page.You will immediately be logged out of the application. This happens because
- All session information is deleted from the Redis server.
- When the old session id passed from our application, Spring session is not able to find data in the Redis server.
- Information will be sent back to Spring security for invalid session id. Spring security will invalidate the session and removed the authentication object.
- An unauthorized status will be sent back by Spring security which force the login screen.
2.3. Session Timeout
You can also test the integration by setting a lower session timeout using application.properties file. For testing purpose, set the session timeout to 10 or 20 second. Once configured, login to the application and be ideal for 20 second, try to reload the page. You will be logged out automatically as the passed in session information is not valid and Spring security will invalid your session (It’s very close tologout using spring security.)
server.servlet.session.timeout=20s
3. Spring Session without Spring Boot
If you have not migrated to Spring Boot, the above configuration will not work for you. In this section we will quickly cover the configuration required for Spring managed session in non boot application.You need to add the following dependencies in your pom.xml file:
<?xml version="1.0" encoding="UTF-8"?>
<dependencies>
   <!-- ... -->
   <dependency>
      <groupId>org.springframework.session</groupId>
      <artifactId>spring-session-data-redis</artifactId>
      <version>{spring-session-version}}</version>
      <type>pom</type>
   </dependency>
   <!-- se Lettuce with Spring to manage the RedisClient and the RedisClusterClient -->
   <dependency>
      <groupId>io.lettuce</groupId>
      <artifactId>lettuce-core</artifactId>
      <version>5.0.4.RELEASE</version>
   </dependency>
   <dependency>
      <groupId>org.springframework</groupId>
      <artifactId>spring-web</artifactId>
      <version>{spring-version}</version>
   </dependency>
</dependencies>
The next step is to enable the Redis with the Spring session using Java configuration. To do this, we need to follow these steps.
- Enable the integration using the
@EnableRedisHttpSessionannotation. - Define a bean with
LettuceConnectionFactory.
@EnableRedisHttpSession
public class ApplicationConfig {

 @Bean
 public LettuceConnectionFactory connectionFactory() {
  return new LettuceConnectionFactory();
 }
}
Above configuration is performing some heavy lifting for us:
- The
@EnableRedisHttpSessionannotation creates a Spring Bean with the name ofspringSessionRepositoryFilterthat implements Filter. RedisConnectionFactoryconnects Session API to the Redis Server.
3.1. Java Servlet Initialization
public class ServletContainerInitializer extends AbstractHttpSessionApplicationInitializer {
 public Initializer() {
  super(ApplicationConfig.class);
 }
}
Let’s look at few important points
- We extended our
ServletContainerInitializerfromAbstractHttpSessionApplicationInitializerto make sure we have correct spring bean available (springSessionRepositoryFilter) AbstractHttpSessionApplicationInitializeralso provides a mechanism to easily make sure Spring loads ourApplicationConfig.
4. Redis Additional Configuration
For enterprise applications, having a single Redis server and default pool configuration will not help. Spring Boot provides a number of configurations which can be optimized using application properties file.Here are some of the important properties which will be helpful during the production configuration:
spring.redis.cluster.max-redirects=  #Maximum number of redirects to follow when executing commands across the cluster.
spring.redis.cluster.nodes=Comma-separated list of "host:port" pairs to bootstrap from. This represents an "initial" list of cluster nodes and is required to have at least one entry.
spring.redis.database=0.0 #Database index used by the connection factory.
spring.redis.host=Redis server host.
spring.redis.jedis.pool.max-active= 8.0 #Maximum number of connections that can be allocated by the pool at a given time. Use a negative value for no limit.
spring.redis.jedis.pool.max-idle=8.0 #Maximum number of "idle" connections in the pool. Use a negative value to indicate an unlimited number of idle connections.
spring.redis.jedis.pool.max-wait = -1ms #Maximum amount of time a connection allocation should block before throwing an exception when the pool is exhausted
spring.redis.jedis.pool.min-idle= 0.0 #Target for the minimum number of idle connections to maintain in the pool
spring.redis.port=6379 #Redis server port.
spring.redis.sentinel.master= #Name of the Redis server.
spring.redis.sentinel.nodes= #Comma-separated list of "host:port" pairs.
spring.redis.ssl=false #enable SSL
spring.redis.timeout= #connectiom timeout
For updated list, please refer to the Spring Boot documentation
Summary
In this article, we saw how to Spring Session with Redis using the spring security application.Spring session provides a transparent centrally managed sessions and Redis server is a reliable, fast and scalable database server for any enterprise application.