Spring Session provides an API and implementations for managing a user’s session information. In this post, we will cover features and advantages of using Spring Session in your Spring powered web application.
1. What is Spring Session?
Spring Session provides a transparent approach to resolve limitation of HTTP session. It provides central session management without being tied to container specific solution (e.g Tomcat, Jetty etc.). API provides integration with
HttpSession– Session API works by replacing theHttpSessionwith container neutral way by providing session ID in headers.WebSocket– Provides the ability to keep HttpSession alive withWebSocketmessages.WebSession– Replacing the Spring WebFlux’s WebSession in an application container neutral way.
On a high level, Session API provides following modules.
- Spring Session Core.
- Session Data Redis – Support for Redis based session management.
- JDBC Session – Relation database based session support.
- Hazelcast – Support for Hazelcast.
Here are benefits of using Spring Session API.
HttpSession– allows replacing theHttpSessionin an application container (i.e. Tomcat) neutral way.- Clustered Sessions – API makes it trivial to support clustered sessions without being tied to an application container specific solution.
- Multiple Browser Sessions – Spring Session supports managing multiple users’ sessions in a single browser instance (i.e. multiple authenticated accounts similar to Google).
- RESTful APIs – Session API allows providing session ids in headers to work with Restful APIs.
2. Why Spring Session
There is a natural question that might arise “Why Spring Session? What are benefits of Spring Session?” To get answer for these question, we need a basic understanding of how HTTPSession works and how the Session management happens in traditional application. Also we may need to understand the following additional things.
- How session management works on application servers?
- How to handle sessions in clustering?
- How sticky session works and how the sessions communication happens in traditional web applications.
I am sure, you must be aware of the concept that, traditionally HTTPSession is container specific i.e the container will create session and provide the session ID to the application. This essentially means that if our application is running on clustering environment, each container will have their own HTTPSession management. Session information is not shared across the different servers. The session id generated by application server 1 will be unknown to the second application server.
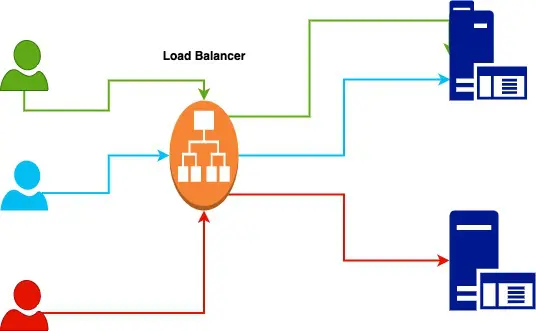
One of the widely solution is to use the sticky session approach using the web server. Here is a high level overview of sticky session approach
- It’s a process where load balancer or web server will create affinity between a client and app server.
- This is done by assigning a cookie by the load balancer to the client for identification.
- Load balancer will try to route each request from the client to the same application server during the session.
This is how it look like with stick sessions:
This approach seems good but it has many drawbacks.
- It can overload a given application server due to session stickiness.
- If the given application server is down, the other application server will have no information about the session from application server 1.
To handle these issues and provides a transparent and stateless communication, Spring session came with a concept of managing the HTTP session centrally. Each application server will work with this central location transparently to get and load the session information.
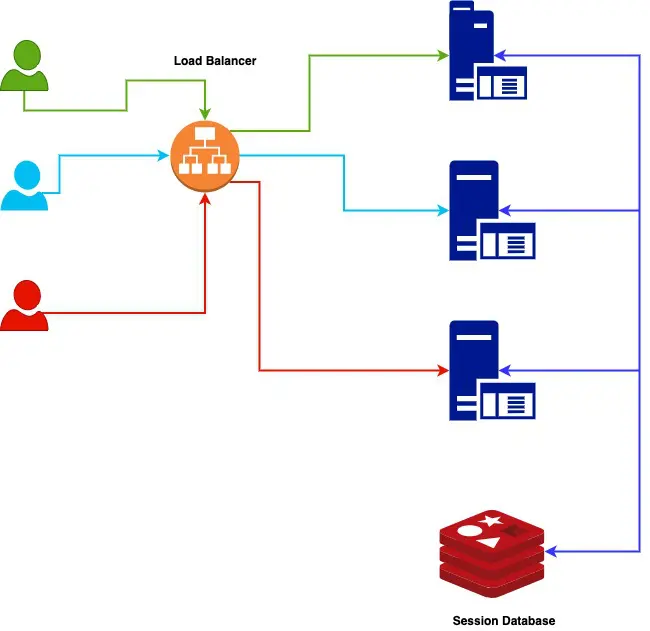
Let’s see some of the benefits of above approach where we are managing the HTTPSession in a central location:
- Session restoration on the application restart. We can fetch the session information from the session database if the given application server restarted. We no longer managing the session in the memory.
- No need if sticky session at load balalncer. Load balancer can be used to exclusively distribute the incoming traffic without overloading a given server.
- Server become truly stateless.
HTTPSessionis stored in the database and not in the server disk/ memory. - Spring sessions a transparent replacement in Spring Boot. We don’t need any code change (few configurations) and adding spring session as dependency in our project.
- Spring session make it easy to work in clustered applications.
3. Spring Session with Spring Boot
Let’s create a simple Spring Boot web application to start with
<?xml version="1.0" encoding="UTF-8"?>
<project xmlns="http://maven.apache.org/POM/4.0.0" xmlns:xsi="http:/x/www.w3.org/2001/XMLSchema-instance" xsi:schemaLocation="http://maven.apache.org/POM/4.0.0 http://maven.apache.org/xsd/maven-4.0.0.xsd">
   <modelVersion>4.0.0</modelVersion>
   <groupId>com.javadevjournal</groupId>
   <artifactId>spring-session-app</artifactId>
   <version>0.0.1-SNAPSHOT</version>
   <packaging>jar</packaging>
   <name>spring-session-app</name>
   <description>Demo project for Spring Boot</description>
   <parent>
      <groupId>org.springframework.boot</groupId>
      <artifactId>spring-boot-starter-parent</artifactId>
      <version>2.0.2.RELEASE</version>
      <relativePath />
      <!-- lookup parent from repository -->
   </parent>
   <properties>
      <project.build.sourceEncoding>UTF-8</project.build.sourceEncoding>
      <project.reporting.outputEncoding>UTF-8</project.reporting.outputEncoding>
      <java.version>1.8</java.version>
   </properties>
   <dependencies>
      <dependency>
         <groupId>org.springframework.boot</groupId>
         <artifactId>spring-boot-starter-web</artifactId>
      </dependency>
      <dependency>
        <groupId>org.springframework.boot</groupId>
        <artifactId>spring-boot-starter-security</artifactId>
      </dependency>
      <dependency>
         <groupId>org.springframework.boot</groupId>
         <artifactId>spring-boot-starter-test</artifactId>
         <scope>test</scope>
      </dependency>
   </dependencies>
   <build>
      <plugins>
         <plugin>
            <groupId>org.springframework.boot</groupId>
            <artifactId>spring-boot-maven-plugin</artifactId>
         </plugin>
      </plugins>
   </build>
</project>
4. Spring Boot Configuration
Let’s configure our Spring Boot application for using Session API. We will add required dependencies using pom.xml file.
4.1 Maven Dependencies
Let’s add dependencies for Spring Session. We are adding a dependency for Redis as well which work as a central storage for our session management.
<dependencies>
	<!-- ... -->
  <dependency>
    <groupId>org.springframework.session</groupId>
    <artifactId>spring-session-data-redis</artifactId>
  </dependency>
  <dependency>
    <groupId>org.springframework.boot</groupId>
    <artifactId>spring-session-data-redis</artifactId>
  </dependency>
</dependencies>
4.2 Spring Session Configurations
Spring Boot provides first class support for session API. Once we added required dependencies, we can enable Session support by setting Store-type property using application.properties file. We are using Redis for this post, to enable Redis for session API set following property
spring.session.store-type=redis # Session store type.Spring Boot support following store type for session API.
Based on the above property, Spring Boot will do several steps under the hood to enable Spring powered Session support.
- Spring Boot create Spring Bean with name
springSessionRepositoryFilter. This filter works under the hood to replace HttpSesion transparently with Spring backed session. - store-type property is equal to using
@EnableRedisHttpSessionannotation manually.
You can disable Spring Session by setting the store-type to none.
4.3 Redis Configurations
Spring Boot does several things to enable Redis support for the session management. It will automatically create a RedisConnectionFactory which connect Session API to Redis Server on localhost on port 6379. Use application.properties file to customize these configurations
spring.redis.host=localhost  #Server host
spring.redis.password=    #password
spring.redis.port=6379    #Redis server port

# Additional configurations
server.servlet.session.timeout= # Session timeout.
spring.session.redis.flush-mode=on-save # Sessions flush mode.
spring.session.redis.namespace=spring:session # Namespace for keys used to store sessions.
This post assumes that you have already installed Redis server, and it’s up and running.If not, please refer to the following video for step by step instructions.
5. REST Controller
Let’s create a simple REST control for our Spring Boot application.
import org.springframework.web.bind.annotation.GetMapping;
import org.springframework.web.bind.annotation.RestController;

import javax.servlet.http.HttpSession;

@RestController
public class SampleSessionRestController {

    /**
     * Simple Session controller which will return session ID backed by Spring Session API
     * @param session
     * @return session ID
     */
    @GetMapping("/")
    String uid(HttpSession session) {
        return session.getId();
    }

}
5.1.Spring Security Configuration
Let’s do a basic setup to enable default configurations for Spring Security.
@Configuration
@EnableWebSecurity
public class AppSecurityConfig extends WebSecurityConfigurerAdapter {

 @Autowired
 public void configureGlobal(AuthenticationManagerBuilder authentication) throws Exception {

  authentication.inMemoryAuthentication()
   .withUser("admin").password("nimda").roles("ADMIN");
 }

 @Override
 protected void configure(HttpSecurity http) throws Exception {
  http
   .httpBasic().and()
   .authorizeRequests()
   .antMatchers("/").hasRole("ADMIN")
   .anyRequest().authenticated();
 }
}
6. How Does Spring Session Work?
API works transparently by replacing HTTP session. Instead of using Application Server (Tomcat etc.) HttpSession, it will persist value in the Redis server (or other store type defined in the application.properties). To understand how Spring session works internally, we should look in the following 2 classes from the spring-session-core.
SessionRepositoryRequestWrapperSessionRepositoryFilter
The SessionRepositoryRequestWrapper extends the javax.servlet.http.HttpServletRequestWrapper. This custom wrapper overrides any method that returns the HttpSession. This means that if you are using the Spring session, all session methods will be taken care by SessionRepositoryRequestWrapper.Here is code snippet for your reference:
public final class SessionRepositoryRequestWrapper
extends HttpServletRequestWrapper {

    private SessionRepositoryRequestWrapper(HttpServletRequest request,
        HttpServletResponse response, ServletContext servletContext) {
        super(request);
        this.response = response;
        this.servletContext = servletContext;
    }
    @Override
    public HttpSessionWrapper getSession(boolean create) {
        // handle session creation internally
    }

    //other methods and details
}
The next is the standard spring filter SessionRepositoryFilter. This filter is responsible to replace the HttpServletRequest with the SessionRepositoryRequestWrapper.
@Override
protected void doFilterInternal(HttpServletRequest request,
    HttpServletResponse response, FilterChain filterChain)
throws ServletException, IOException {
    request.setAttribute(SESSION_REPOSITORY_ATTR, this.sessionRepository);

    SessionRepositoryRequestWrapper wrappedRequest = new SessionRepositoryRequestWrapper(
        request, response, this.servletContext);
    SessionRepositoryResponseWrapper wrappedResponse = new SessionRepositoryResponseWrapper(
        wrappedRequest, response);

    try {
        filterChain.doFilter(wrappedRequest, wrappedResponse);
    } finally {
        wrappedRequest.commitSession();
    }
}
Both request and response are wrapped using the SessionRepositoryRequestWrapper which ensure that anything after this filter will be using the custom HTTP session and not standard HttpSession.Spring session make sure that this filter is placed before any other filter which use the HttpSession. Keep in mind that all this is automatically added to your stack once we add spring session dependencies and not require any code change.Also spring session internally use some persistent mechanism to store the session information at a central location.
7. Test Application
Let’s finally test our application to make sure Session API is working as expected.
public class SpringSessionAppApplicationTests {

 private TestRestTemplate testRestTemplate;
 private String testUrl = "http://localhost:8080/";


 @Test
 public void testUnauthenticated() {
  RestTemplate restTemplate = new RestTemplate();
  ResponseEntity < String > result = restTemplate.getForEntity(testUrl, String.class);
  assertEquals(HttpStatus.UNAUTHORIZED, result.getStatusCode());
 }

 @Test
 public void testSpringSessionAPI() {

  URI uri = URI.create(testUrl);
  RestTemplate restTemplate = new RestTemplate();
  ResponseEntity < String > firstResponse = firstRequest(restTemplate, uri);
  String sessionId1 = firstResponse.getBody();
  String cookie = firstResponse.getHeaders().getFirst("Set-Cookie");
  String sessionId2 = nextRequest(restTemplate, uri, cookie).getBody();
  assertThat(sessionId1).isEqualTo(sessionId2);

 }

 private ResponseEntity < String > firstRequest(RestTemplate restTemplate, URI uri) {
  HttpHeaders headers = new HttpHeaders();
  headers.set("Authorization", "Basic " + Base64.getEncoder().encodeToString("admin:nimda".getBytes()));
  RequestEntity < Object > request = new RequestEntity < > (headers, HttpMethod.GET, uri);
  return restTemplate.exchange(request, String.class);
 }

 private ResponseEntity < String > nextRequest(RestTemplate restTemplate, URI uri,
  String cookie) {
  HttpHeaders headers = new HttpHeaders();
  headers.set("Cookie", cookie);
  RequestEntity < Object > request = new RequestEntity < > (headers, HttpMethod.GET, uri);
  return restTemplate.exchange(request, String.class);
 }

}
Let’s see what we are trying to do with our unit test case.
- With our first unit test case, we got unauthorized status back from the controller since we never passed default username and password in the request.
- Our second unit test case divided into two parts
- In the first request, we passed username and password to the controller and got success response from the controller.
- For the second request, we passed the same cookie in the request without passing username and password.
- We compared the session id returned in both the request and found those equal.
To test it in more detail, you can also delete the explicit key in Redis. Enter the following into your terminal ensuring to replace session id with the value of your SESSION cookie
redis-cli del spring:session:sessions:session-id<code>If you try to visit your application, observe that we are no longer authenticated.
8. Spring Session without Spring Boot
In this section, we will quickly cover steps required to use Spring-managed Session in non Spring Boot application.
8.1 Dependencies
Before using session API, we need to update dependencies
<?xml version="1.0" encoding="UTF-8"?>
<dependencies>
   <!-- ... -->
   <dependency>
      <groupId>org.springframework.session</groupId>
      <artifactId>spring-session-data-redis</artifactId>
      <version>{spring-session-version}}</version>
      <type>pom</type>
   </dependency>
   <!-- se Lettuce with Spring to manage the RedisClient and the RedisClusterClient -->
   <dependency>
      <groupId>io.lettuce</groupId>
      <artifactId>lettuce-core</artifactId>
      <version>5.0.4.RELEASE</version>
   </dependency>
   <dependency>
      <groupId>org.springframework</groupId>
      <artifactId>spring-web</artifactId>
      <version>{spring-version}</version>
   </dependency>
</dependencies>
8.2 Java Configuration
@EnableRedisHttpSession
public class ApplicationConfig {

 @Bean
 public LettuceConnectionFactory connectionFactory() {
  return new LettuceConnectionFactory();
 }
}- The
@EnableRedisHttpSessionannotation creates a Spring Bean with the name ofspringSessionRepositoryFilterthat implements Filter. RedisConnectionFactoryconnects Session API to the Redis Server.
8.3 Java Servlet Initialization
public class ServletContainerInitializer extends AbstractHttpSessionApplicationInitializer {
 public Initializer() {
  super(ApplicationConfig.class);
 }
}
Let’s look at few important points
- We extended our
ServletContainerInitializerfromAbstractHttpSessionApplicationInitializerto make sure we have correct spring bean available (springSessionRepositoryFilter) AbstractHttpSessionApplicationInitializeralso provides a mechanism to easily make sure Spring loads ourApplicationConfig.
Summary
In this post, we covered different features and use cases for Spring Session API. This API provides a transparent way to handle session for our application which provides flexibility and power to wire up multiple applications to the same Redis instance and share authentication information.Please refer to our GitHub repository for the updated code-base.
Hi,
this post is really helpful for me to store my file to Redis HttpSession.
I have a question. How can I config in application.property and how can I do to switch between Tomcat HttpSesion and Redis HttpSession in my Spring Boot application? I need this is because sometimes I need Tomcat HttpSession to store my file, sometimes I need Redis HttpSession to store my file. Please advice.
Thank you
Tri Tran
Redis is just a storage for your HTTP session and it will originally going to store your HTTP session.I am still not clear why do you want to manage the HTTP session in 2 different places? Handling it on the tomcat level will not give you the flexibility what Spring session offers you.
Nice post. and I build it with latest spring. check code here: https://github.com/gaoxingliang/spring-session-redis-demo
Hope it help
Thanks!!!
Thank you so much!! I was reading some more explanation in google but doubt is not clear. Can you please clear my doubt. (1) In the above code internally user session data is storing in which Redis cache/memory or disk storage? (2) If we use @CachePut for user session data to store in Redis then session data will be stored in spring redis session or redis cache(memory/disk) or both? Is this approach is good to save user session attribute?
(3)How we will make sure multiple user login in the same browser.
Hello Bhagwati,
Her are the answers to your questions
1. In this article, we are using Redis as underlying storage for the Spring session.You can use other storage options as well (e.g https://javadevjournal.com/spring/spring-session-with-jdbc/)
2. I am not sure what you meant by user session? @CachePut is part of Spring caching API and this is altogether different, you can use different caching API’s to store caching data.Spring session is to handle the HTTP session transparently.
3. Read for more details https://docs.spring.io/spring-session/docs/1.3.4.RELEASE/reference/html5/guides/users.html
Thanks for the tutorials. For using with Spring boot, do we need to install redis seperately or it gets included when we add the maven dependency “spring-session-data-redis”?
Yes, you need to install Redis separately.’spring-session-data-redis’ only provides a transparent integration to let Redis store and handle your session data.
Thank you very much for this code. Question: Is it mandatory to implement SpringSecurity. For testing purpose if create small app, do session.setAttribute, test from 2 InCognito browser windows, do we still need SpringSecuirty? Cant it work based on cookies/JSESSIONID like a normal Http Servlet would work where we dont implement any Security for test purpose
No, Spring security is not required but with most of the application need to have some security framework around it. Spring Session provides an API and implementations for managing a user’s session information, so you won’t be getting this without integrating Spring session with some way to store session information (like Redis)
Very nice explanation.
Keep posting.
Happy that you liked this post. 🙂