IN this article, we are going to discuss the Spring WebClient. Spring WebClient is a reactive web-client which was introduced as part of Spring 5.
Spring WebClient
In Simple terms, Spring WebClient is a non-blocking reactive client which helps to perform HTTP request. They introduced this as part of Spring 5. WebClient API’s are introduced as part of replacing existent Spring RestTemplate. Let’s look at some of the important feature of the new client.
- Spring WebClient support for both synchronous and asynchronous.
- Supports streaming up and down.
- Works with HTTP/1.1
- Supports highly concurrent, reactive, non-blocking with less resource intensive framework.
- Support both traditional and Spring reactive module.
- Provides a functional API that takes advantage of Java 8 lambdas.
As of 5.0, the non-blocking, reactive WebClient offers a modern alternative to the RestTemplate with efficient support for both sync and async, as well as streaming scenarios. The RestTemplate will be deprecated in a future version and will not have major new features from now on. I highly recommended it to start WebClient.
In this article, we will see how to set up the Spring WebClient and how to use it for making GET, POST or any other HTTP Request. We will also learn how to configure the client to handle timeout and other HTTP related configurations.
1. Application Setup
We will use Spring Boot for dependency management and spring boot auto-configuration. The WebClient is part of spring-webflux module and we will add it as required dependency for Spring Reactive support.
<dependency>
   <groupId>org.springframework.boot</groupId>
    <artifactId>spring-boot-starter-webflux</artifactId>
</dependency>
Keep in mind that Spring WebClient will be used on top of an existing asynchronous HTTP client library. We have the following options:
- Reactor Netty.
- Jetty Reactive Httpclient.
- Apache HttpComponent.
If you are using Spring Boot, this is taken care of automatically by Spring Boot auto-configuration.
2. Working with Spring WebClient
We will cover the following aspects in this section:
- Create Spring WebClient.
- HTTP GET/POST call using the WebClient.
- Additional configuration.
I am using https://reqres.in for simulating our HTTP REST call. It’s a hosted REST-API ready to respond to your API calls. This makes it easy to work on the REST API.
2.1. Creating WebClient
The WebClient provides create() method to create a default instance. This is the most basic steps to create the client. The functional API provide more flexible and powerful way to create the client, which includes:
- Initializing the client with base URI.
- Cookie setup.
- HTTP header configurations.
@Bean
public WebClient getWebClient(WebClient.Builder webClientBuilder) {
    return webClientBuilder
        .baseUrl("https://reqres.in/api")
        .defaultHeader(HttpHeaders.CONTENT_TYPE, MediaType.APPLICATION_JSON_VALUE)
        .build();
}
Spring Boot makes it really easy by injecting WebClient.Builder. This is part of DefaultWebClientBuilder class. We can use the builder to customize the client behavior. Another option is to create the WebClient by using WebClient.create() and configure it accordingly.
WebClient client = WebClient.create("https://reqres.in/api");2.2. Sending Request
Sending request using Spring WebClient is like what we used to do with RestTemplate except it provides more fluent API and control on the API calls. Let’s take a look at some of the important points while using WebClient for sending request.
- The
RequestHeadersUriSpecprovide option to use the HTTP method (e.g. GET or POST etc.) while calling the API. - Add header, cookies or authentication details (if required).
- Set request URI.
- Setup request body (e.g sending POST request).
- Call the
retrieve()orexchange()method. - Handle API response.
 WebClient webClient = webClientBuilder
     .clientConnector(new ReactorClientHttpConnector(getHttpClient()))
     .baseUrl("https://reqres.in/api")
     .build();

 Customer customer = webClient.get()
     .uri("/users/{id}", id)
     .header(HttpHeaders.CONTENT_TYPE, MediaType.APPLICATION_JSON_VALUE)
     .retrieve()
     .bodyToMono(Customer.class);
2.3. Response
We can use retrieve() and then bodyToFlux() and bodyToMono()method in case we are only interested in the API response. We can use the exhange() method in case we need more details from response.
3. WebClient – GET Request
Let’s look at the HTTP GET call using the Spring WebClient. We use the GET method whenever we like to get/fetch the resources. We will use the GET method for:
- Single user GET
/customers/{id} - List of customer GET
/customers
@RestController
public class CustomWebClientController {

    @Resource
    private WebClient webClient;

    @GetMapping("/customers/{id}")
    public Mono < Customer > getCustomer(@PathVariable String id) {

        return webClient.get()
            .uri("/users/{id}", id)
            .header(HttpHeaders.CONTENT_TYPE, MediaType.APPLICATION_JSON_VALUE)
            .retrieve()
            .bodyToMono(Customer.class);
    }

    @GetMapping("/customers")
    public Mono < String > getCustomers() {

        return webClient.get()
            .uri("/users/")
            .header(HttpHeaders.CONTENT_TYPE, MediaType.APPLICATION_JSON_VALUE)
            .retrieve()
            .bodyToMono(String.class);
    }
}
4. WebClient – POST Request
@RestController
public class CustomWebClientController {
@PostMapping("/customers")
public Mono < String > createCustomer(final Data data) {
return webClient.post()
.uri("/users/")
.header(HttpHeaders.CONTENT_TYPE, MediaType.APPLICATION_JSON_VALUE)
.body(Mono.just(data), Data.class)
.retrieve()
.bodyToMono(String.class);
}
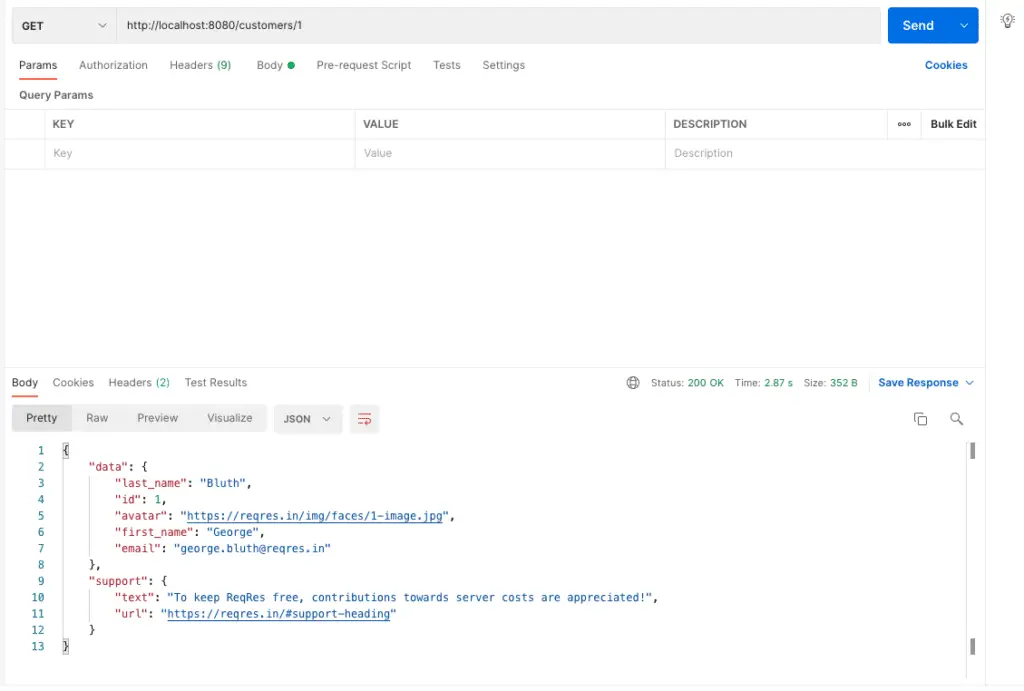
}If we run above code, this is how the output will look like:
5. WebClient – retrieve() vs exchange()
While using the Spring WebClient, we have the option to use retrieve() or exchange() method. Let’s look at the difference between these 2 methods to understand their use-cases.
- The
retrieve()method should be preferred in case we are interested in response body. - exchange method provides more control and details like status, headers and response body, etc.
-
retrieve()method provides automatic error signal (e.g. 4xx and 5xx). - No automatic error signal is available for
exchange()method and we need to check status code and handle it.
We also need to understand the Flux and Mono types available with Reactor
6. Timeout Configuration with Spring WebClient
Similar to Spring RestTemplate, we can set up the connection timeout for the WebClient. Use the HttpClient class to set up timeout for the client. Let’s see how to do this:
@Configuration
public class CustomWebClient {

    @Bean
    public WebClient getWebClient(WebClient.Builder webClientBuilder) {

        return webClientBuilder
            .clientConnector(new ReactorClientHttpConnector(getHttpClient()))
            .baseUrl("https://reqres.in/api")
            .build();
    }

    private HttpClient getHttpClient() {
        return HttpClient.create()
            .option(ChannelOption.CONNECT_TIMEOUT_MILLIS, 10 _000)
            .doOnConnected(conn - > conn
                .addHandlerLast(new ReadTimeoutHandler(10))
                .addHandlerLast(new WriteTimeoutHandler(10)));
    }
}
Let’s look at some important points:
- The
ChannelOption.CONNECT_TIMEOUT_MILLISallows us to se connection timeout. - Configuring read and write timeout using the
ReadTimeoutHandlerandWriteTimeoutHandler. - If you like, you can set response timeout using
Duration.ofMillis().
6.1. Memory Limit
The default memory limit for in-memory buffer data is 256KB. In case this limit exceeds, Spring will throw DataBufferLimitException error. Spring provide option to increase the buffer data limit using the max-in-memory-size property. We can define this in our application.properties file.
spring.codec.max-in-memory-size=2MBSummary
In this article, we look at the Spring WebClient. We saw how to configure and setup the client and use it. We also saw how to set up timeout configuration and memory limit for your client. In our next article, we will take a deeper look at the different method available on the WebClient. As always, the source code for this article is available on the GitHub Repository.