In this article, we will inspect the Spring Security custom logout handler. We will explore what is logout handler in Spring security and why we need it.
Introuduction
Spring security provides a beautiful solution to solve authentication and authorization problems. There are different event handlers in spring security to handle different kinds of events. Such events are AuthenticationSuccessHandler, LogoutHandler, AuthenticationFailureHandler, etc.
In this article, we will look at the LogoutHandler event with CustomLogoutHandler. Custom logout handler used to perform some post logout operation like clear some cache, make some API tokens invalid or some other actions.
1. Application Setup
As we know spring boot provides simple configuration things. We will create an initial project from spring initializer. We will add the dependencies listed below.
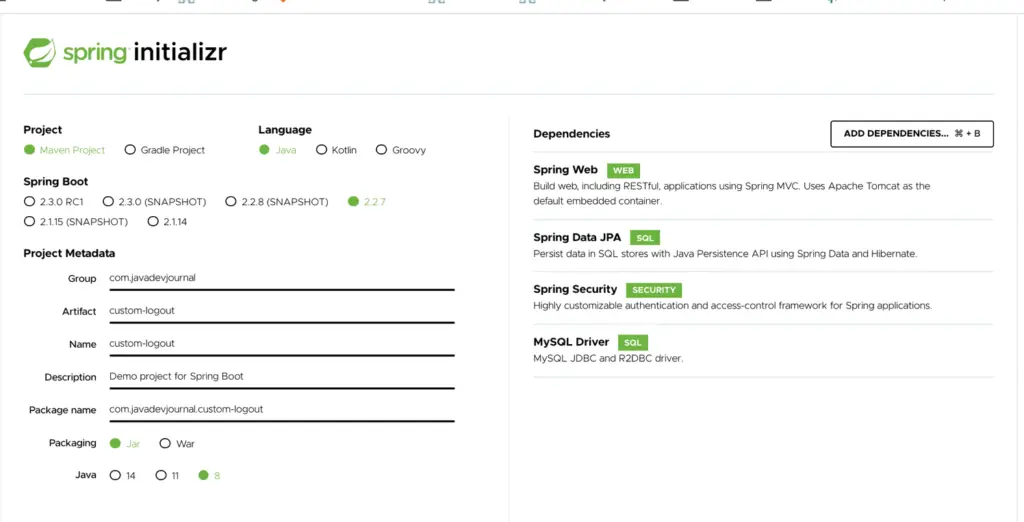
After generating the project from spring initializer pom.xml file should be like below snapshot.
<?xml version="1.0" encoding="UTF-8"?>
<project xmlns="http://maven.apache.org/POM/4.0.0"
    xmlns:xsi="http://www.w3.org/2001/XMLSchema-instance" xsi:schemaLocation="http://maven.apache.org/POM/4.0.0 https://maven.apache.org/xsd/maven-4.0.0.xsd">
    <modelVersion>4.0.0</modelVersion>
    <parent>
        <groupId>org.springframework.boot</groupId>
        <artifactId>spring-boot-starter-parent</artifactId>
        <version>2.2.7.RELEASE</version>
        <relativePath/>
        <!-- lookup parent from repository -->
    </parent>
    <groupId>com.javadevjournal</groupId>
    <artifactId>custom-logout</artifactId>
    <version>0.0.1-SNAPSHOT</version>
    <name>custom-logout</name>
    <description>Demo project for Spring Boot</description>

    <properties>
        <java.version>1.8</java.version>
    </properties>

    <dependencies>
        <dependency>
            <groupId>org.springframework.boot</groupId>
            <artifactId>spring-boot-starter-thymeleaf</artifactId>
        </dependency>

        <dependency>
            <groupId>org.springframework.boot</groupId>
            <artifactId>spring-boot-starter-data-jpa</artifactId>
        </dependency>
        <dependency>
            <groupId>org.springframework.boot</groupId>
            <artifactId>spring-boot-starter-security</artifactId>
        </dependency>
        <dependency>
            <groupId>org.springframework.boot</groupId>
            <artifactId>spring-boot-starter-web</artifactId>
        </dependency>

        <dependency>
            <groupId>mysql</groupId>
            <artifactId>mysql-connector-java</artifactId>
            <scope>runtime</scope>
        </dependency>
        <dependency>
            <groupId>org.springframework.boot</groupId>
            <artifactId>spring-boot-starter-test</artifactId>
            <scope>test</scope>
            <exclusions>
                <exclusion>
                    <groupId>org.junit.vintage</groupId>
                    <artifactId>junit-vintage-engine</artifactId>
                </exclusion>
            </exclusions>
        </dependency>
        <dependency>
            <groupId>org.springframework.security</groupId>
            <artifactId>spring-security-test</artifactId>
            <scope>test</scope>
        </dependency>
    </dependencies>

    <build>
        <plugins>
            <plugin>
                <groupId>org.springframework.boot</groupId>
                <artifactId>spring-boot-maven-plugin</artifactId>
            </plugin>
        </plugins>
    </build>
</project>
To download all dependencies, we can run mvn package command from the root directory of the project.
2. Spring Security Configuration.
The next step of our application to configure spring security. We should follow the below steps to complete security setup.
- Create database and user table.
- Declare JPA entity by supporting the user table.
- Declare a CustomUserDetailsService for spring authentication
- Define CustomLogoutHandler to handle logout event
- Define controllers and services to support this.
2.1 Create database
Let’s define the database configuration using the application.properties file.
spring.jpa.generate-ddl=true
spring.datasource.url=jdbc:mysql://localhost:3306/test_db
spring.datasource.username=root
spring.datasource.password=root
spring.datasource.driver-class-name=com.mysql.jdbc.Driver
Spring Boot will automatically generate initial DDL script to generate the table structure.Here is the DDL script for your refrence:
CREATE TABLE `user` (
  `id` bigint(20) NOT NULL AUTO_INCREMENT,
  `email` varchar(255) COLLATE utf8_bin DEFAULT NULL,
  `username` varchar(255) COLLATE utf8_bin DEFAULT NULL,
  `name` varchar(255) COLLATE utf8_bin DEFAULT NULL,
  `address` varchar(255) COLLATE utf8_bin DEFAULT NULL,
  `mobile` varchar(255) COLLATE utf8_bin DEFAULT NULL,
  `password` varchar(255) COLLATE utf8_bin DEFAULT NULL,
  `user_name` varchar(255) COLLATE utf8_bin DEFAULT NULL,
  `status` tinyint(1) DEFAULT 0,
  PRIMARY KEY (`id`)
) ENGINE=InnoDB DEFAULT CHARSET=utf8 COLLATE=utf8_bin;

INSERT INTO `user` (`id`, `email`, `username`, `name`, `address`, `mobile`, `password`, `user_name`, `status`)
VALUES
	(7,X'73616E6A6F79642E63736540676D61696C2E636F6D',NULL,X'4C4F56454C592042414E494B205348414D42552042414E494B',X'466C61743A2033382C20416E696B2056696C612C20536F62756A62616720522F412C20537265656D616E67616C',X'3031373139313439383430',X'243261243130244D787A4C5154345A646A776B666135634D6A4354772E6541446B70364369613253346D6556585A306C4478655350357A754845582E',X'73616E6A6F7973757374',0);
2.2 Create JPA Entity
To provide support of ORM we should declare a JPA entity.
package com.javadevjournal.customlogout.core.entity;

import javax.persistence.*;

@Entity
@Table(name = "user")
public class UserEntity {
    @Id
    @GeneratedValue(strategy = GenerationType.IDENTITY)
    private Long id;
    private String name;
    private String mobile;
    private String address;
    private String userName;
    private String email;
    private String password;
    private Boolean status;

    public Boolean getStatus() {
        return status;
    }

    public void setStatus(Boolean status) {
        this.status = status;
    }

    public Long getId() {
        return id;
    }

    public void setId(Long id) {
        this.id = id;
    }

    public String getName() {
        return name;
    }

    public void setName(String name) {
        this.name = name;
    }

    public String getMobile() {
        return mobile;
    }

    public void setMobile(String mobile) {
        this.mobile = mobile;
    }

    public String getAddress() {
        return address;
    }

    public void setAddress(String address) {
        this.address = address;
    }

    public String getUserName() {
        return userName;
    }

    public void setUserName(String userName) {
        this.userName = userName;
    }

    public String getEmail() {
        return email;
    }

    public void setEmail(String email) {
        this.email = email;
    }

    public String getPassword() {
        return password;
    }

    public void setPassword(String password) {
        this.password = password;
    }

}
2.3. Create Repository
To persist or find data from database we should declare a repository service like below code.
package com.javadevjournal.customlogout.core.repository;

import com.javadevjournal.customlogout.core.entity.UserEntity;
import org.springframework.data.jpa.repository.JpaRepository;
import org.springframework.stereotype.Repository;

@Repository
public interface UserRepository extends JpaRepository<UserEntity, Long > {
   UserEntity findByEmailOrUserName(String email, String username);
}M/code>
2.4. Custom UserDetails Service
We should declare CustomUserDetailsService though we are authentication users from the database. Our UserDetailsService looks like this.
package com.javadevjournal.customlogout.core.service;
import com.javadevjournal.customlogout.core.entity.UserEntity;
import com.javadevjournal.customlogout.core.repository.UserRepository;
import org.springframework.beans.factory.annotation.Autowired;
import org.springframework.security.core.userdetails.User;
import org.springframework.security.core.userdetails.UserDetails;
import org.springframework.security.core.userdetails.UserDetailsService;
import org.springframework.security.core.userdetails.UsernameNotFoundException;
import org.springframework.stereotype.Service;

@Service
public class CustomUserDetailsService implements UserDetailsService {

   @Autowired
   private UserService userRepository;

   @Override
   public UserDetails loadUserByUsername(String username) throws UsernameNotFoundException {
      final UserEntity userEntity = userRepository.findUserByUsername(username);
      if (userEntity == null) {
         throw new UsernameNotFoundException(username);
      }
      UserDetails user = User.withUsername(userEntity.getEmail()).password(userEntity.getPassword()).authorities("USER").build();
      return user;
   }
}
2.5. Application Security Configuration
Let’s do the configuration things for application. Spring provides java or XML based configuration system. We will use java based configuration. Our configuration file should be like below code snapshot.
package com.javadevjournal.customlogout.core.config;

import com.javadevjournal.customlogout.core.service.CustomUserDetailsService;
import org.springframework.beans.factory.annotation.Autowired;
import org.springframework.context.annotation.Bean;
import org.springframework.context.annotation.Configuration;
import org.springframework.http.HttpStatus;
import org.springframework.security.authentication.dao.DaoAuthenticationProvider;
import org.springframework.security.config.annotation.authentication.builders.AuthenticationManagerBuilder;
import org.springframework.security.config.annotation.web.builders.HttpSecurity;
import org.springframework.security.config.annotation.web.configuration.EnableWebSecurity;
import org.springframework.security.config.annotation.web.configuration.WebSecurityConfigurerAdapter;
import org.springframework.security.crypto.bcrypt.BCryptPasswordEncoder;
import org.springframework.security.crypto.password.PasswordEncoder;
import org.springframework.security.web.authentication.logout.HttpStatusReturningLogoutSuccessHandler;

@Configuration
@EnableWebSecurity
public class AppConfig extends WebSecurityConfigurerAdapter {
    @Autowired
    private CustomLogoutHandler logoutHandler;

    @Override
    protected void configure(HttpSecurity http) throws Exception {
        http.authorizeRequests()
            .antMatchers("/auth/**").hasAnyAuthority("USER")
            .antMatchers("/login**").permitAll()
            .antMatchers("/resources/**").permitAll()
            .antMatchers("/register**").permitAll()
            .and()
            .formLogin()
            .loginPage("/login")
            .defaultSuccessUrl("/auth/home", true)
            .and()
            .logout()
            .logoutUrl("/logout")
            .addLogoutHandler(logoutHandler)
            .logoutSuccessHandler(new HttpStatusReturningLogoutSuccessHandler(HttpStatus.OK))
            .permitAll()
            .and()
            .csrf().disable();;
    }
    @Bean
    public DaoAuthenticationProvider authProvider() {
        DaoAuthenticationProvider authProvider = new DaoAuthenticationProvider();
        authProvider.setUserDetailsService(userDetailsService());
        authProvider.setPasswordEncoder(passwordEncoder());
        return authProvider;
    }

    @Bean
    public CustomUserDetailsService userDetailsService() {
        return new CustomUserDetailsService();
    }

    @Bean
    public PasswordEncoder passwordEncoder() {
        return new BCryptPasswordEncoder();
    }

    @Override
    protected void configure(AuthenticationManagerBuilder auth) throws Exception {
        auth.authenticationProvider(authProvider());
    }
}
We are using DaoAuthenticationProvider as Authentication Provider and using our CustomUserDetailsService to configure verify our authentication.
AppConfig class extends WebSecurityConfigurerAdapter class and override configuration() method. In configuration method we are restricting /auth/** for authenticated users and other URL’s are almost open for unauthenticated users.We declared a custom logout handler to check the logged in user count.
3. Spring MVC things
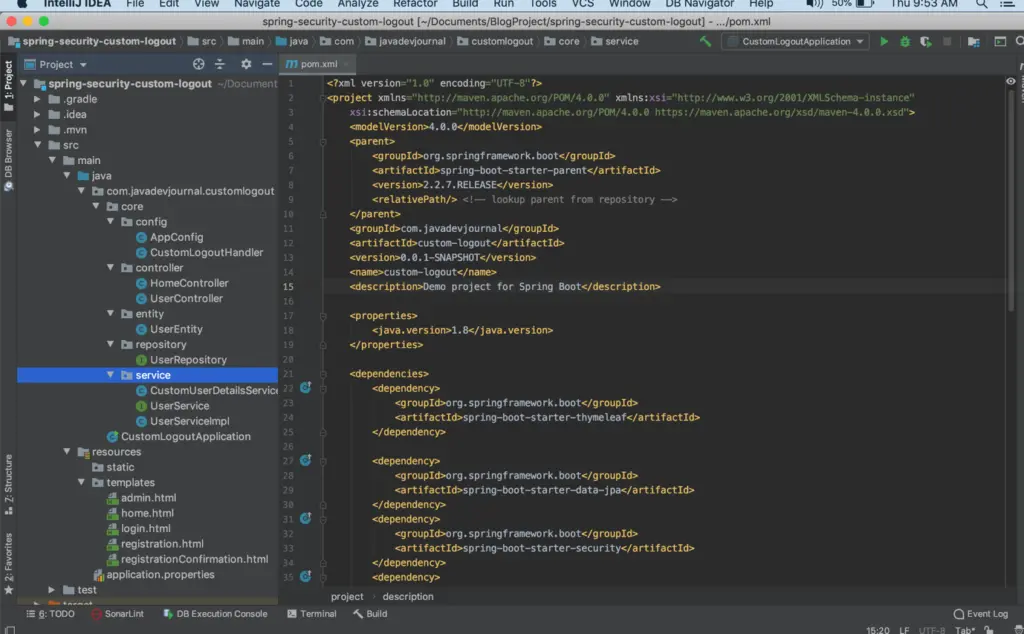
Here we are using supporting java classes and HTML files to support the application. I write HTML files with Thymeleaf template. This is how the project structure look like:
7. Run And Test Application.
To run application we will follow the below steps.
- Download or clone the application from GitHub.
- Go to the root directory of the project.
- Execute mvn spring-boot:run command to run the application
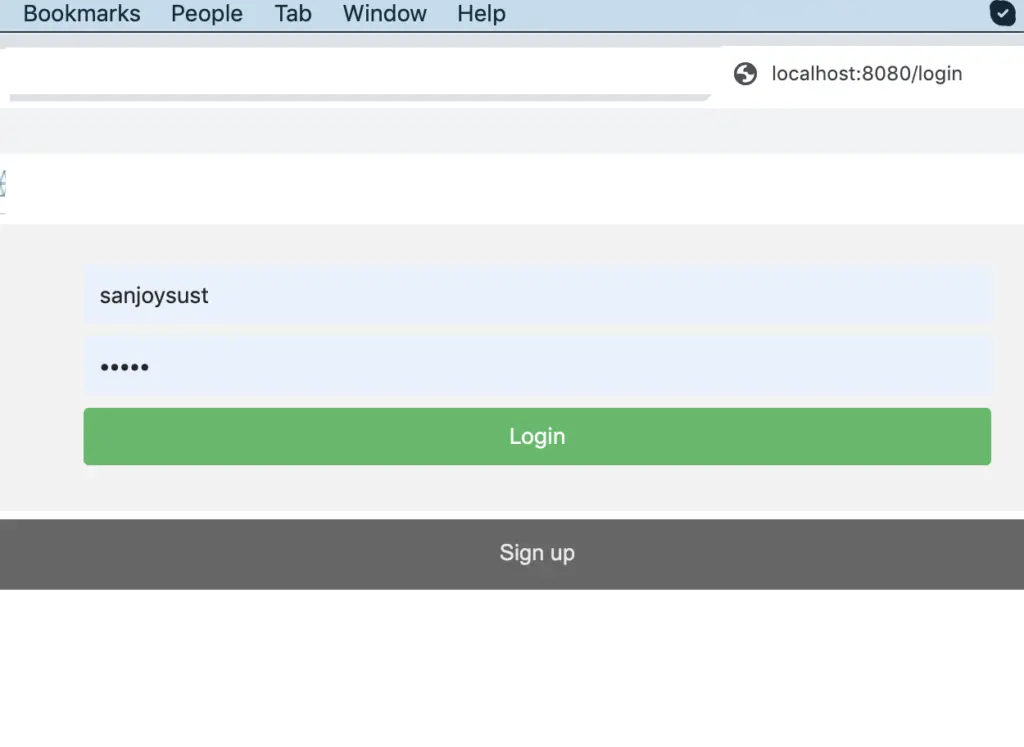
The next step is to test the application. Hit the URL http://localhost:8080/login to login to the application. If you are not registered yet, please click on the signup button. Initially, we inserted one row during the database setup. You can test login thing with this credential.
- Username: sanjoysust
- Password: 12345
After click on above link screen should be like the below image.
After logged in home page should be like below images
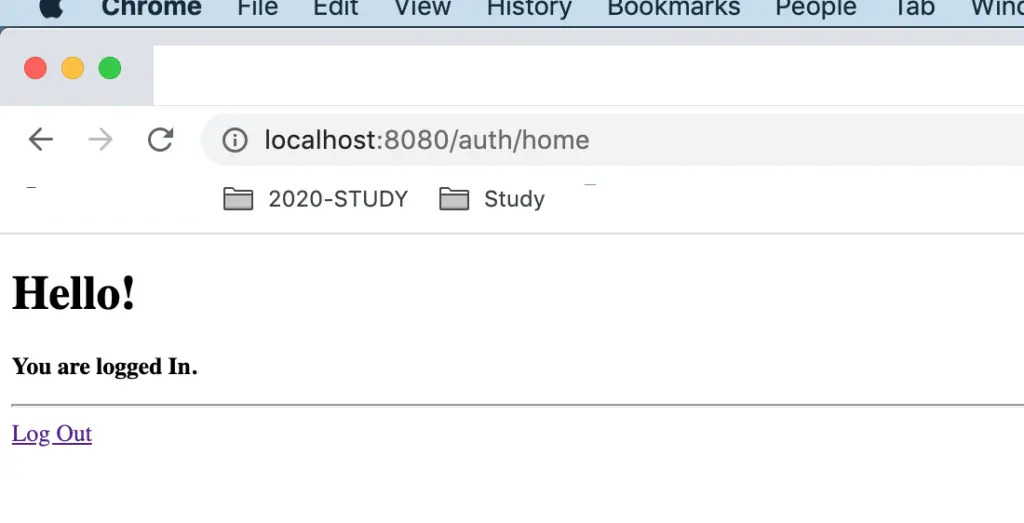
Click on logout to log out from the system. After logged out please check the database status of the status field of the user table. It should be 0 or false. But after login, it was 1 or true.
Summary
In this post, we discussed the spring security custom logout handler. We saw why we need custom logout handler for Spring security and how to configure it. There is another handler called LogoutSuccessHandler which handler maintains the logout success event. The source code for this article is available on the GitHub.
CustomLogoutHandler isn’t defined anywhere..?
Please take a look at the GitHub repository https://github.com/javadevjournal/javadevjournal/blob/master/Spring-Boot/spring-security-custom-logout/src/main/java/com/javadevjournal/customlogout/core/config/CustomLogoutHandler.java