In this post, we will look at the Spring batch project setup and configuration. We will create a Spring Batch Application using Spring Boot. We will also show the setup and dependencies. Last, we will run the application by invoking a batch job and see the execution of this using the in-memory H2 DB. This article will also show a sample application with ItemReader, ItemProcessor, and ItemWriter at the basic level.
Introduction
Spring batch is a very lightweight framework from Spring Framework family, and it’s designed and developed for scalable and robust batch applications. While we develop a scalable project, we often have to process a large amount of data especially in the form of reading the data from a source (e.g. CSV file), process it (run business logic), and write to another source (database).
Spring Batch comes as a very useful and high-performing tool for this nature of work. They have developed the Spring batch using a POJO-based approach of the core Spring Framework. To understand it better, let’s take an example of ecommerce application and where we can use the Spring Batch framework.
- An ecommerce application needs product price from the ERP system.
- ERP system sends the feed file (in CSV or any other format) to our ecommerce application to process.
- Ecommerce application uses the Spring batch to read the file.
- It processes and transforms the incoming data into the desired output.
- Run any additional business logic to validate or decorate the price information.
This is one example but there are several use cases like
- Product stock information feed file.
- Product feed file.
- Syndication feed files.
As a prerequisite, someone starting with Spring Batch should have a good understanding of the Spring Framework.
1. Spring Batch Application Setup
We will use the visual interface Spring Initializer to generate the initial application structure. You can also use the IDE to generate the project structure as most modern IDE have build in integration with Initializr.
We are using Java 8; Spring Boot 2.2.6, and adding the following dependencies for Spring Batch,
- H2 Database
- Spring Boot Dev Tools
- Spring Web
- Lombok(optional).
Client “GENERATE”, and Spring Initializer will create an initial structure of the project with the dependencies. Once generated, please unzip the folder and create a new project in your favorite IDE. Here we are using IntelliJ IDE.
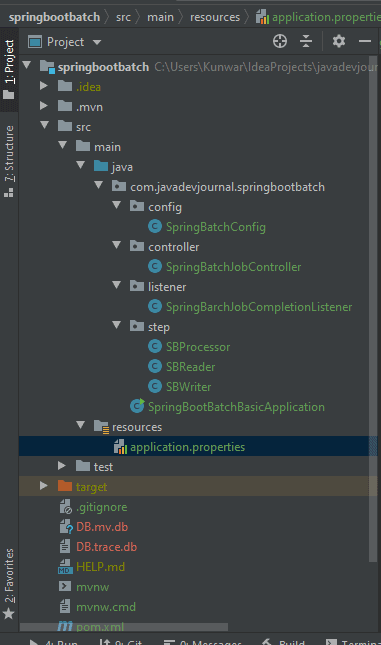
2. Spring Batch Project Structure
We will see the following project structure in IntelliJ:
This is how our pom.xml look like:
<?xml version="1.0" encoding="UTF-8"?>
<project xmlns="http://maven.apache.org/POM/4.0.0" xmlns:xsi="http://www.w3.org/2001/XMLSchema-instance" xsi:schemaLocation="http://maven.apache.org/POM/4.0.0 https://maven.apache.org/xsd/maven-4.0.0.xsd">
   <modelVersion>4.0.0</modelVersion>
   <parent>
      <groupId>org.springframework.boot</groupId>
      <artifactId>spring-boot-starter-parent</artifactId>
      <version>2.3.0.RELEASE</version>
      <relativePath />
      <!-- lookup parent from repository -->
   </parent>
   <groupId>com.javadevjournal</groupId>
   <artifactId>springbootbatch</artifactId>
   <version>0.0.1-SNAPSHOT</version>
   <name>springbootbatchbasic</name>
   <description>Spring Boot Spring Batch Code</description>
   <properties>
      <java.version>1.8</java.version>
      <project.build.sourceEncoding>UTF-8</project.build.sourceEncoding>
      <project.reporting.outputEncoding>UTF-8</project.reporting.outputEncoding>
   </properties>
   <dependencies>
      <dependency>
         <groupId>org.springframework.boot</groupId>
         <artifactId>spring-boot-starter-batch</artifactId>
      </dependency>
      <dependency>
         <groupId>org.springframework.boot</groupId>
         <artifactId>spring-boot-starter-data-rest</artifactId>
      </dependency>
      <dependency>
         <groupId>org.springframework.boot</groupId>
         <artifactId>spring-boot-devtools</artifactId>
         <scope>runtime</scope>
         <optional>true</optional>
      </dependency>
      <dependency>
         <groupId>com.h2database</groupId>
         <artifactId>h2</artifactId>
         <scope>runtime</scope>
      </dependency>
      <dependency>
         <groupId>org.projectlombok</groupId>
         <artifactId>lombok</artifactId>
         <optional>true</optional>
      </dependency>
      <dependency>
         <groupId>log4j</groupId>
         <artifactId>log4j</artifactId>
         <version>1.2.14</version>
         <scope>runtime</scope>
      </dependency>
      <dependency>
         <groupId>org.springframework.boot</groupId>
         <artifactId>spring-boot-starter-test</artifactId>
         <scope>test</scope>
         <exclusions>
            <exclusion>
               <groupId>org.junit.vintage</groupId>
               <artifactId>junit-vintage-engine</artifactId>
            </exclusion>
         </exclusions>
      </dependency>
      <dependency>
         <groupId>org.springframework.batch</groupId>
         <artifactId>spring-batch-test</artifactId>
         <scope>test</scope>
      </dependency>
   </dependencies>
   <build>
      <plugins>
         <plugin>
            <groupId>org.springframework.boot</groupId>
            <artifactId>spring-boot-maven-plugin</artifactId>
         </plugin>
      </plugins>
   </build>
</project>
3. Application Configuration
To work with the web application and database, let’s define the properties in the application.properties file.
server.port=8080
#h2 in-memory database
spring.datasource.url=jdbc:h2:mem:testdb
spring.datasource.driverClassName=org.h2.Driver
spring.datasource.username=test
spring.datasource.password=test

#logging
log4j.rootCategory=INFO, stdout
log4j.appender.stdout=org.apache.log4j.ConsoleAppender
log4j.appender.stdout.layout=org.apache.log4j.PatternLayout
log4j.appender.stdout.layout.ConversionPattern=%d{ABSOLUTE} %5p %t %c{2}:%L - %m%n
log4j.category.org.springframework.beans.factory=DEBUG
Let’s look at some important points in our application.properties:
- server port–it is the port where the spring batch’s main application will run.
It requires the following properties to set up the in-memory H2 database.
spring.datasource.url
spring.datasource.driverClassName,
spring.datasource.username
spring.datasource.password
We have already added the project dependency for this. The H2 DB will have a console where we can see the different BATCH tables and contents of it. we require The following properties to set up customizable logging for our application.
log4j.rootCategory,
log4j.appender.stdout
log4j.appender.stdout.layout
log4j.appender.stdout.layout.ConversionPattern
log4j.category.org.springframework.beans.factory
We have already added the project dependency for this.
3.1 Main Class:
package com.javadevjournal.springbootbatch;

import org.springframework.batch.core.configuration.annotation.EnableBatchProcessing;
import org.springframework.boot.SpringApplication;
import org.springframework.boot.autoconfigure.SpringBootApplication;

@SpringBootApplication
@EnableBatchProcessing
public class SpringBootBatchBasicApplication {

    public static void main(String[] args) {
        SpringApplication.run(SpringBootBatchBasicApplication.class, args);
    }

}@EnableBatchProcessing– This annotation helps the spring boot application to run as Spring Batch application.@SpringBootApplication– This annotation is required to make our application as Spring Boot Application
4. Spring Batch Config:
This is the Java config class for application beans and dependencies and this class takes care of all the configuration i.e. JobBuilderFactory, StepBuilderFactory, Job, Step, and JobExecutionListener.
package com.javadevjournal.springbootbatch.config;

import org.springframework.batch.core.Job;
import org.springframework.batch.core.JobExecutionListener;
import org.springframework.batch.core.Step;
import org.springframework.batch.core.configuration.annotation.JobBuilderFactory;
import org.springframework.batch.core.configuration.annotation.StepBuilderFactory;
import org.springframework.batch.core.launch.support.RunIdIncrementer;
import org.springframework.beans.factory.annotation.Autowired;
import org.springframework.context.annotation.Bean;
import org.springframework.context.annotation.Configuration;

import com.javadevjournal.springbootbatch.listener.SpringBatchJobCompletionListener;
import com.javadevjournal.springbootbatch.step.SBProcessor;
import com.javadevjournal.springbootbatch.step.SBReader;
import com.javadevjournal.springbootbatch.step.SBWriter;

@Configuration
public class SpringBatchConfig {

    @Autowired
    public JobBuilderFactory jobBuilderFactory;

    @Autowired
    public StepBuilderFactory stepBuilderFactory;

    @Bean
    public Job processJob() {
        return jobBuilderFactory.get("javadevjournaljob")
            .incrementer(new RunIdIncrementer()).listener(listener())
            .flow(orderStep1()).end().build();
    }

    @Bean
    public Step orderStep1() {
        return stepBuilderFactory.get("step1"). < String, String > chunk(1)
            .reader(new SBReader()).processor(new SBProcessor())
            .writer(new SBWriter()).build();
    }

    @Bean
    public JobExecutionListener listener() {
        return new SpringBatchJobCompletionListener();
    }

}
5. Spring Batch Controller:
Our controller will have just one method to invoke our batch processing.
package com.javadevjournal.springbootbatch.controller;

import org.springframework.batch.core.Job;
import org.springframework.batch.core.JobParameters;
import org.springframework.batch.core.JobParametersBuilder;
import org.springframework.batch.core.launch.JobLauncher;
import org.springframework.beans.factory.annotation.Autowired;
import org.springframework.web.bind.annotation.GetMapping;
import org.springframework.web.bind.annotation.RequestMapping;
import org.springframework.web.bind.annotation.RestController;

@RestController
public class SpringBatchJobController {

    @Autowired
    JobLauncher jobLauncher;

    @Autowired
    Job javadevjournaljob;

    @GetMapping("/invokejob")
    public String invokeBatchJob() throws Exception {
        JobParameters jobParameters = new JobParametersBuilder().addLong("time", System.currentTimeMillis())
            .toJobParameters();
        jobLauncher.run(javadevjournaljob, jobParameters);
        return "Batch job has been invoked";
    }
}
6. Spring Batch Listner:
It will activate our listener after the job and it will check the status of the execution (in our example, from H2 table) and if the status is BatchStatus.COMPLETED, it will log on to the console “BATCH JOB COMPLETED SUCCESSFULLY”.
package com.javadevjournal.springbootbatch.listener;

import com.javadevjournal.springbootbatch.step.SBWriter;
import org.slf4j.Logger;
import org.slf4j.LoggerFactory;
import org.springframework.batch.core.BatchStatus;
import org.springframework.batch.core.JobExecution;
import org.springframework.batch.core.listener.JobExecutionListenerSupport;

public class SpringBatchJobCompletionListener extends JobExecutionListenerSupport {
    Logger logger = LoggerFactory.getLogger(SpringBatchJobCompletionListener.class);

    @Override
    public void afterJob(JobExecution jobExecution) {
        if (jobExecution.getStatus() == BatchStatus.COMPLETED) {
            logger.info("BATCH JOB COMPLETED SUCCESSFULLY");
        }
    }

}
7. Spring Batch Step ItemReader:
ItemReader is associated with Step, and it represents the retrieval of input for the Step. It is sequential, one item at a time. ItemReader returns null when it can’t provide further items. We will override the read() method from the ItemReader interface for our processing.
package com.javadevjournal.springbootbatch.step;

import org.springframework.batch.item.ItemReader;
import org.springframework.batch.item.NonTransientResourceException;
import org.springframework.batch.item.ParseException;
import org.springframework.batch.item.UnexpectedInputException;

public class SBReader implements ItemReader < String > {

    private String[] messages = {
        "javadevjournal.com",
        "Welcome to Spring Batch Example",
        "We use H2 Database for this example"
    };

    private int count = 0;

    @Override
    public String read() throws Exception,
    UnexpectedInputException,
    ParseException,
    NonTransientResourceException {

        if (count < messages.length) {
            return messages[count++];
        } else {
            count = 0;
        }
        return null;
    }

}
8. Spring Batch Step ItemProcessor:
ItemProcessor is associated with Step and it represents the business processing of the step (item provided by ItemReader). Once it completes its processing it sends the item to ItemWriter, in case the item isn’t valid, it will return null.We will override the process() method from the ItemProcessor interface for our processing.
package com.javadevjournal.springbootbatch.step;

import org.springframework.batch.item.ItemProcessor;
public class SBProcessor implements ItemProcessor < String, String > {

    @Override
    public String process(String data) throws Exception {
        return data.toUpperCase();
    }

}
9. Spring Batch Step ItemWriter:
ItemWriter is associated with Step, and it represents the output for the step. It understands the current item only, and it isn’t aware of the next items. We will override the write() method from the ItemWriter interface for our processing.
package com.javadevjournal.springbootbatch.step;

import java.util.List;

import org.slf4j.Logger;
import org.slf4j.LoggerFactory;
import org.springframework.batch.item.ItemWriter;

public class SBWriter implements ItemWriter < String > {
    Logger logger = LoggerFactory.getLogger(SBWriter.class);
    @Override
    public void write(List <? extends String > messages) throws Exception {
        for (String msg: messages) {
            logger.info("Writing the data \n" + msg);
        }
    }

}
10. Run and Test Application:
Our setup is complete. We will run the main class using either run command shift+F10 or using maven command mvn spring-boot:run.It is important to see the logs printed on the console as it will give us lots of important information:
2020-06-02 18:00:00.548  INFO 20848 --- [  restartedMain] o.s.b.w.embedded.tomcat.TomcatWebServer  : Tomcat initialized with port(s): 8080 (http)
2020-06-02 18:00:02.453  INFO 20848 --- [  restartedMain] o.s.b.a.h2.H2ConsoleAutoConfiguration    : H2 console available at '/h2-console'. Database available at 'jdbc:h2:mem:testdb'
2020-06-02 18:00:07.612  INFO 20848 --- [  restartedMain] o.s.b.w.embedded.tomcat.TomcatWebServer  : Tomcat started on port(s): 8080 (http) with context path ''
2020-06-02 18:00:07.668  INFO 20848 --- [  restartedMain] c.j.s.SpringBootBatchBasicApplication    : Started SpringBootBatchBasicApplication in 33.51 seconds (JVM running for 45.302)
11. Service Call:
Once the application is up and running, we will invoke the batch application using http://localhost:8080/invokjob. We are running it from our local host. We will see the following message on the web page:

We will also see the following logs:
2020-06-02 18:00:07.676  INFO 20848 --- [  restartedMain] o.s.b.a.b.JobLauncherApplicationRunner   : Running default command line with: []
2020-06-02 18:00:07.924  INFO 20848 --- [  restartedMain] o.s.b.c.l.support.SimpleJobLauncher      : Job: [FlowJob: [name=javadevjournaljob]] launched with the following parameters: [{run.id=1}]
2020-06-02 18:00:08.036  INFO 20848 --- [  restartedMain] o.s.batch.core.job.SimpleStepHandler     : Executing step: [step1]
2020-06-02 18:00:08.076  INFO 20848 --- [  restartedMain] c.j.springbootbatch.step.SBWriter        : Writing the data
JAVADEVJOURNAL.COM
2020-06-02 18:00:08.084  INFO 20848 --- [  restartedMain] c.j.springbootbatch.step.SBWriter        : Writing the data
WELCOME TO SPRING BATCH EXAMPLE
2020-06-02 18:00:08.092  INFO 20848 --- [  restartedMain] c.j.springbootbatch.step.SBWriter        : Writing the data
WE USE H2 DATABASE FOR THIS EXAMPLE
2020-06-02 18:00:08.108  INFO 20848 --- [  restartedMain] o.s.batch.core.step.AbstractStep         : Step: [step1] executed in 64ms
BATCH JOB COMPLETED SUCCESSFULLY
2020-06-02 18:00:08.116  INFO 20848 --- [  restartedMain] o.s.b.c.l.support.SimpleJobLauncher      : Job: [FlowJob: [name=javadevjournaljob]] completed with the following parameters: [{run.id=1}] and the following status: [COMPLETED] in 120ms
12. H2 DB Console:
We have already seen the required properties for setting up the H2 DB, once the application is up and running, we can go to the URL http://localhost:8080/h2-console/ to access the H2 DB console. We will see the following console on screen:
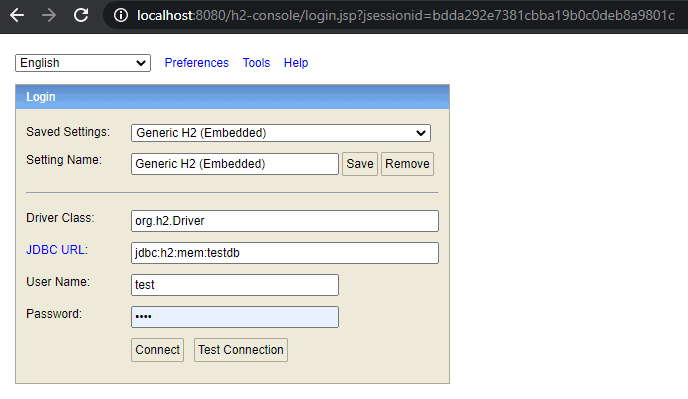
Click the Connect button to connect to it and we will see:
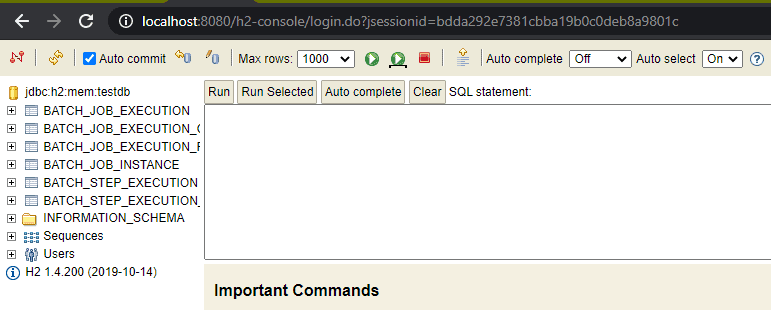
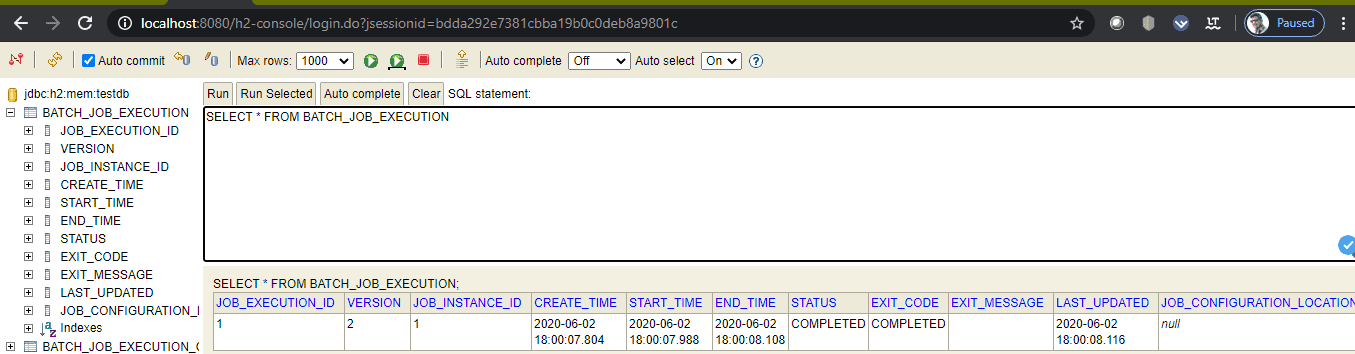
On the left-hand side, we can see all the tables, we can use this as a normal SQL developer tool and run the queries to see the results. We will run the query for BATCH_JOB_EXECUTION table:
Summary
In this post, we covered Spring batch project setup and configuration with Java configuration. In this series we will cover all the basic and core features for the Spring Batch. Let’s summarized what we covered in the post:
- Set up a spring batch application using spring boot.
- We have gone through the project structure, the pom.xml, the application.properties, and the main class files.
- Set up the config, the controller, and the listener.
- H2 DB setup and see the H2 console and how to use it.
- We have seen the working on batch service using chrome and called out batch job.
The source code for this project is available on GitHub.
There is a typo at the SBWriter.class
The “write” method has “<<” in the argument.
Corrected, Thanks for the feedback!!