In this article, we will cover the basics of microservices with Spring Boot using Spring cloud. We will cover some basic concepts and finally will create a small micro-service to give you an overview.
1. Introduction to Microservices
Microservices means many small services, building small, self-contained, ready to run applications. In monolithic architecture, a combination of many components in an application becomes a large application that has many disadvantages. For example, if a monolithic application down, the entire application will be down. Even it’s difficult to maintain a large monolithic application.
Microservices breaks a large application to different smaller parts, so it is easy to identify where the problem occurs and also if a component goes down it will not affect the whole application environment.In this article, we will summarize the basics of building microservices with spring boot and spring cloud.
[sc_fs_faq html=”true” headline=”h2″ img=”” question=”What are microservices?” img_alt=”” css_class=””] In a nutshell, microservices allow us to deliver application code in small and manageable pieces ,independent of others. [/sc_fs_faq]
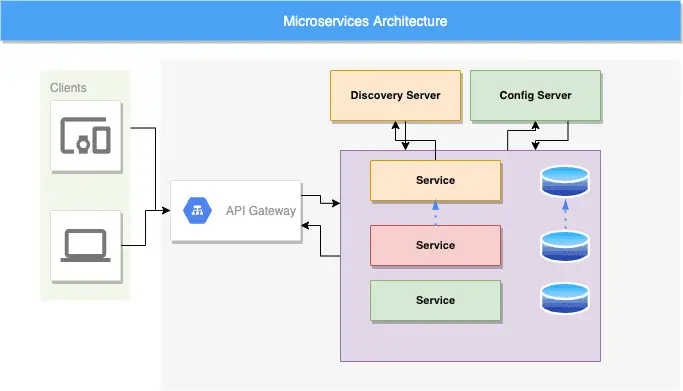
2. Microservices architecture
The concept of microservices is simple. It should break a large service with many small independent services. Let’s discuss some important points of microservices based on below architecture:
- Each micro service has its own database.
- Client API do not have direct access to the services. It can only interact through API gateway.
- We will register each service with the discovery server. The discovery has information of all the microservices available in the system.
- Configuration server contains all the configurations for the microservices and we will use this server to get configuration information like hostname, url etc. for our microservices.
3. Application Setup and Overview.
We will use Spring Boot to build our microservices example. Spring boot projects can easily be configured using the spring initializer or using IDE if you like. Will configure the discovery service and config server and one core service in this article.Let’s build our application.
3.1. Root project setup.
We will create a root project to do our code and then add other modules like discovery server, config server to our core module. Let’s create a spring boot project with spring web dependency.

After the core module creation, let’s create discovery and config server module using the Spring Initializr.
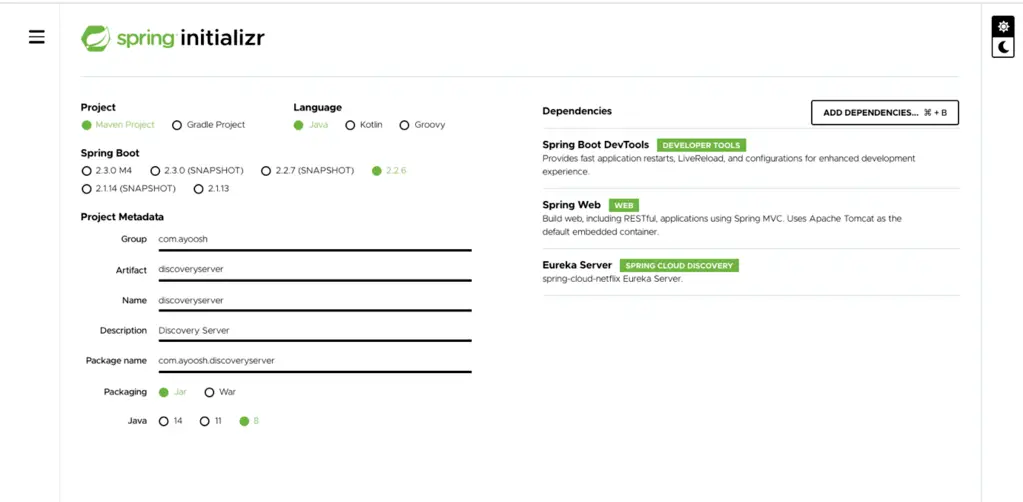
3.2. Discovery Server Setup
For Discovery Server we should configure like this
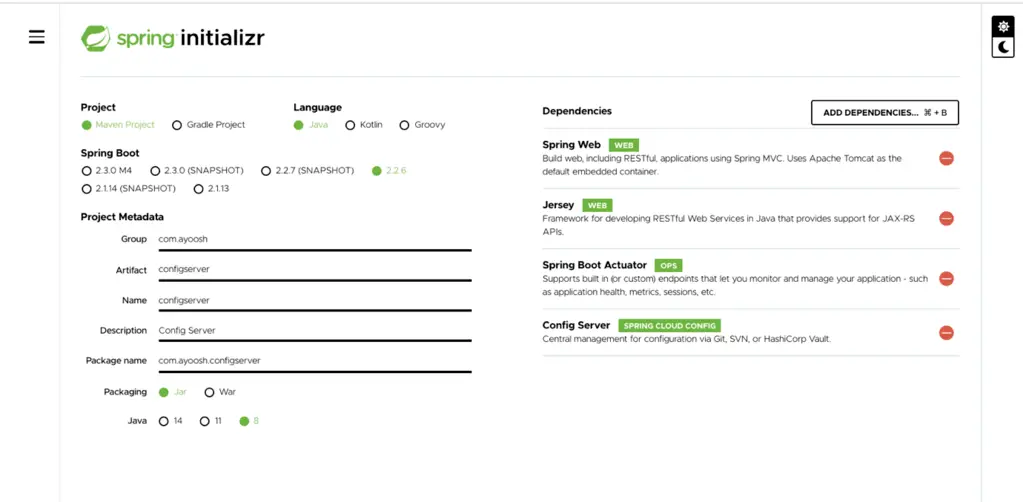
3.3. Config Server configuration
To create a config server, let’s create the module with dependencies listed below image.
4. Core Service Configuration
For core service, we also need database ( including spring data JPA and MySQL dependency for our example). Please remember to setup MySQL on your machine before moving to the next step.If you like, you can also use the in memory database for development. Database name should be profile_management and other configuration like username password are located in configuration server.
Once the database setup is done, let’s create employee_profile table by running the following SQL script.
Create Table employee_profile(id int(11) NOT NULL AUTO_INCREMENT,name varchar(255),address varchar(255),PRIMARY KEY (`id`));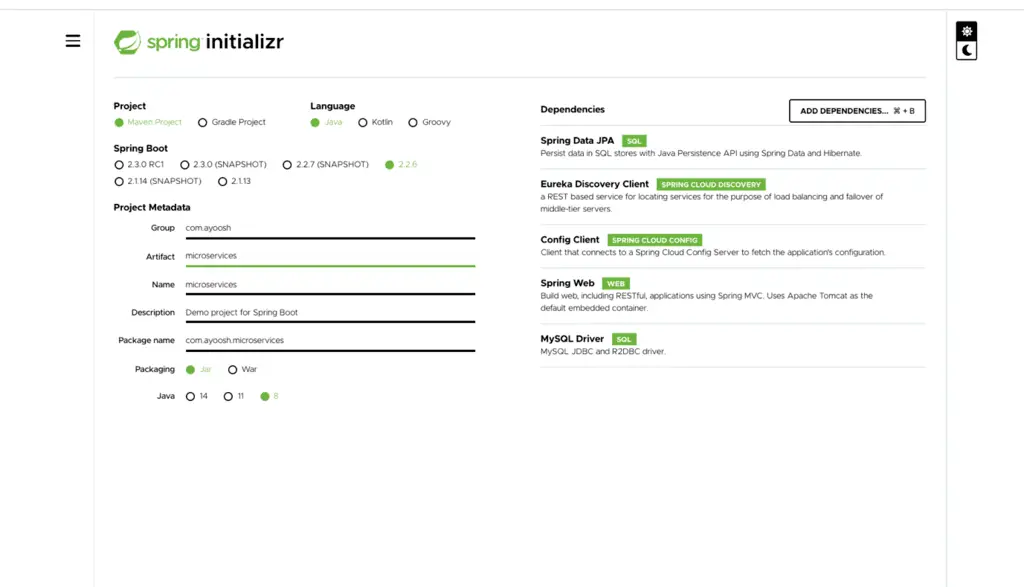
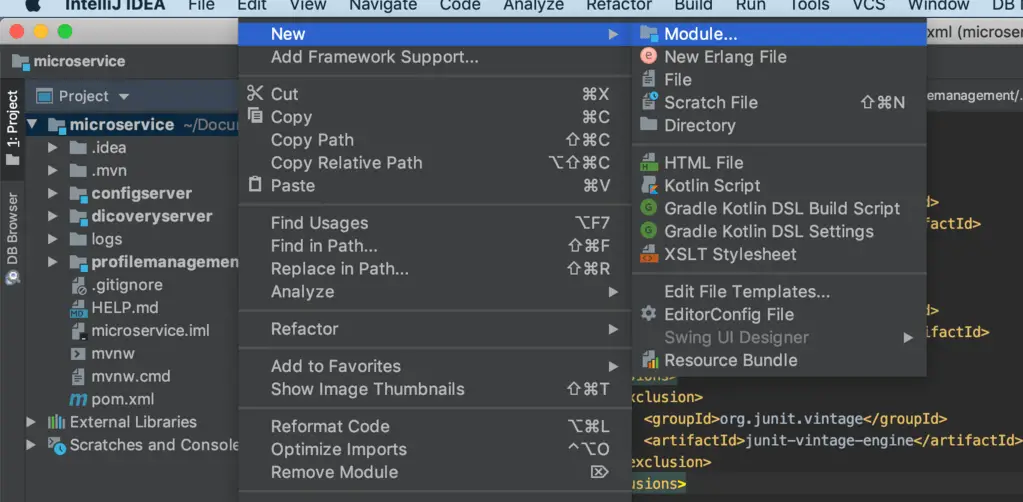
After creation all projects, open the IntelliJ Idea or other IDE. Open our root project and then need to create a new module for all services. For IntelliJ Idea, it will be like this
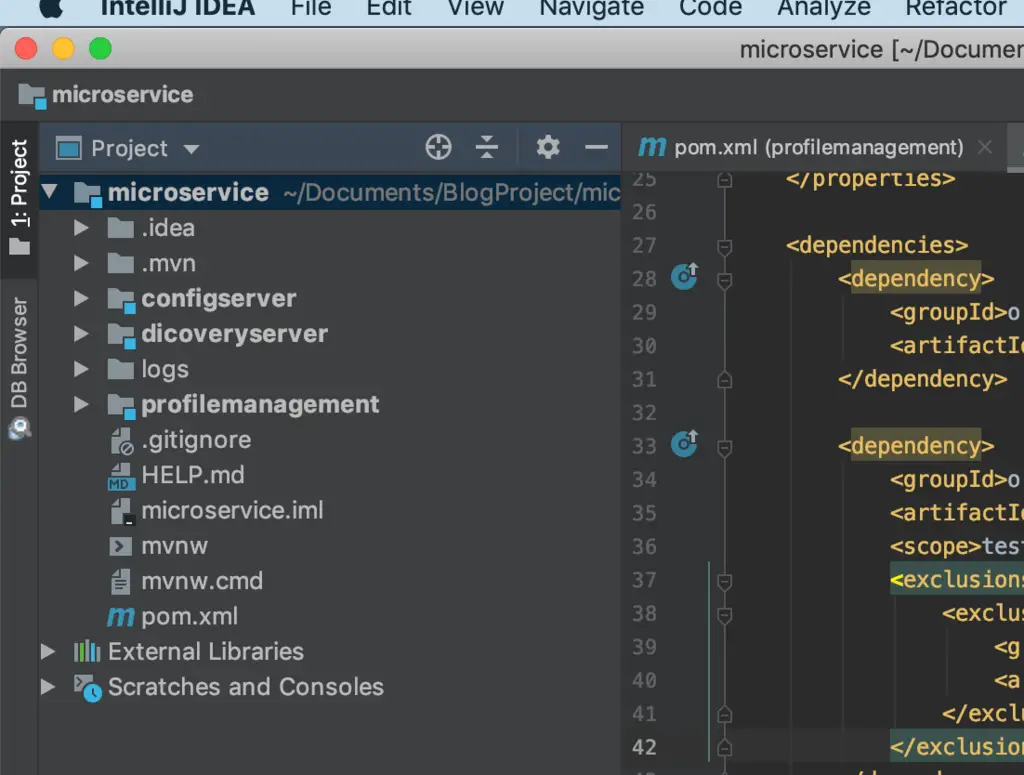
This is how the final project layout might look like:
Our root project pom.xml will be like this
<?xml version="1.0" encoding="UTF-8"?>
<project xmlns="http://maven.apache.org/POM/4.0.0" xmlns:xsi="http://www.w3.org/2001/XMLSchema-instance" xsi:schemaLocation="http://maven.apache.org/POM/4.0.0 https://maven.apache.org/xsd/maven-4.0.0.xsd">
   <modelVersion>4.0.0</modelVersion>
   <packaging>pom</packaging>
   <modules>
      <module>dicoveryserver</module>
      <module>configserver</module>
      <module>profilemanagement</module>
   </modules>
   <parent>
      <groupId>org.springframework.boot</groupId>
      <artifactId>spring-boot-starter-parent</artifactId>
      <version>2.2.6.RELEASE</version>
      <relativePath />
      <!-- lookup parent from repository -->
   </parent>
   <groupId>com.javadevjournal</groupId>
   <artifactId>microservice</artifactId>
   <version>0.0.1-SNAPSHOT</version>
   <name>microservice</name>
   <description>Microservices with spring boot</description>
   <properties>
      <java.version>1.8</java.version>
   </properties>
   <dependencies>
      <dependency>
         <groupId>org.springframework.boot</groupId>
         <artifactId>spring-boot-starter-web</artifactId>
      </dependency>
      <dependency>
         <groupId>org.springframework.boot</groupId>
         <artifactId>spring-boot-starter-test</artifactId>
         <scope>test</scope>
         <exclusions>
            <exclusion>
               <groupId>org.junit.vintage</groupId>
               <artifactId>junit-vintage-engine</artifactId>
            </exclusion>
         </exclusions>
      </dependency>
   </dependencies>
   <build>
      <plugins>
         <plugin>
            <groupId>org.springframework.boot</groupId>
            <artifactId>spring-boot-maven-plugin</artifactId>
         </plugin>
      </plugins>
   </build>
</project>
5. Service discovery with Eureka servers.
The Discovery server used to register all services after they go to live. Then it will be easy to find out the service from the registry. When a service registers with eureka it will provide the metadata like host, port and health indicator parameters to the client to connect.
We already created a eureka service from the spring-boot initializer and included our root project.
<?xml version="1.0" encoding="UTF-8"?>
<project xmlns="http://maven.apache.org/POM/4.0.0" xmlns:xsi="http://www.w3.org/2001/XMLSchema-instance" xsi:schemaLocation="http://maven.apache.org/POM/4.0.0 http://maven.apache.org/xsd/maven-4.0.0.xsd">
   <parent>
      <artifactId>microservice</artifactId>
      <groupId>com.javadevjournal</groupId>
      <version>0.0.1-SNAPSHOT</version>
   </parent>
   <modelVersion>4.0.0</modelVersion>
   <artifactId>dicoveryserver</artifactId>
   <properties>
      <java.version>1.8</java.version>
      <spring-cloud.version>Hoxton.SR3</spring-cloud.version>
   </properties>
   <dependencies>
      <dependency>
         <groupId>org.springframework.boot</groupId>
         <artifactId>spring-boot-starter-web</artifactId>
      </dependency>
      <dependency>
         <groupId>org.springframework.cloud</groupId>
         <artifactId>spring-cloud-starter-netflix-eureka-server</artifactId>
      </dependency>
      <dependency>
         <groupId>org.springframework.boot</groupId>
         <artifactId>spring-boot-devtools</artifactId>
         <scope>runtime</scope>
         <optional>true</optional>
      </dependency>
      <dependency>
         <groupId>org.springframework.boot</groupId>
         <artifactId>spring-boot-starter-test</artifactId>
         <scope>test</scope>
         <exclusions>
            <exclusion>
               <groupId>org.junit.vintage</groupId>
               <artifactId>junit-vintage-engine</artifactId>
            </exclusion>
         </exclusions>
      </dependency>
   </dependencies>
   <dependencyManagement>
      <dependencies>
         <dependency>
            <groupId>org.springframework.cloud</groupId>
            <artifactId>spring-cloud-dependencies</artifactId>
            <version>${spring-cloud.version}</version>
            <type>pom</type>
            <scope>import</scope>
         </dependency>
      </dependencies>
   </dependencyManagement>
   <build>
      <plugins>
         <plugin>
            <groupId>org.springframework.boot</groupId>
            <artifactId>spring-boot-maven-plugin</artifactId>
         </plugin>
      </plugins>
   </build>
</project>
We need to add annotation @EnableEurekaServer to the application main class. This annotation will enable the services registration with the eureka server.
package com.javadevjournal.discoveryserver;

import org.springframework.boot.SpringApplication;
import org.springframework.boot.autoconfigure.SpringBootApplication;
import org.springframework.cloud.netflix.eureka.server.EnableEurekaServer;

@SpringBootApplication
@EnableEurekaServer
public class DiscoveryserverApplication {

    public static void main(String[] args) {
        SpringApplication. < em > run < /em>(DiscoveryserverApplication.class, args);
    }

}
Now we need to define some properties to application.properties file.
spring.application.name=discoveryserver
server.port=8081
eureka.client.register-with-eureka=false
eureka.client.fetch-registry=false
6. Configuration Server
The purpose of the configuration server is to use a centralized configuration directory for all servers. Config server can fetch configuration data from external centralized location. As GitHub provides file storage facility to us, we will use GitHub for our configuration file location. After including the configuration project to our root project, we will see the pom.xml file like this.
<?xml version="1.0" encoding="UTF-8"?>
<project xmlns="http://maven.apache.org/POM/4.0.0" xmlns:xsi="http://www.w3.org/2001/XMLSchema-instance" xsi:schemaLocation="http://maven.apache.org/POM/4.0.0 http://maven.apache.org/xsd/maven-4.0.0.xsd">
   <parent>
      <artifactId>microservice</artifactId>
      <groupId>com.javadevjournal</groupId>
      <version>0.0.1-SNAPSHOT</version>
   </parent>
   <modelVersion>4.0.0</modelVersion>
   <artifactId>configserver</artifactId>
   <properties>
      <java.version>1.8</java.version>
      <spring-cloud.version>Hoxton.SR3</spring-cloud.version>
   </properties>
   <dependencies>
      <dependency>
         <groupId>org.springframework.boot</groupId>
         <artifactId>spring-boot-starter-actuator</artifactId>
      </dependency>
      <dependency>
         <groupId>org.springframework.boot</groupId>
         <artifactId>spring-boot-starter-jersey</artifactId>
      </dependency>
      <dependency>
         <groupId>org.springframework.boot</groupId>
         <artifactId>spring-boot-starter-web</artifactId>
      </dependency>
      <dependency>
         <groupId>org.springframework.cloud</groupId>
         <artifactId>spring-cloud-config-server</artifactId>
      </dependency>
      <dependency>
         <groupId>org.springframework.boot</groupId>
         <artifactId>spring-boot-starter-test</artifactId>
         <scope>test</scope>
         <exclusions>
            <exclusion>
               <groupId>org.junit.vintage</groupId>
               <artifactId>junit-vintage-engine</artifactId>
            </exclusion>
         </exclusions>
      </dependency>
   </dependencies>
   <dependencyManagement>
      <dependencies>
         <dependency>
            <groupId>org.springframework.cloud</groupId>
            <artifactId>spring-cloud-dependencies</artifactId>
            <version>${spring-cloud.version}</version>
            <type>pom</type>
            <scope>import</scope>
         </dependency>
      </dependencies>
   </dependencyManagement>
   <build>
      <plugins>
         <plugin>
            <groupId>org.springframework.boot</groupId>
            <artifactId>spring-boot-maven-plugin</artifactId>
         </plugin>
      </plugins>
   </build>
</project>
And the Main Application class will be like this
package com.javadevjournal.configserver;

import org.springframework.boot.SpringApplication;
import org.springframework.boot.autoconfigure.SpringBootApplication;
import org.springframework.cloud.config.server.EnableConfigServer;

@SpringBootApplication
@EnableConfigServer
public class ConfigserverApplication {

    public static void main(String[] args) {
        SpringApplication.run(ConfigserverApplication.class, args);
    }

}
After adding the annotation to the main class, we will look at the properties file for configuration properties.
server.port=8082
spring.application.name=configserver
spring.cloud.config.server.git.uri = https://github.com/flopcoder82/microservices
spring.cloud.config.server.git.username=XXXXXX
spring.cloud.config.server.git.password=XXXXXXXX
spring.cloud.config.server.git.clone-on-start=true
7. MicroServices (Profile Management)
Now need to configure core service. Core service will contain business module. Pom.xml file should be like below code snapshot.
<?xml version="1.0" encoding="UTF-8"?>
<project xmlns="http://maven.apache.org/POM/4.0.0" xmlns:xsi="http://www.w3.org/2001/XMLSchema-instance" xsi:schemaLocation="http://maven.apache.org/POM/4.0.0 http://maven.apache.org/xsd/maven-4.0.0.xsd">
   <parent>
      <artifactId>microservice</artifactId>
      <groupId>com.javadevjournal</groupId>
      <version>0.0.1-SNAPSHOT</version>
   </parent>
   <modelVersion>4.0.0</modelVersion>
   <artifactId>profilemanagement</artifactId>
   <properties>
      <java.version>1.8</java.version>
      <spring-cloud.version>Hoxton.SR3</spring-cloud.version>
   </properties>
   <dependencies>
      <dependency>
         <groupId>org.springframework.boot</groupId>
         <artifactId>spring-boot-starter-web</artifactId>
      </dependency>
      <dependency>
         <groupId>org.springframework.cloud</groupId>
         <artifactId>spring-cloud-starter-config</artifactId>
      </dependency>
      <dependency>
         <groupId>org.springframework.cloud</groupId>
         <artifactId>spring-cloud-starter-netflix-eureka-client</artifactId>
      </dependency>
      <dependency>
         <groupId>org.springframework.boot</groupId>
         <artifactId>spring-boot-starter-data-jpa</artifactId>
      </dependency>
      <dependency>
         <groupId>mysql</groupId>
         <artifactId>mysql-connector-java</artifactId>
         <scope>runtime</scope>
      </dependency>
      <dependency>
         <groupId>org.springframework.boot</groupId>
         <artifactId>spring-boot-starter-test</artifactId>
         <scope>test</scope>
         <exclusions>
            <exclusion>
               <groupId>org.junit.vintage</groupId>
               <artifactId>junit-vintage-engine</artifactId>
            </exclusion>
         </exclusions>
      </dependency>
   </dependencies>
   <dependencyManagement>
      <dependencies>
         <dependency>
            <groupId>org.springframework.cloud</groupId>
            <artifactId>spring-cloud-dependencies</artifactId>
            <version>${spring-cloud.version}</version>
            <type>pom</type>
            <scope>import</scope>
         </dependency>
      </dependencies>
   </dependencyManagement>
   <build>
      <plugins>
         <plugin>
            <groupId>org.springframework.boot</groupId>
            <artifactId>spring-boot-maven-plugin</artifactId>
         </plugin>
      </plugins>
   </build>
</project>
We will simply see an example of an employee profile. For this reason, we have to create a service, controller domain class.At first, have to configure our main application class as below. We will enable eureka and config the client by annotation.
package com.javadevjournal.profilemanagement;
import org.springframework.boot.SpringApplication;
import org.springframework.boot.autoconfigure.SpringBootApplication;
import org.springframework.cloud.client.discovery.EnableDiscoveryClient;
import org.springframework.cloud.netflix.eureka.EnableEurekaClient;
@SpringBootApplication
@EnableEurekaClient
@EnableDiscoveryClient
public class ProfilemanagementApplication {
public static void main(String[] args) {
SpringApplication.run(ProfilemanagementApplication.class, args);
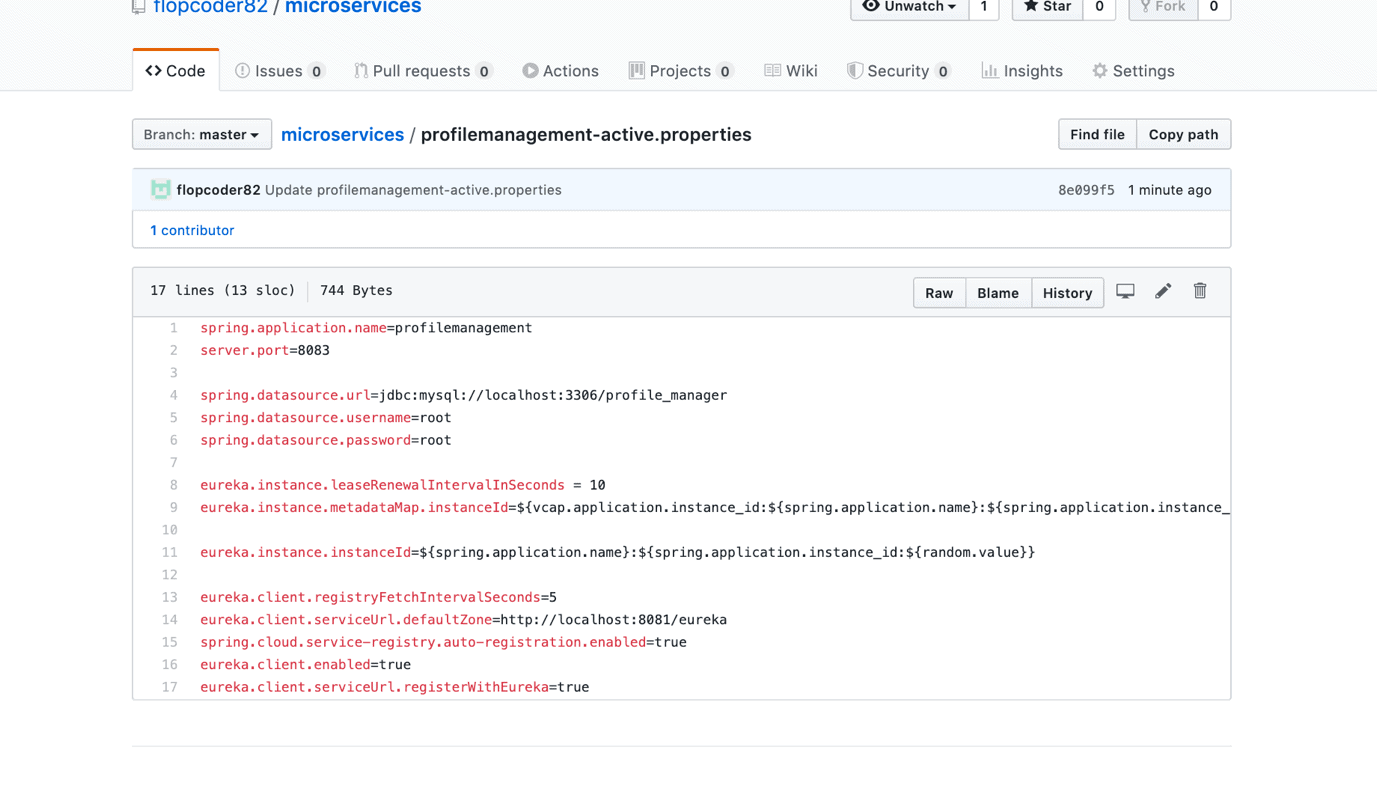
}<code>We will create a boorstrap.properties file to our resource folder of the application. Because we will use the config server to get the properties file. When we use this properties file, during application startup it will first fetch the properties from GitHub through the config server. Yes, we will also create a git repository to the GitHub named by microservice. Then we should add a properties file like named by profilemanagement-active.properties. Github repository will look like the below image. We can check this from here also.
Our bootstrap.properties file will be like this
spring.cloud.config.uri=http://localhost:8082
spring.cloud.config.name=profilemanagement
spring.cloud.config.profile=active
and <em>application.properties</em> file should be like this spring.application.name=profilemanagement
Then we will create following classes to our project.
package com.javadevjournal.profilemanagement.domain;

import javax.persistence.*;

@Entity
@Table(name = "employee_profile")
public class EmployeeProfile {
    @Id
    @GeneratedValue(strategy = GenerationType.IDENTITY)
    @Column(name = "id")
    private int id;
    @Column(name = "name")
    private String name;
    @Column(name = "address")
    private String address;
    public int getId() {
        return id;
    }

    public void setId(int id) {
        this.id = id;
    }

    public String getName() {
        return name;
    }

    public void setName(String name) {
        this.name = name;
    }

    public String getAddress() {
        return address;
    }

    public void setAddress(String address) {
        this.address = address;
    }


}
7.1. Repository
package com.javadevjournal.profilemanagement.dao;

import com.ayoosh.profilemanagement.domain.EmployeeProfile;
import org.springframework.data.jpa.repository.JpaRepository;
import org.springframework.stereotype.Repository;

@Repository
public interface ProfileRepository extends JpaRepository < EmployeeProfile, Integer > {

}
Services
package com.javadevjournal.profilemanagement.service;

import com.ayoosh.profilemanagement.domain.EmployeeProfile;
import java.util.List;

public interface EmployeeProfileService {
    void addEmployeeProfile(EmployeeProfile profile);
    List < EmployeeProfile > getEmployeeProfiles();
}
7.2. Service Implementation
package com.javadevjournal.profilemanagement.service;

import com.ayoosh.profilemanagement.dao.ProfileRepository;
import com.ayoosh.profilemanagement.domain.EmployeeProfile;
import org.springframework.beans.factory.annotation.Autowired;
import org.springframework.stereotype.Service;
import java.util.ArrayList;
import java.util.List;

@Service
public class EmployeeProfileServiceImpl implements EmployeeProfileService {

    @Autowired
    ProfileRepository repository;
    List < EmployeeProfile > employeeProfileList = new ArrayList < > ();

    @Override
    public void addEmployeeProfile(EmployeeProfile profile) {
        repository.save(profile);
    }

    @Override
    public List < EmployeeProfile > getEmployeeProfiles() {
        return repository.findAll();
    }
}
7.3. Controller
package com.ayoosh.profilemanagement.controller;

import com.ayoosh.profilemanagement.domain.EmployeeProfile;
import com.ayoosh.profilemanagement.service.EmployeeProfileService;
import org.springframework.beans.factory.annotation.Autowired;
import org.springframework.web.bind.annotation.*;
import java.util.List;

@RestController
@RequestMapping(value = "/")
public class EmployeeController {
    @Autowired
    EmployeeProfileService employeeProfileService;

    @PostMapping
    public void saveEmployeeProfile(@RequestBody EmployeeProfile employeeProfile) {
        employeeProfileService.addEmployeeProfile(employeeProfile);
    }

    @GetMapping
    public List < EmployeeProfile > getAllEmployee() {
        return employeeProfileService.getEmployeeProfiles();
    }

}
8. Running the example and display the results.
Our configuration to build microservies with Spring Boot is complete. We are ready to run our application . Till now we have configured the following things.
- Eureka server
- Configuration server
- Core service
Now we will go to the eurekaserver directory from the terminal and will run mvn spring-boot:run. As we configured the eureka server to port 8081, it will listen to 8081 port.Then we will go to the config server and run mvn spring-boot:run command. As we configured the config server at port 8082, it will listen to port 8082.
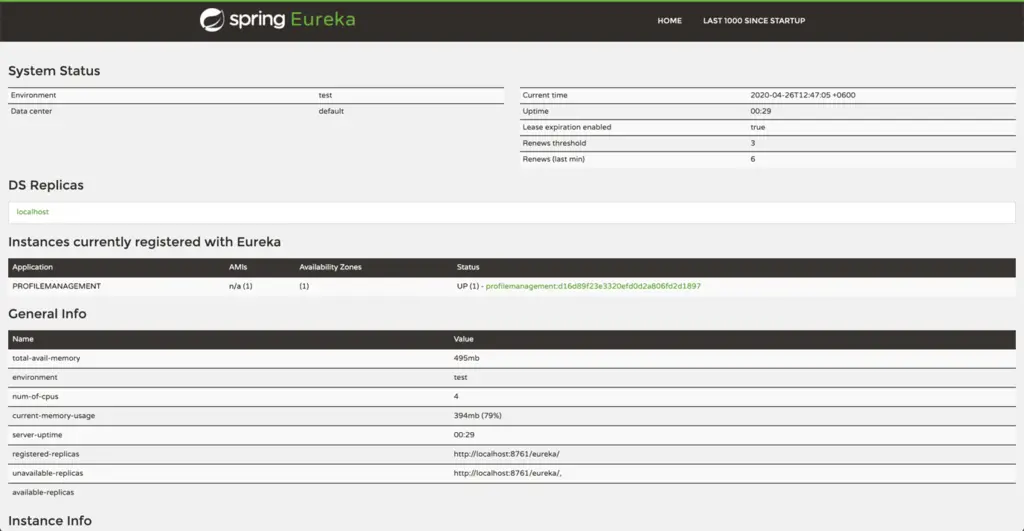
Now we will run our core service profilemanagement. Go to the directory of profilemanagement project and execute mvn spring-boot:run command. It will listen to port 8083. Now all server is running. So, we can test now. At first, we will check the eureka server at http://localhost:8081/. It will be like the below image. Here we can see that PROFILEMANAGEMENT project is registered here.
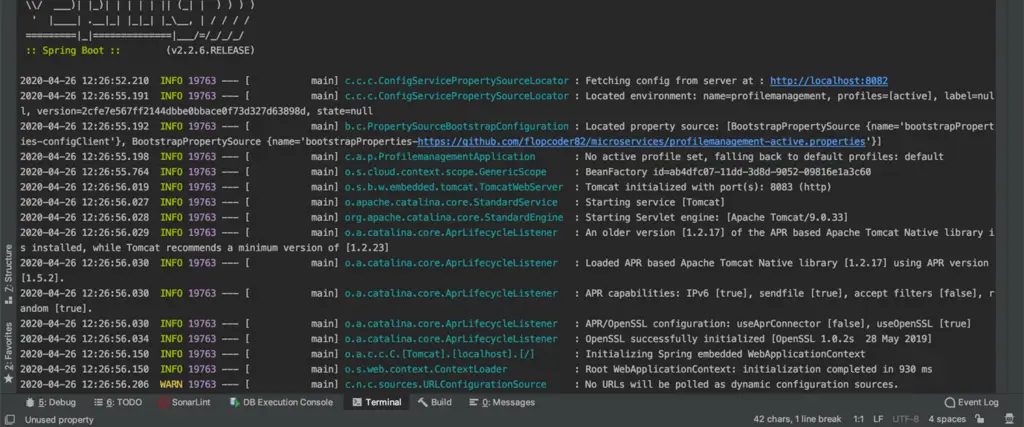
And we will check the log of the core server. We will see that it will take the properties file from the github through configserver.
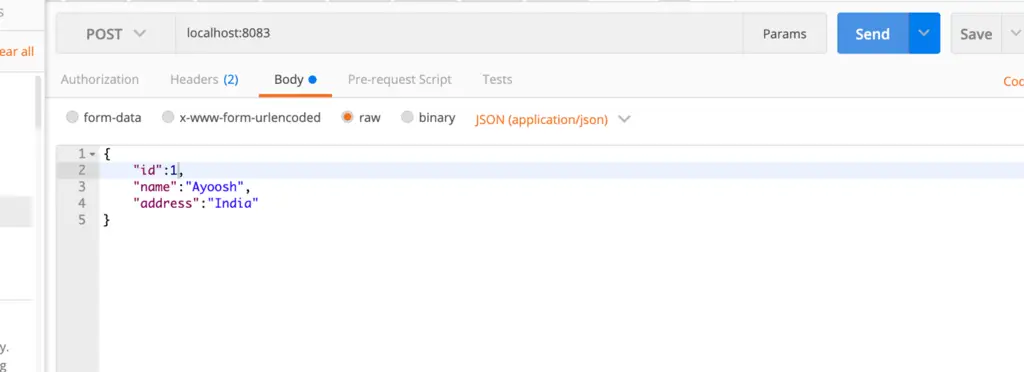
Now we will check profilemanagement service through postman.First, we will create a profile through postman like the below image. This is a POST request.
And then, we will fetch the profiles through GET request
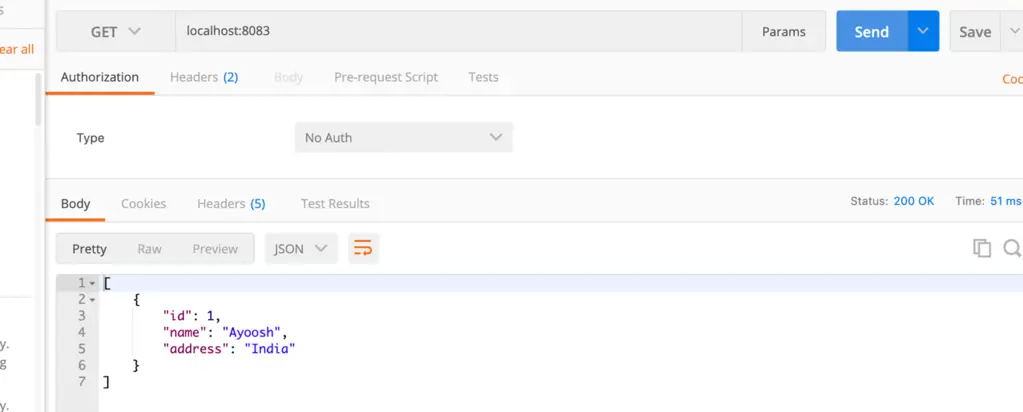
We can see that its working fine. With POST request its saving data to a list and with GET request its fetching data from the server.
9. Feign and Hystrix
We can also use Feign and hystrix to manage the fallback of services. When a service will fail to reach then the hystrix and feign can do the fallback thing to manage the application keep live. If we will not able to reach one service then it will manage the fallback task wonderfully. We will discuss more this on our next article
Summary
In this article, we saw the basics of building microservices with Spring Boot.Microservices comes with a great benefit for a large system. Here, developers can work on their independent modules without too much dependency. And if a server goes to down it will not down the whole system.The source code for this article is available on GitHub.
It would be really nice of you if you could please host the code on github. Thanks
The source is available on the Github. Here is the URL
SourceCode GitHub