In this article of Spring Boot, we will discuss as how to integrate Spring Boot with Hibernate. We will build a simple Spring Boot application and use Hibernate to store the data.
1. Spring Boot with Hibernate
To bootstrap our application, we have the following options
- Spring Initializr
- Use IDE
- Use Spring Boot CLI tool.
We are using the Spring Initializr for this article. As part of the setup, we will add, Web, JPA, MySQL dependencies our application. To start, go to the Spring Initializr and create the project structure.
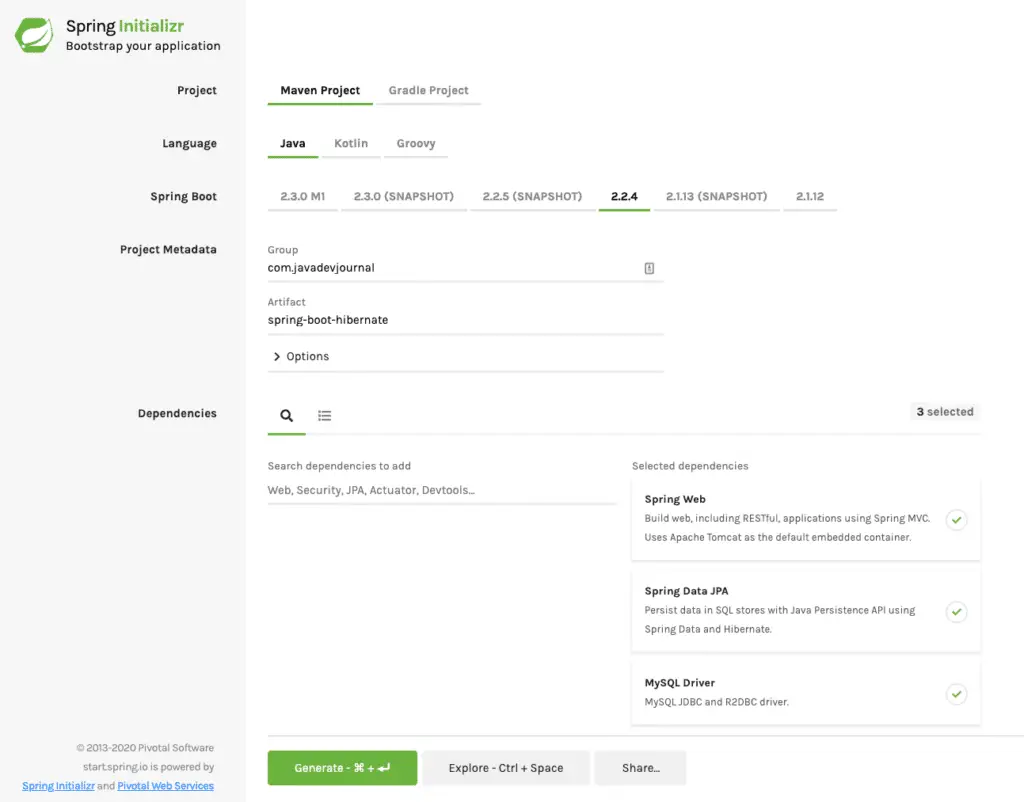
Click on the “Generate” button to download the project structure on your machine. This is how our pom.xml will look like
<?xml version="1.0" encoding="UTF-8"?>
<project xmlns="http://maven.apache.org/POM/4.0.0" xmlns:xsi="http://www.w3.org/2001/XMLSchema-instance" xsi:schemaLocation="http://maven.apache.org/POM/4.0.0 http://maven.apache.org/xsd/maven-4.0.0.xsd">
<modelVersion>4.0.0</modelVersion>
<parent>
<groupId>org.springframework.boot</groupId>
<artifactId>spring-boot-starter-parent</artifactId>
<version>2.2.4.RELEASE</version>
<relativePath />
<!-- lookup parent from repository -->
</parent>
<groupId>com.javadevjournal</groupId>
<artifactId>spring-boot-hibernate</artifactId>
<version>0.0.1-SNAPSHOT</version>
<name>spring-boot-hibernate</name>
<description>Application to integrate Spring Boot with Hibernate</description>
<properties>
<java.version>1.8</java.version>
</properties>
<dependencies>
<dependency>
<groupId>org.springframework.boot</groupId>
<artifactId>spring-boot-starter-data-jpa</artifactId>
</dependency>
<dependency>
<groupId>org.springframework.boot</groupId>
<artifactId>spring-boot-starter-web</artifactId>
</dependency>
<dependency>
<groupId>mysql</groupId>
<artifactId>mysql-connector-java</artifactId>
<scope>runtime</scope>
</dependency>
<dependency>
<groupId>org.springframework.boot</groupId>
<artifactId>spring-boot-starter-test</artifactId>
<scope>test</scope>
</dependency>
</dependencies>
<build>
<plugins>
<plugin>
<groupId>org.springframework.boot</groupId>
<artifactId>spring-boot-maven-plugin</artifactId>
</plugin>
</plugins>
</build>
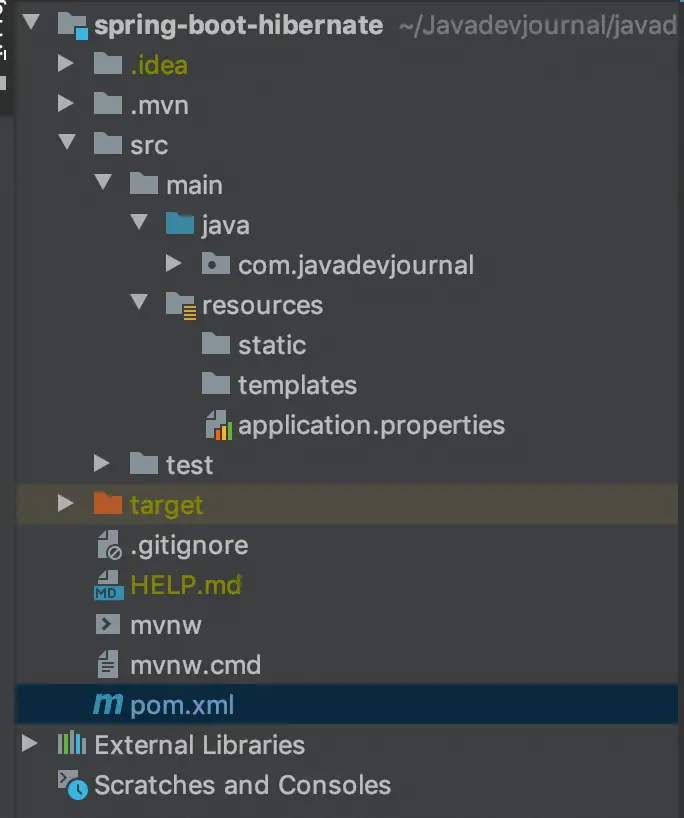
</project>We are using MySQL for this post, in case you like to use other DB, please add the correct dependencies in your pom.xml file. With these dependencies, Spring Boot ensure to include all the jars in the class-path including the Hibernate. Here is the screenshot of the project structure.
2. Configuring Database (MySQL)
Spring Boot will automatically try to create DataSource if it finds the if spring-data-jpa is in the class-path. It will try to read the database configurations from the application.properties file. Let’s add the database configuration to our application.properties file and let Spring Boot to do the rest of work for us.
#datasource configurations
spring.datasource.url=jdbc:mysql://localhost:3306/spring-boot-hibernate?useJDBCCompliantTimezoneShift=true&useLegacyDatetimeCode=false&serverTimezone=UTC
spring.datasource.username=root
spring.datasource.password=root
spring.datasource.driver-class-name=com.mysql.jdbc.Driver

# DDL generation
spring.jpa.generate-ddl=true
Create the database with name spring-boot-hibernate.
3. Database Initialization
Spring Boot JPA provides the option for DDL generation. Spring JPA provides following two properties for the DDL generation.
spring.jpa.generate-ddl(boolean) as vendor independent.spring.jpa.hibernate.ddl-autoHibernate specific feature.
For more information on Hibernate property, please read Initialize a Database Using Hibernate
4. Create JPA Entity Class
To use the hibernate to work with our data, let’s create a customer entity to store and retrieve customer information from the database.
@Entity
public class Customer {

 @Id
 @GeneratedValue(strategy = GenerationType.IDENTITY)
 private Long id;
 private String firstName;
 private String lastName;
 private String email;

 public Customer() {
 }
 //get & set methods
}
Let’s cover some important points from our entity class:
- The
@Entityannotation show that this class is an entity class. - We are not using
@Tableannotation, Hibernate will map it to the table named as “Customer“. You can use a different table name with<span class="token annotation punctuation">@Table</span><span class="token punctuation">(</span>name <span class="token operator">=</span> <span class="token string">"User"</span><span class="token punctuation">)</span> - The
@Idannotation mark the id field as unique id field. We are using the identity generation strategy for our example. - The
firstNameandlastNameare un-mapped and it will map them to the same column name as in the properties. We have the option to use@Columnannotation to customize column names.
5. Create The Repository
Spring JPA provide a transparent integration with the underlying JPA layer using the JPA repositories. It will take care of creating repository implementations automatically, at run-time, from a repository interface. Let’s create a simple CustomerRepository for our Customer entity and let Spring JPA handle the implementation part for us:
import com.javadevjournal.data.Customer;
import org.springframework.data.repository.CrudRepository;
@Repository
public interface CustomerRepository extends JpaRepository<Customer,Long> { }
Spring JPA handle most of the work for us and we only need to define the interface.The @Repository annotation helps Spring to bootstrap the JPA features during component scanning.The JpaRepository provide several OOTB methods to help us get started.
save(S entity)findById(ID id)findOne()findAll()
For a complete list of method, please refer to the SimpleJpaRepository
6. Create The Service
Let’s create a simple service which will interact with the JPA repository to perform database operations:
package com.javadevjournal.service;

import com.javadevjournal.data.Customer;
import com.javadevjournal.dto.CustomerData;
import com.javadevjournal.repository.CustomerRepository;
import org.springframework.beans.factory.annotation.Autowired;
import org.springframework.stereotype.Service;

import javax.persistence.EntityNotFoundException;
import java.util.ArrayList;
import java.util.List;

@Service("customerService")
public class DefaultCustomerService implements CustomerService {

    @Autowired
    private CustomerRepository customerRepository;

    /**
     * Create a customer based on the data sent to the service class.
     * @param customer
     * @return DTO representation of the customer
     */
    @Override
    public CustomerData saveCustomer(CustomerData customer) {
        Customer customerModel = populateCustomerEntity(customer);
        return populateCustomerData(customerRepository.save(customerModel));
    }

    /**
     * Delete customer based on the customer ID.We can also use other option to delete customer
     * based on the entity (passing JPA entity class as method parameter)
     * @param customerId
     * @return boolean flag showing the request status
     */
    @Override
    public boolean deleteCustomer(Long customerId) {
        customerRepository.deleteById(customerId);
        retunr true;
    }

    /**
     * Method to return the list of all the customers in the system.This is a simple
     * implementation but use pagination in the real world example.
     * @return list of customer
     */
    @Override
    public List < CustomerData > getAllCustomers() {
        List < CustomerData > customers = new ArrayList < > ();
        List < Customer > customerList = customerRepository.findAll();
        customerList.forEach(customer - > {
            customers.add(populateCustomerData(customer));
        });
        return customers;
    }

    /**
     * Get customer by ID. The service will send the customer data else will throw the exception.
     * @param customerId
     * @return CustomerData
     */
    @Override
    public CustomerData getCustomerById(Long customerId) {
        return populateCustomerData(customerRepository.findById(customerId).orElseThrow(() - > new EntityNotFoundException("Customer not found")));
    }

    /**
     * Internal method to convert Customer JPA entity to the DTO object
     * for frontend data
     * @param customer
     * @return CustomerData
     */
    private CustomerData populateCustomerData(final Customer customer) {
        CustomerData customerData = new CustomerData();
        customerData.setId(customer.getId());
        customerData.setFirstName(customer.getFirstName());
        customerData.setLastName(customer.getLastName());
        customerData.setEmail(customer.getEmail());
        return customerData;
    }

    /**
     * Method to map the front end customer object to the JPA customer entity.
     * @param customerData
     * @return Customer
     */
    private Customer populateCustomerEntity(CustomerData customerData) {
        Customer customer = new Customer();
        customer.setFirstName(customerData.getFirstName());
        customer.setLastName(customerData.getLastName());
        customer.setEmail(customerData.getEmail());
        return customer;
    }
}
Our service class provides method to save, delete and find all customers in the database.
7. Create Customer Controller
package com.javadevjournal.controller;

import com.javadevjournal.dto.CustomerData;
import com.javadevjournal.service.CustomerService;
import org.springframework.web.bind.annotation.*;

import javax.annotation.Resource;
import java.util.List;

@RestController
@RequestMapping("/customers")
public class CustomerController {

    @Resource(name = "customerService")
    private CustomerService customerService;

    /**
     * <p>Get all customer data in the system.For production system you many want to use
     * pagination.</p>
     * @return List<CustomerData>
     */
    @GetMapping
    public List < CustomerData > getCustomers() {
        return customerService.getAllCustomers();
    }

    /**
     * Method to get the customer data based on the ID.
     * @param id
     * @return CustomerData
     */
    @GetMapping("/customer/{id}")
    public CustomerData getCustomer(@PathVariable Long id) {
        return customerService.getCustomerById(id);
    }

    /**
     * Post request to create customer information int the system.
     * @param customerData
     * @return
     */
    @PostMapping("/customer")
    public CustomerData saveCustomer(final @RequestBody CustomerData customerData) {
        return customerService.saveCustomer(customerData);
    }

    /**
     * <p>Delete customer from the system based on the ID. The method mapping is like the getCustomer with difference of
     * @DeleteMapping and @GetMapping</p>
     * @param id
     * @return
     */
    @DeleteMapping("/customer/{id}")
    public Boolean deleteCustomer(@PathVariable Long id) {
        return customerService.deleteCustomer(id);
    }

}
8. Test The Application
As part of the last step, let’s create the main class for our Spring Boot application:
@SpringBootApplication
public class SpringBootHibernateApplication {
private static final Logger log = LoggerFactory.getLogger(SpringBootHibernateApplication.class);
public static void main(String[] args) {
SpringApplication.run(SpringBootHibernateApplication.class, args);
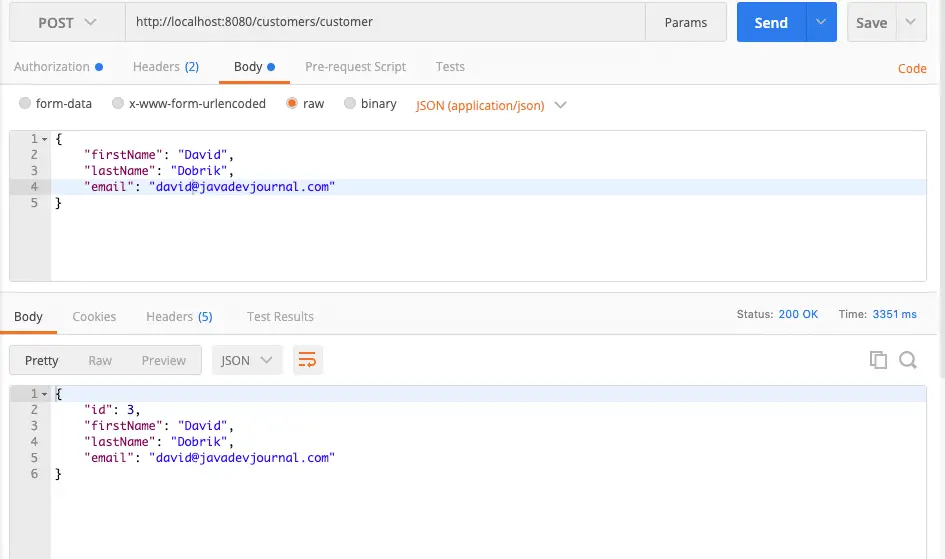
}We will create few records in the system using the POST method. We are using the Postman for this demo but you can use any other REST client.
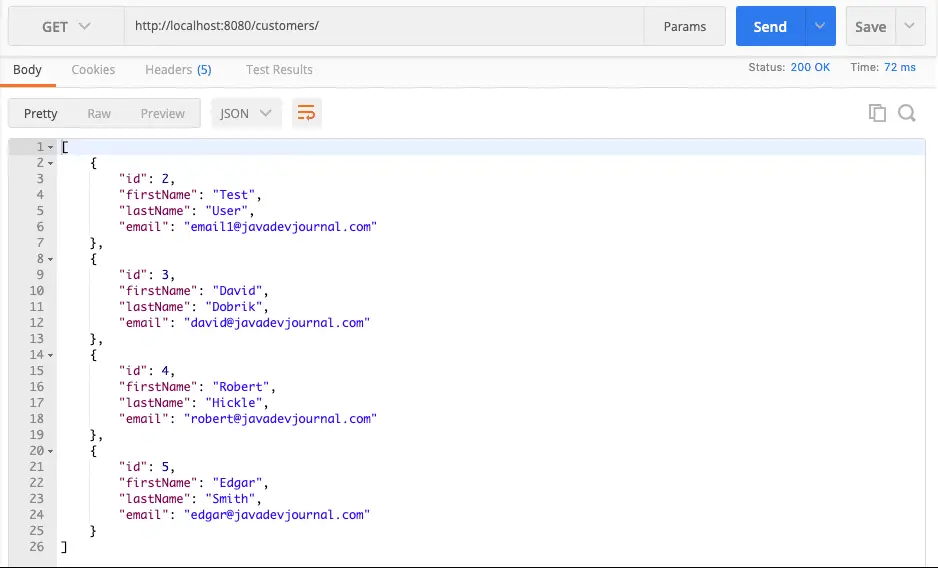
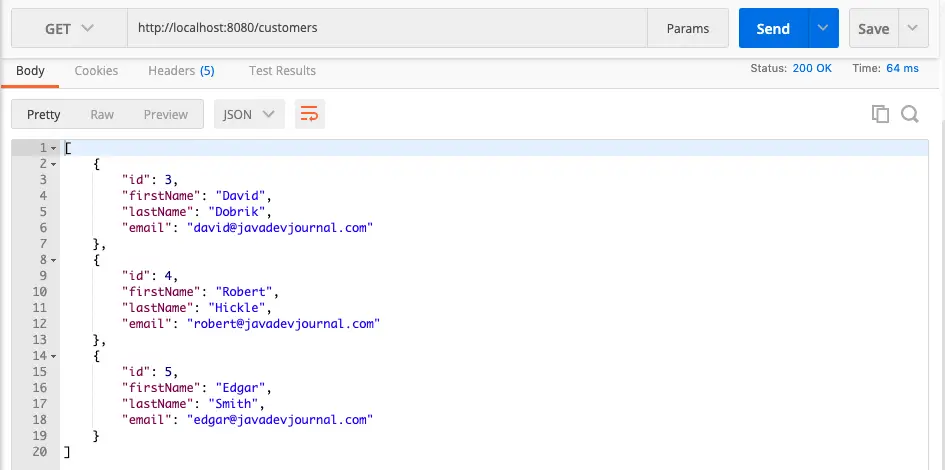
Retrieving all customers from the system GET /customers
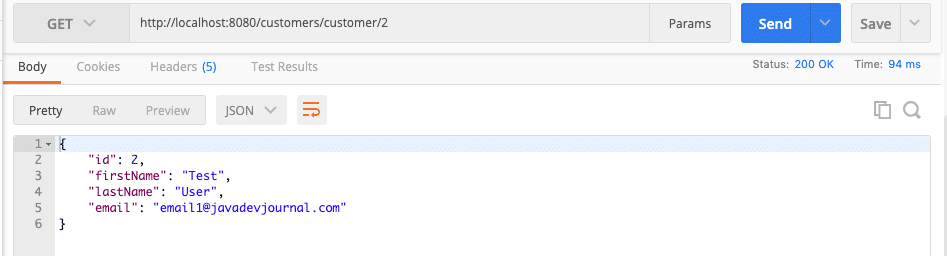
Retrieving customer information from the system by customer id GET /customers/customer/2
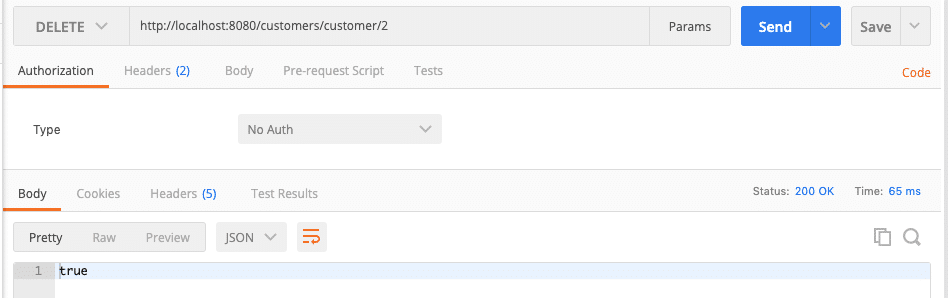
Delete customer information from by customer id DELETE /customers/customer/2
Updated Customer List
9. Enable JPA Auditing
Spring Data provides sophisticated support to transparently keep track of who created or changed an entity and the point in time this happened. To enjoy that functionality you have to equip your entity classes with auditing metadata that can be defined either using annotations or by implementing an interface.
Spring JPA provides @CreatedBy, @LastModifiedBy to capture the user who created or changed the entity and @CreatedDate and @LastModifiedDate to capture the point in time this happened. Here is our changed JPA entity class with the auditing changes.
@Entity
@EntityListeners(AuditingEntityListener.class)
public class Customer {

    @Id
    @GeneratedValue(strategy = GenerationType.IDENTITY)
    private Long id;
    private String firstName;
    private String lastName;
    private String email;

    @Column(updatable = false, nullable = false)
    @CreatedDate
    private LocalDateTime createdTime;

    @Column(nullable = false)
    @LastModifiedDate
    private LocalDateTime updatedTime;

    //getter and setter
}
Apart from the annotation on the createdTime and modifiedTime fields, we need to perform the following changes
- Add the
AuditingEntityListenerto the domain model. We added the@EntityListeners(AuditingEntityListener.class)to our JPA entity class. - Enable the JPA auditing in the main class using the
@EnableJpaAuditingannotation.
10. Enable SQL Logging
In the development phase, it’s helpful to see the SQL statements being generated by Hibernate.We can enable it using the following properties in our application.properties file
#Statitcs and SQL logs
spring.jpa.show-sql=true
spring.jpa.properties.hibernate.format_sql=true
spring.jpa.properties.hibernate.generate_statistics=true

#Enable this section based on your preferences
#logging.level.org.hibernate.type=trace
#logging.level.org.hibernate.stat=debug

logging.pattern.console=%d{yyyy-MM-dd HH:mm:ss} - %msg%n
Above setting will enable the SQL statement printing on the console.if we call our controller method to get the list of customers, we will also find the following SQL statement printing on the console:
Hibernate:
    select
        customer0_.id as id1_0_,
        customer0_.created_time as created_2_0_,
        customer0_.email as email3_0_,
        customer0_.first_name as first_na4_0_,
        customer0_.last_name as last_nam5_0_,
        customer0_.updated_time as updated_6_0_
    from
        customer customer0_
2020-02-12 21:44:40 - Session Metrics {
    939620 nanoseconds spent acquiring 1 JDBC connections;
    0 nanoseconds spent releasing 0 JDBC connections;
    23985787 nanoseconds spent preparing 1 JDBC statements;
    1151373 nanoseconds spent executing 1 JDBC statements;
    0 nanoseconds spent executing 0 JDBC batches;
    0 nanoseconds spent performing 0 L2C puts;
    0 nanoseconds spent performing 0 L2C hits;
    0 nanoseconds spent performing 0 L2C misses;
    0 nanoseconds spent executing 0 flushes (flushing a total of 0 entities and 0 collections);
    28096 nanoseconds spent executing 1 partial-flushes (flushing a total of 0 entities and 0 collections)
The first part displays the SQL being generated by system while the second part shows the metrics
11. Table Names and Uppercase
In case you to set the database table name in Upper case, you many need to set the spring.jpa.hibernate.naming.physical-strateg property in your application.properties file and set the entity name accordingly. Let’s see one example configuration for better understanding.
Set the following property in the application.properties or yml file.
spring.jpa.hibernate.naming.physicalstrategy=org.hibernate.boot.model.naming.PhysicalNamingStrategyStandardImplYou can now configure the entity name as:
@Entity(name="USER")
public class Customer {

 //member details
}
Summary
In this article, we learned how to integrate Spring Boot with Hibernate. We saw how Spring Boot transparently handle the JPA integration including Hibernate. The source code for this article is available on the GitHub.
here u used JPA not hibernate
JPA is a specification and Hibernate is the most popular JPA implementation, not sure what you mean by “I used JPA and not hibernate”? The underlying JPA implementation for this article is still hibernate.