In this article, we will look at the how to pass an additional parameter with Spring Security login page.
Pass an additional parameter with spring security login page
There are multiple way to pass an additional parameter with Spring security page but we will look at the 2 main approach in this section. Here are the 2 options to accomplish this:
- Pass parameter using the Authentication Filter Approach.
- For most advance cases, we will use the AuthenticationDetailsSource
To understand, let’s assume we want to pass a security token code with each login request as an additional parameter with Spring Security login page to use it in our authentication process.
1. Project and Maven Setup
This article is part of our Spring Security series and you can download the source code from our GitHub Repository. If you are creating a new project, you can use the Spring Initializr to create the initial project setup. This is how our pom.xml looks like
<?xml version="1.0" encoding="UTF-8"?>
<project xmlns="http://maven.apache.org/POM/4.0.0" xmlns:xsi="http://www.w3.org/2001/XMLSchema-instance"
	xsi:schemaLocation="http://maven.apache.org/POM/4.0.0 https://maven.apache.org/xsd/maven-4.0.0.xsd">
	<modelVersion>4.0.0</modelVersion>
	<parent>
		<groupId>org.springframework.boot</groupId>
		<artifactId>spring-boot-starter-parent</artifactId>
		<version>2.3.1.RELEASE</version>
		<relativePath/> <!-- lookup parent from repository  -->
	</parent>
	<groupId>com.javadevjournal</groupId>
	<artifactId>spring-security-series</artifactId>
	<version>0.0.1-SNAPSHOT</version>
	<name>Spring Security Tutorial Series</name>
	<description>Series to explain the core Spring security concepts.</description>

	<dependencies>
		<!-- we need dev tool only for development and not for the production -->
		<dependency>
			<groupId>org.springframework.boot</groupId>
			<artifactId>spring-boot-devtools</artifactId>
		</dependency>
		<dependency>
			<groupId>org.springframework.boot</groupId>
			<artifactId>spring-boot-starter</artifactId>
		</dependency>
		<dependency>
			<groupId>org.springframework.boot</groupId>
			<artifactId>spring-boot-starter-security</artifactId>
		</dependency>
		<dependency>
			<groupId>org.springframework.boot</groupId>
			<artifactId>spring-boot-starter-web</artifactId>
		</dependency>
		<dependency>
			<groupId>org.springframework.boot</groupId>
			<artifactId>spring-boot-starter-validation</artifactId>
		</dependency>
		<dependency>
			<groupId>org.springframework.boot</groupId>
			<artifactId>spring-boot-starter-thymeleaf</artifactId>
		</dependency>
		<!-- https://mvnrepository.com/artifact/org.thymeleaf.extras/thymeleaf-extras-springsecurity5 -->
		<dependency>
			<groupId>org.thymeleaf.extras</groupId>
			<artifactId>thymeleaf-extras-springsecurity5</artifactId>
			<version>3.0.4.RELEASE</version>
		</dependency>

	</dependencies>
	<build>
		<plugins>
			<plugin>
				<groupId>org.springframework.boot</groupId>
				<artifactId>spring-boot-maven-plugin</artifactId>
			</plugin>
		</plugins>
	</build>

</project>
2. Custom Authentication Filter
As we know that spring security user the security filters to start the authentication process. Spring security uses the UsernamePasswordAuthenticationFilter to handle the form based login process. The simple and easiest option to pass an additional parameter with Spring Security login page is to create a custom filter by extending the UsernamePasswordAuthenticationFilter and handle any additional parameters. Let’s see how to do this.
public class CustomAuthenticationFilter extends UsernamePasswordAuthenticationFilter {

    private static final String customToken = "jdjCustomToken";

    /**
     * This is override of UsernamePasswordAuthenticationFilter
     * @param request
     * @param response
     * @return
     * @throws AuthenticationException
     */
    @Override
    public Authentication attemptAuthentication(HttpServletRequest request, HttpServletResponse response) throws AuthenticationException {

        UsernamePasswordAuthenticationToken authRequest = getAuth(request);
        setDetails(request, authRequest);
        return getAuthenticationManager().authenticate(authRequest);
    }

    /*
        We are combing the username and our custom token to pass on this data to the underlying system.
        As an alternate, you can also save it in session but keep in mind that this will only be available
        where HTTP session is available.
     */
    private UsernamePasswordAuthenticationToken getAuth(final HttpServletRequest request) {
        String username = obtainUsername(request);
        String password = obtainPassword(request);
        String customToken = obtainCustomToken(request);

        String usernameDomain = String.format("%s%s%s", username.trim(),
            String.valueOf(Character.LINE_SEPARATOR), customToken);

        return new UsernamePasswordAuthenticationToken(
            usernameDomain, password);
    }

    @Nullable
    protected String obtainCustomToken(HttpServletRequest request) {
        return request.getParameter(customToken);
    }
}
Above code is simple and self explanatory. We are getting the username and password similar to the UsernamePasswordAuthenticationFilter and then getting our customToken from the HTTPServletRequest. We are combining both username and customToken and passing the token to the AuthenticationManager. The next step is to customize our custom user details service to use this information for authentication.
2.1 Spring Security UserDetails Service
Spring security DAOAuthentication Provider uses the UserDetails service to get the user information from the underlying database. The UserDetailsService contract defines a single method called loadUserByUsername. We will use this method to extract both username and custom token to execute our authentication.
@Service("userDetailsService")
public class CustomUserDetailService implements UserDetailsService {

    @Resource
    UserRepository userRepository;

    @Override
    public UserDetails loadUserByUsername(String email) throws UsernameNotFoundException {
        //Let's split the email to get both values
        String[] usernameAndCustomToken = StringUtils.split(email, String.valueOf(Character.LINE_SEPARATOR));

        //if the String arrays is empty or size is not equal to 2, let's throw exception
        if (Objects.isNull(usernameAndCustomToken) || usernameAndCustomToken.length != 2) {
            throw new UsernameNotFoundException("User not found");
        }
        final String userName = usernameAndCustomToken[0];
        final String customToken = usernameAndCustomToken[1]; // use it based on your requirement
        final UserEntity customer = userRepository.findByEmail(userName);
        if (customer == null) {
            throw new UsernameNotFoundException(email);
        }
        boolean enabled = !customer.isAccountVerified(); // we can use this in case we want to activate account after customer verified the account
        UserDetails user = User.withUsername(customer.getEmail())
            .password(customer.getPassword())
            .disabled(customer.isLoginDisabled())
            .authorities(getAuthorities(customer)).build();

        return user;
    }
}
2.2. Spring Security Configuration
Now we have created our custom security filter and customized the class. The next step is to configure these details with Spring security. We will do the following steps:
- Register our custom security filter with Spring Security.
- Inject the AuthenticationManager with our custom security filter.
To register the customer security filter, we will use the addFilterBefore method of the HTTPSecurity class.
@EnableWebSecurity
public class AppSecurityConfig extends WebSecurityConfigurerAdapter {

    @Override
    protected void configure(HttpSecurity http) throws Exception {
        http.addFilterBefore(authFilter(), UsernamePasswordAuthenticationFilter.class)
            .authorizeRequests()
            .antMatchers("/login", "/register", "/home")
            .permitAll()
            .antMatchers("/account/**").hasAnyAuthority("CUSTOMER", "ADMIN")
            .and()
            ....
    }
}
The last step to pass an additional parameter with spring security login page is to pass the AutenticationManager and Authentication Failure Handler to the custom security filter.
@Bean
public CustomAuthenticationFilter authFilter() throws Exception {
    CustomAuthenticationFilter filter = new CustomAuthenticationFilter();
    filter.setAuthenticationManager(authenticationManagerBean());
    filter.setAuthenticationFailureHandler(failureHandler());
    return filter;
}
2.3. Login Page
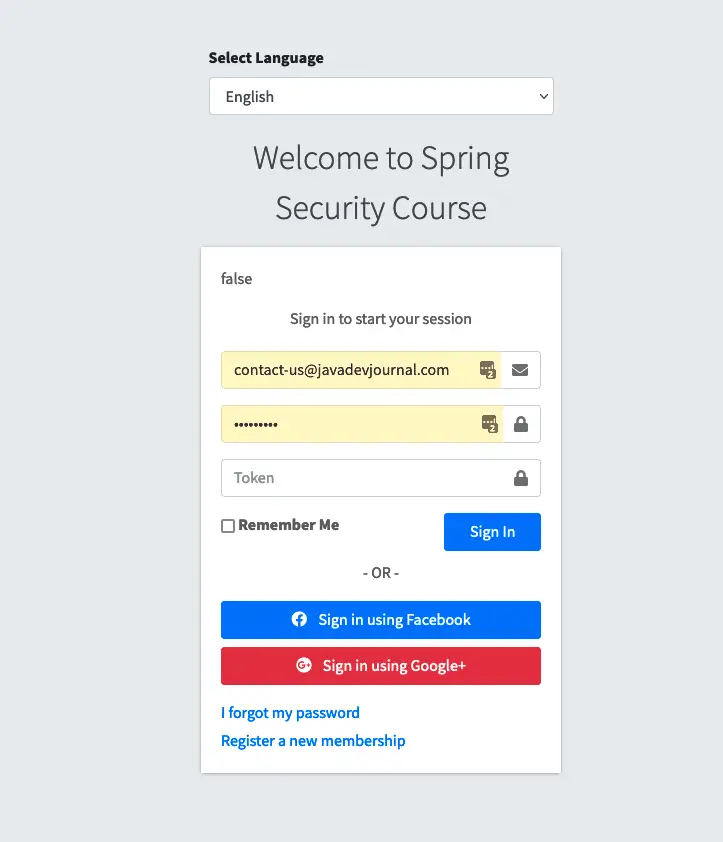
The last step is to add the additional field to the login page. This will allow customer to fill the custom token before submitting the login request. A simple input field is excellent for our need.
<div class="input-group mb-3">
  <input type="text" name="jdjCustomToken" class="form-control" placeholder="Token"/>
  <div class="input-group-append">
    <div class="input-group-text">
      <span class="fas fa-lock"></span>
    </div>
  </div>
</div>
If we run our application and open the login page, we will see an additional input field.
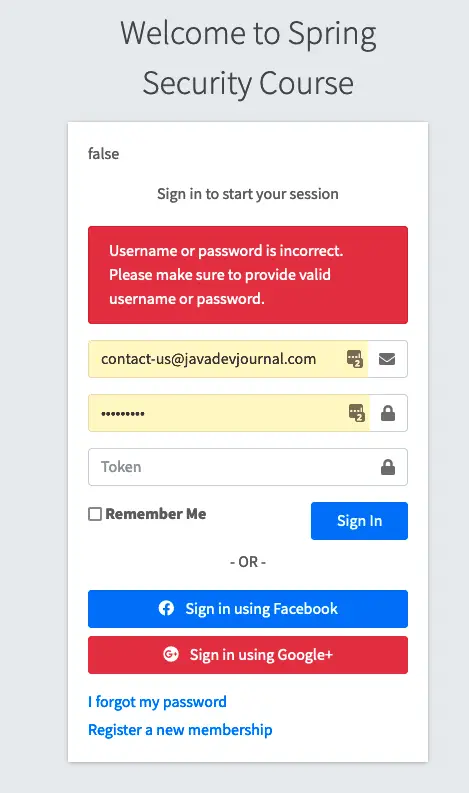
If we don’t pass the token, we will get the login failure error, while the with correct username and password with token, system will let you login.
3. Using Custom Authentication Token
To pass an additional parameter with spring security login page for more advance use cases, we can use a custom AuthenticationToken in combination with the Custom security filter as described in the above section. We will pass this additional information to the Spring security authentication using a custom UsernamePasswordAuthenticationToken and custom authentication provider. You need to create a custom authentication provider and handle the support() method accordingly. Here is a sample code to start with
@Component
public class CustomAuthenticationProvider implements AuthenticationProvider {

   // inject anything as per your requirement

    @Override
    public Authentication authenticate(Authentication authentication) {

       // run your authetication work here
    }

    @Override
    public boolean supports(Class<?> authentication) {
        return authentication.equals(CustomUsernamePasswordAuthenticationToken.class);
    }
}
Summary
In this article, we talked about how to pass an additional parameter with Spring Security login page. Passing additional parameters like security token or other details is a very common use case for any modern application. We talked about the simple solution to handle these parameters using the Spring Security filter. At the end of this article, we talked about creating our own custom token and handle this using the custom authentication provider. As always, the source code for this article is available on our GitHub repository. Let us know in case you think there are other better option to pass an additional parameter with Spring Security login page or we can handle it differently.