In this article, we will look at adding a custom filter in Spring Security. We will see the various use cases to add a custom filter in Spring security along with what are the different options to add a filter with Spring Security.
1. Custom Filter in Spring Security
As we know that Spring security works on the core concepts of filter chain which is nothing but a set of filters added to the request to carry the security work for our application. Spring Security provides several filters by default, and most of the time, these are enough. There are few use cases where we may need to create a spring security custom filter for our requirements.
The filters in Spring Security architecture are typical HTTP filters. We can create filters by implementing the Filter interface from the javax.servlet package. Like for any other HTTP filter, override the doFilter() method to implement its logic. To get the Spring security support, we can use the GenericFilterBean abstract class. This class implements Java’s Filter interface and provides an implementation for filter initialization method (init()). Spring security provides the following options while adding a custom filter to security filter chain.
- Adding a filter before an existing one in the chain.
- Adding a filter after an existing one in the chain.
- Adding/Replacing a filter at the location of another in the chain
2. Writing Custom Spring Security Filter
Let’s take a simple example where we want to validate a specific header before we allow the other filter chain to execute, in case the header is missing, we will send unauthorized response to the client, for valid header, we will continue the filter journey and let spring security execute the normal workflow. Let’s see how our custom filter looks like:
package com.javadevjournal.core.security.filter;

import org.apache.commons.lang3.StringUtils;
import org.springframework.web.filter.GenericFilterBean;

import javax.servlet.FilterChain;
import javax.servlet.ServletException;
import javax.servlet.ServletRequest;
import javax.servlet.ServletResponse;
import javax.servlet.http.HttpServletRequest;
import javax.servlet.http.HttpServletResponse;
import java.io.IOException;

public class CustomHeaderAuthFilter extends GenericFilterBean {

    @Override
    public void doFilter(ServletRequest servletRequest, ServletResponse servletResponse, FilterChain filterChain) throws IOException, ServletException {

        var request = (HttpServletRequest) servletRequest;
        var response = (HttpServletResponse) servletResponse;

        //if header is missing , send un-athorized error back
        String authHeader = request.getHeader("X-HEADER");
        if (StringUtils.isEmpty(authHeader)) {
            response.setStatus(
                HttpServletResponse.SC_UNAUTHORIZED);
        } else {
            filterChain.doFilter(servletRequest, servletResponse);
        }
    }
}
This is a simple code to show as how to create a filer, you can put the logic as per your requirement. The next part is to register this custom filter in Spring Security filter chain.
3. Configure Custom Filter With Spring Security
Let’s configure our custom filter with Spring security filter chain. Spring security provides few options to register the custom filter. We can use one of them based on our requirement.
- addFilterAfter(filter, class)–Adds a filter after the position of the specified filter class.
- addFilterBefore(filter, class)–Filter before the position of the specified filter class.
- addFilterAt(filter, class)–Adds a filter at the location of the specified filter class.
- addFilter(filter)–adds a filter that must be an instance of or extend the filter provided by Spring Security
In case you are overriding Spring Security’s default filter(e.g. UsernamePasswordAuthenticationFilter), you should either the class or the abstract class.
@Configuration
public class AppSecurityConfigurerAdapter
  extends WebSecurityConfigurerAdapter {

    @Override
    protected void configure(HttpSecurity http) throws Exception {
        http.addFilterAfter(
            customAuthFilter(), BasicAuthenticationFilter.class);
    }
}

@Bean
public CustomHeaderAuthFilter customAuthFilter(){
  return new CustomHeaderAuthFilter();
}
Here, we are adding our custom filter after the BasicAuthenticationFilter. You can add the filter as per your requirement. Here is another example where we are adding filter after the UsernamePasswordAuthenticationFilter.
http.addFilterBefore(authFilter(), UsernamePasswordAuthenticationFilter.class);4. Testing Custom Filter
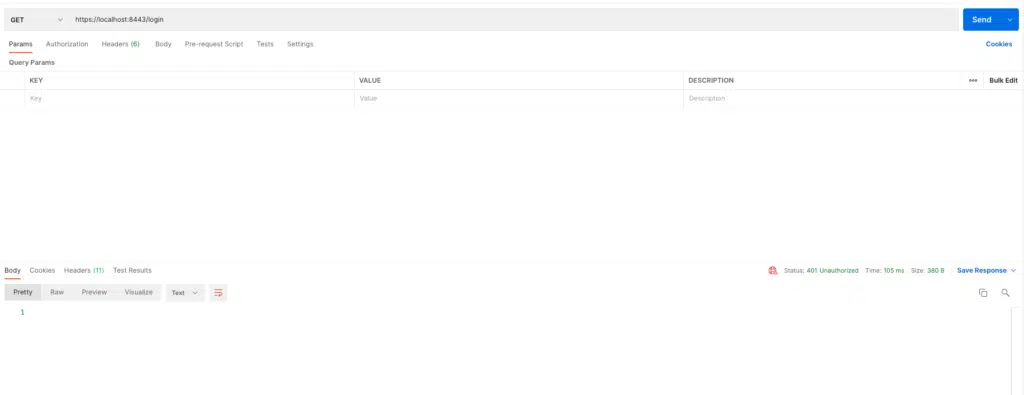
With all above configuration, we are all set for our application. Once we run our application and try to login without passing the security header, we will get the access denied error.
Summary
In this article, we saw adding a custom filter in Spring Security to our Spring security application. We also saw how to add it before, after or at a specific location of the security filter stack. The source code for this article is available on our GitHub repository.
This has been the best spring security tutorial. I have used spring security in many projects but I still had some gaps to fill which this tutorials helped me. thanks alot
Thanks Erick!!