In this article of spring security tutorial, we will see how to create a Spring Security custom 403 access denied page. we will take a look at the steps for spring security custom 403 page.
Spring Security Custom 403 Access Denied Page
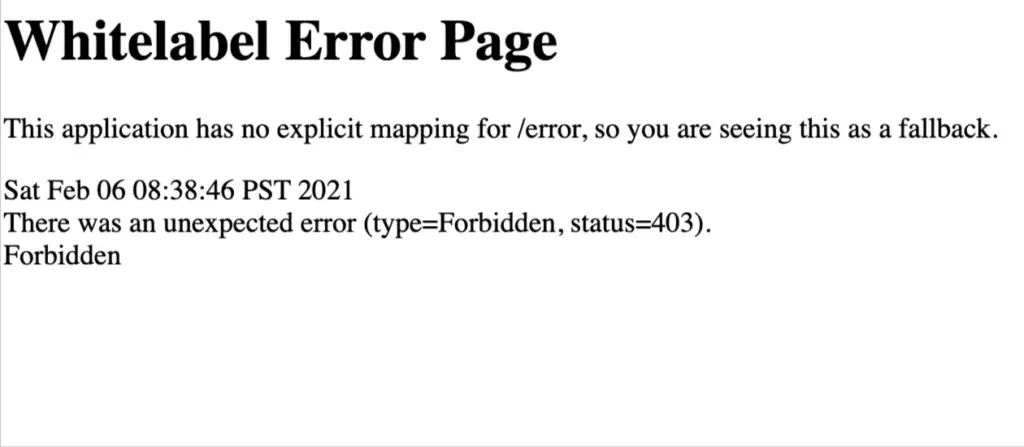
In Spring security, when an unauthorized user will try to access the secure/ protected page, spring security will throw an access denied exception. There is a default 403 access denied page available with spring security, or if we are using spring boot, it will show the infamous whitelabel error page. Spring security flexible architecture provides the option to customize the 403 access denied page.
1. Application Setup
Before we create spring security custom 403 access denied page, let’s look at our pom.xml file containing the required dependencies.
<?xml version="1.0" encoding="UTF-8"?>
<project xmlns="http://maven.apache.org/POM/4.0.0" xmlns:xsi="http://www.w3.org/2001/XMLSchema-instance" xsi:schemaLocation="http://maven.apache.org/POM/4.0.0 https://maven.apache.org/xsd/maven-4.0.0.xsd">
   <modelVersion>4.0.0</modelVersion>
   <parent>
      <groupId>org.springframework.boot</groupId>
      <artifactId>spring-boot-starter-parent</artifactId>
      <version>2.3.1.RELEASE</version>
      <relativePath />
      <!-- lookup parent from repository -->
   </parent>
   <groupId>com.javadevjournal</groupId>
   <artifactId>spring-security-series</artifactId>
   <version>0.0.1-SNAPSHOT</version>
   <name>Spring Security Tutorial Series</name>
   <description>Series to explain the core Spring security concepts.</description>
   <properties>
      <java.version>1.8</java.version>
   </properties>
   <dependencies>
      <dependency>
         <groupId>org.springframework.boot</groupId>
         <artifactId>spring-boot-starter</artifactId>
      </dependency>
      <dependency>
         <groupId>org.springframework.boot</groupId>
         <artifactId>spring-boot-starter-security</artifactId>
      </dependency>
      <dependency>
         <groupId>org.springframework.boot</groupId>
         <artifactId>spring-boot-starter-web</artifactId>
      </dependency>
      <dependency>
         <groupId>org.springframework.boot</groupId>
         <artifactId>spring-boot-starter-thymeleaf</artifactId>
      </dependency>
      <dependency>
         <groupId>org.springframework.boot</groupId>
         <artifactId>spring-boot-starter-data-jpa</artifactId>
      </dependency>
      <dependency>
         <groupId>org.thymeleaf.extras</groupId>
         <artifactId>thymeleaf-extras-springsecurity5</artifactId>
         <version>3.0.4.RELEASE</version>
      </dependency>
      <dependency>
         <groupId>org.springframework.boot</groupId>
         <artifactId>spring-boot-starter-test</artifactId>
         <scope>test</scope>
         <exclusions>
            <exclusion>
               <groupId>org.junit.vintage</groupId>
               <artifactId>junit-vintage-engine</artifactId>
            </exclusion>
         </exclusions>
      </dependency>
   </dependencies>
   <build>
      <plugins>
         <plugin>
            <groupId>org.springframework.boot</groupId>
            <artifactId>spring-boot-maven-plugin</artifactId>
         </plugin>
      </plugins>
   </build>
</project>
Our pom.xml file contains only required dependencies, and you may need more based on your use case. Also, if you are not using spring boot, the above file is not relevant to you but will give you the idea for the required dependencies.
2. Custom Access Denied Page
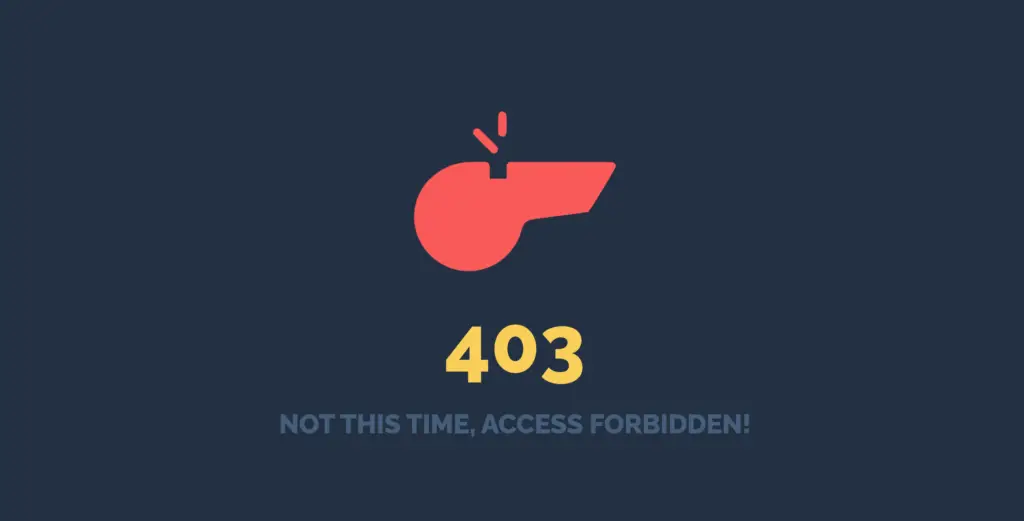
To replace the Spring Security custom access denied page, we need to create a custom HTML page for our application. I am using Thymeleaf to build the HTML page, but you can use any other templating engine of your choice. Here is our custom access denied page.
Below HTML is just a sample HTML. You may need different HTML for your production app.
<!DOCTYPE html>
<html xmlns:th="http://www.thymeleaf.org" lang="en">
    <head>
        <meta charset="UTF-8" />
        <meta name="viewport" content="width=device-width, initial-scale=1.0" />
        <meta http-equiv="X-UA-Compatible" content="ie=edge" />
        <link href="https://fonts.googleapis.com/css?family=Raleway:500,800" rel="stylesheet" />
        <title>Access Denied</title>
    </head>
    <body>
        <use>
            <svg version="1.1" xmlns="http://www.w3.org/2000/svg" xmlns:xlink="http://www.w3.org/1999/xlink" x="0px" y="0px" viewBox="0 0 1000 1000" enable-background="new 0 0 1000 1000" xml:space="preserve" class="whistle">
                <metadata></metadata>
                <g>
                    <g transform="translate(0.000000,511.000000) scale(0.100000,-0.100000)">
                        <path
                            d="M4295.8,3963.2c-113-57.4-122.5-107.2-116.8-622.3l5.7-461.4l63.2-55.5c72.8-65.1,178.1-74.7,250.8-24.9c86.2,61.3,97.6,128.3,97.6,584c0,474.8-11.5,526.5-124.5,580.1C4393.4,4001.5,4372.4,4001.5,4295.8,3963.2z"
                        />
                        <path
                            d="M3053.1,3134.2c-68.9-42.1-111-143.6-93.8-216.4c7.7-26.8,216.4-250.8,476.8-509.3c417.4-417.4,469.1-463.4,526.5-463.4c128.3,0,212.5,88.1,212.5,224c0,67-26.8,97.6-434.6,509.3c-241.2,241.2-459.5,449.9-488.2,465.3C3181.4,3180.1,3124,3178.2,3053.1,3134.2z"
                        />
                        <path
                            d="M2653,1529.7C1644,1445.4,765.1,850,345.8-32.7C62.4-628.2,22.2-1317.4,234.8-1960.8C451.1-2621.3,947-3186.2,1584.6-3500.2c1018.6-501.6,2228.7-296.8,3040.5,515.1c317.8,317.8,561,723.7,670.1,1120.1c101.5,369.5,158.9,455.7,360,553.3c114.9,57.4,170.4,65.1,1487.7,229.8c752.5,93.8,1392,181.9,1420.7,193.4C8628.7-857.9,9900,1250.1,9900,1328.6c0,84.3-67,172.3-147.4,195.3c-51.7,15.3-790.8,19.1-2558,15.3l-2487.2-5.7l-55.5-63.2l-55.5-61.3v-344.6V719.8h-411.7h-411.7v325.5c0,509.3,11.5,499.7-616.5,494C2921,1537.3,2695.1,1533.5,2653,1529.7z"
                        />
                    </g>
                </g>
            </svg>
        </use>
        <h1>403</h1>
        <h2>Not this time, access forbidden!</h2>
    </body>
</html>
3. Spring Security Configuration
We have the custom HTML in place. The next step is to configure the Spring Security custom 403 access denied page. To customize this page, Spring security provides the following options while configuring the HttpSecurity element.
- Configure access denied page using the
accessDeniedPage(). - Use
accessDeniedHandler()method.
The accessDeniedHandler() method provides more flexibility and control while customizing the access denied page in spring security, and we will use this option for this article.
3.1 Access Denied Handler
Spring security access denied handler provides us the flexibility and power to run the custom logic before redirecting user to the 403 page.To create a custom access denied handler with spring security, create a class by extending the <a aria-label="AccessDeniedHandler (opens in a new tab)" href="https://docs.spring.io/spring-security/site/docs/current/api/org/springframework/security/web/access/AccessDeniedHandler.html" target="_blank" rel="noreferrer noopener" class="rank-math-link">AccessDeniedHandler</a> interface.
package com.javadevjournal.core.security.handlers;

import org.slf4j.Logger;
import org.slf4j.LoggerFactory;
import org.springframework.security.access.AccessDeniedException;
import org.springframework.security.core.Authentication;
import org.springframework.security.core.context.SecurityContextHolder;
import org.springframework.security.web.access.AccessDeniedHandler;

import javax.servlet.ServletException;
import javax.servlet.http.HttpServletRequest;
import javax.servlet.http.HttpServletResponse;
import java.io.IOException;

public class CustomAccessDeniedHandler implements AccessDeniedHandler {

    private static final Logger LOG = LoggerFactory.getLogger(CustomAccessDeniedHandler.class);

    @Override
    public void handle(HttpServletRequest request, HttpServletResponse response, AccessDeniedException accessDeniedException) throws IOException, ServletException {

        Authentication authentication = SecurityContextHolder.getContext().getAuthentication();
        if (authentication != null) {

            LOG.info("User '" + authentication.getName() +
                "' attempted to access the URL: " +
                request.getRequestURI());
        }
        response.sendRedirect(request.getContextPath() + "/access-denied");
    }
}
The custom handler is only logging the information and redirecting user to the “access-denied” controller. If you look closely, at this point we have access to the request, response, exception and the authentication object. We can build any custom logic based on this information.
3.2. Access Denied Controller.
Next is to create a custom controller to handle the redirect and send use to the access denied page. This is a simple Spring MVC controller, but we have the flexibility to perform any additional logic before showing the page to the customer.
package com.javadevjournal.web.controller.error;

import org.springframework.stereotype.Controller;
import org.springframework.web.bind.annotation.GetMapping;

@Controller
public class AccessDeniedController {

    @GetMapping("/access-denied")
    public String getAccessDenied() {
        return "/error/accessDenied";
    }
}
3.3. Configuring the Custom Access Denied Handler.
We have created the following components for our custom access denied page:
- Custom HTML page.
- Custom access denied handler.
- Spring MVC controller.
The last part of the setup is to let Spring security know about our custom handler. It will do this as part of configuring spring security through the HttpSecurity component. Here is a simplified version of our Spring security configuration (You can check complete configuration on our GitHub Repository)
@EnableWebSecurity
public class AppSecurityConfig extends WebSecurityConfigurerAdapter {

    @Override
    protected void configure(HttpSecurity http) throws Exception {
        http.authorizeRequests()
            .antMatchers("/login", "/register", "/home")
            .permitAll()
            .antMatchers("/account/**").hasAuthority("ADMIN")
            .and()
            .exceptionHandling().accessDeniedHandler(accessDeniedHandler())
            .and()
            ...
    }

    @Bean
    public AccessDeniedHandler accessDeniedHandler() {
        return new CustomAccessDeniedHandler();
    }

}
There are few important things in the above configuration.
- We are only allowing
ADMINauthority to access the/account/**. This means any other user with different authority will get the 403 access denied exception. - Since this is an exception handling, we are using the Spring security
.excepTionHandling()method and telling that we like to handle the access denied use case by passing custom access denied handler to theaccessDeniedHandler()method (.exceptionHandling().accessDeniedHandler(accessDeniedHandler()). - Last part defines our custom handler as a spring managed bean.
4. Testing Application
Our setup is complete, let’s start our application and try to access the page. In the first screen shot (without custom access denied configuration), our application will show the default page.
Once we active the configurations for spring security custom 403 access denied page. Let’s try to access the unauthorized section again by simply login to the system, this time, we will be greeted by our custom access denied page.
Summary
In this article, we saw how to create a Spring Security custom 403 access denied page. We took a deep dive in to the different components to required to customize the access denied page for spring security application. As always, the source code for our Spring Security Course is available on the GitHub.